PCF – Use “ConversationControl”
A few weeks ago, I have published a new PCF Control, “ConversationControl” (Github, PCFGallery, my Page). Since the release, I received one or two questions on how to use the control. It looks like it is not as straight forward as I thought. In this post, I will describe the use case of the control as well as how to configure and use it.
Use case
Let me begin by explaining the use case of this control.
Let’s assume we do handle all correspondence with our customers via CDS. To do this we created a custom entity (an activity actually) that holds all the messages sent to and received from the customer. For the demo, I created a second entity, “Custom Incident”, which is activated for activities.
The Customer can see all the messages by logging in to a custom website/portal. This can be designed completely free and shown in a nice way.
For the user who is working in a Model-Driven App (MDA) it is a different story. Usually, we show all the related custom messages as a subGrid on the related main entity (custom incident).
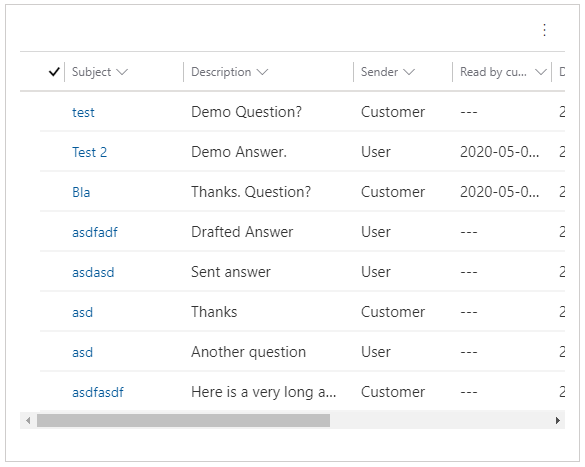
This is not very user friendly or readable and needs a better layout. That is where the “ConversationControl” comes in the picture.
One of our community members (Nicolai Schjørmann) reached out to me with an additional use case. They would like to visualize the conversation between two different departments inside of the same organization.
There might be additional difficulties to implement this. For example, the sender and receiver are changing depending on who the viewer is.
We might release a cooperative blog post about this use case.
Prerequisites
To use the control, we do need two entities
Custom Message
This entity will, as described earlier, represent every message sent to or received from the customer and will be related to the “custom incident” entity. In the demo, described in this post, it will be a custom activity entity.
Custom Incident
The sole purpose of this entity is to have one place (or the parent) to all the messages in a conversation. This could be any other entity that is configured for activities. I have chosen a custom entity only for demo purposes.
Base configuration
We will start with the base configuration of the control. This is the minimum required configuration to get the control working.
Required fields on “Custom Message”
The first thing we will configure is the custom activity entity, message. I do assume you have created this entity already and will only describe what is needed for the “ConversationControl”. The control requires two fields on the entity.
Text Field
The field that holds the data that should be shown as the message text. In our demo we will use the “description” field of the activity entity
Sender Field
The field that holds the information who the sender of the message was. This must be an OptionSet. The field name, in my example, is “bebe_sender”.
View on “Custom Message”
The next step is to configure/create the view we will later use in the subGrid.
Important: Every field you would like to use in the control has to be added to the view.
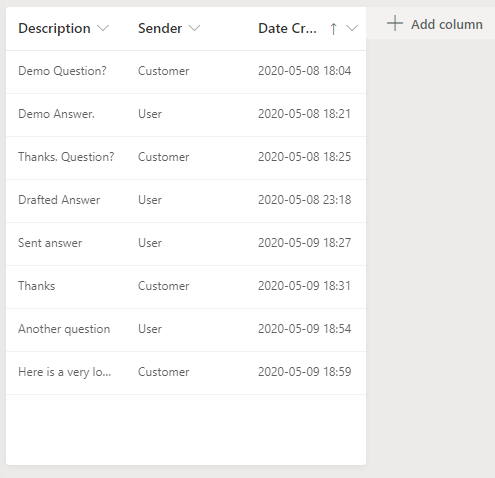
Since we are doing the base configuration the view only needs to contain the two fields. Those are the two above mentioned once (Text field and sender field).
Since the order of the messages in the PCF will be the same as in the view, I also have added the “createdOn” field and sorted the view by this field ascending (“Older to newer”). This will show the messages in the order they would appear in a chat app (newest message at the bottom).
Form on “Custom Incident”
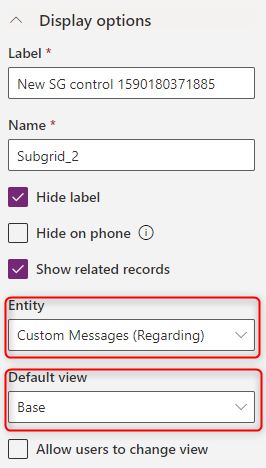
For the demo purpose I configured two subGrids on the main form of the “Custom Incident” entity.
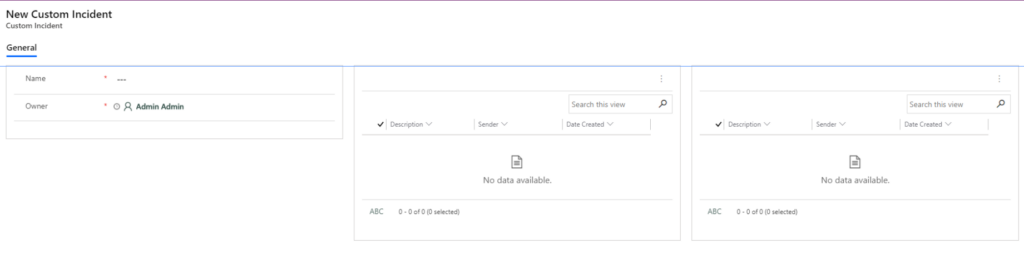
Both of the subGrids show all related custom messages with the view we created earlier; in my case it’s called “Base”.
Configure the PCF Control
To configure the PCF control, we must switch to the classic UI. Unfortunately, this is not yet implemented in the UCI.
To add the control, we open the configuration “pop up” of the second subGrid and switch to the “Controls” tab. There you have to use the “Add Control…” button.
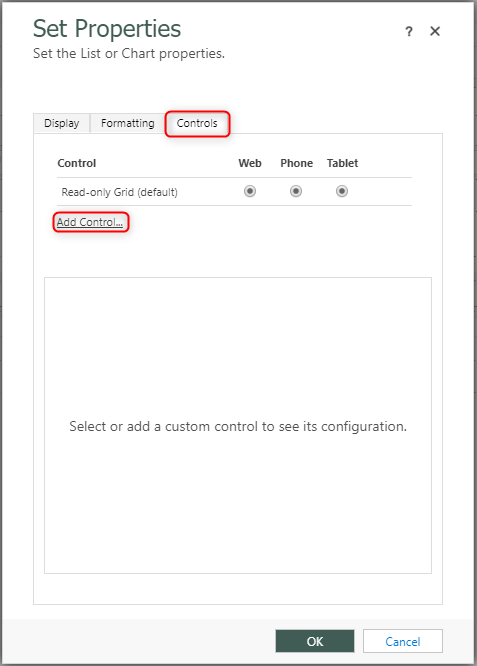
In the new popup you have to choose the “Conversation Control”, select it and press “Add”.

Now we have configured the PCF as our control of the subGrid. Let’s start with the real configuration.
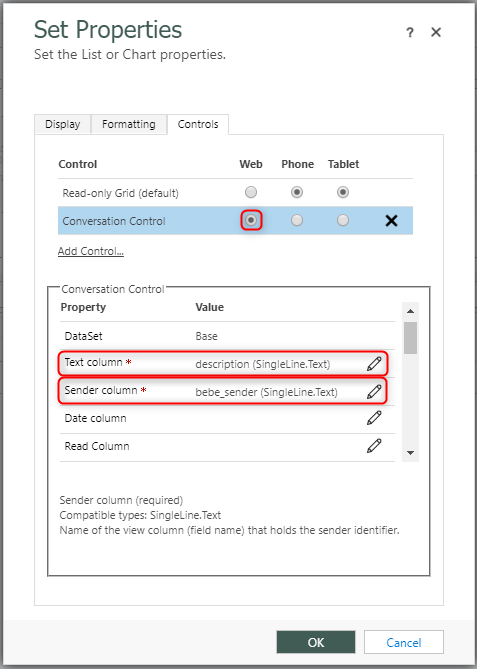
If you press the little pencil beside the “Text column” configuration a pop up will open. Here you type your desired field name (schema name) in the first input field. In my case, it is “description”

The same you do for the sender field. For me it is “bebe_sender”. It’s important to at least check the checkbox for the web client at the top.
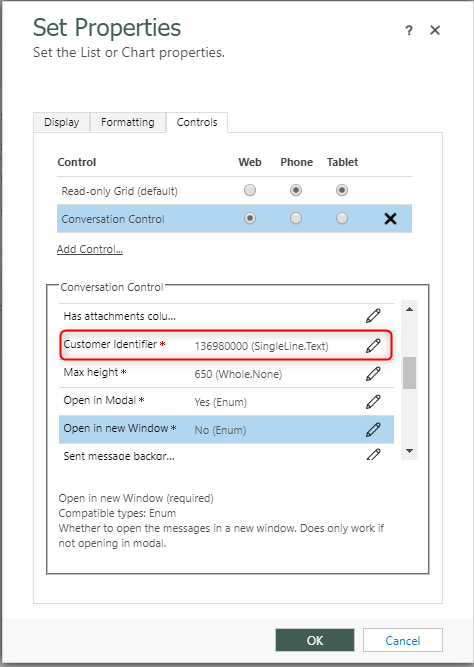
If you scroll a bit down you will find one more field that is required but empty, Customer Identifier. This seems to be the tricky part now. You remember the sender OptionSet you created? This field should contain the value of this field that identifies whether the sender was the customer. You can find out what the value is by opening your optionSet. If you click the three dots beside your customer item, you do have one choice called “View more”. It will show you the value.

For the configuration field you should use this value without the commas. So, for my example it would be “136980000”.
If you have several values that identify the customer, you can fill the configuration with a comma separated list of ids.
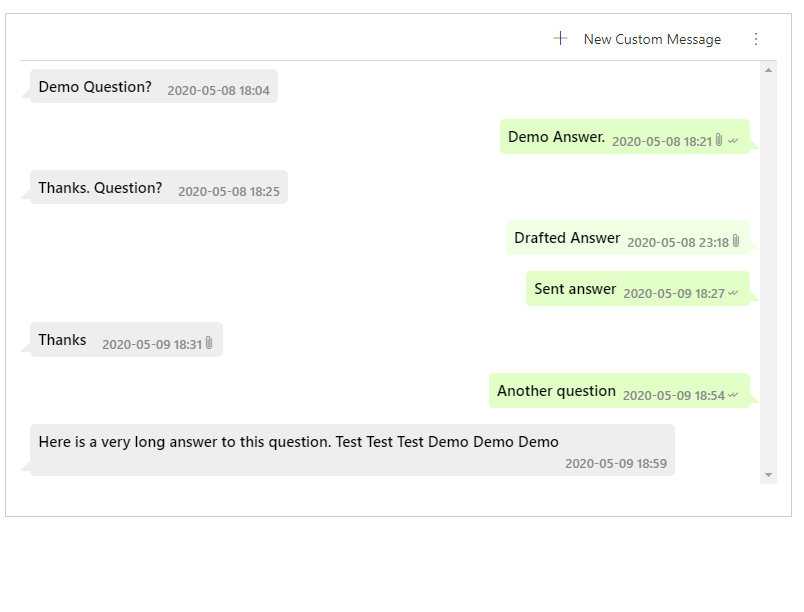
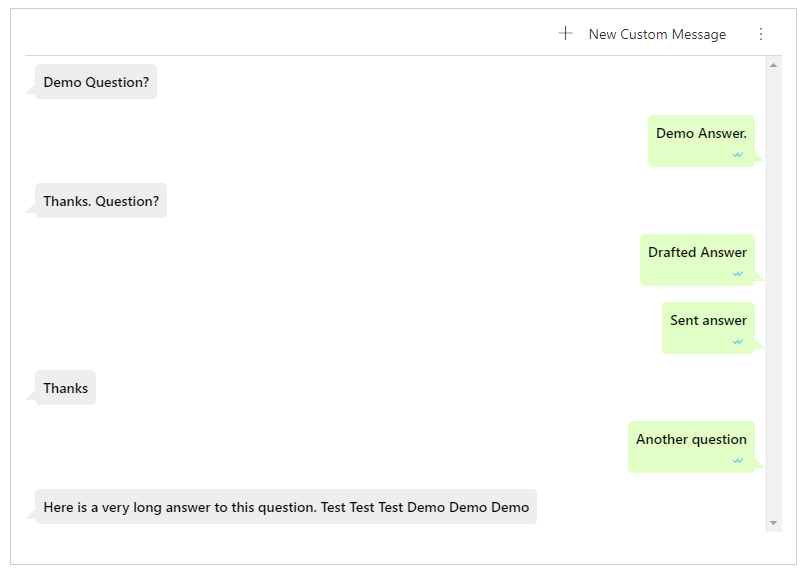
If you save and publish everything the subGrid should look like this.
Additional Configuration
Now that the basic configuration is working, we can add some more information to the control.
Fields
All the following fields are on the custom message entity. As mentioned earlier you need to add all the fields you will use to the view.
The following fields could be configured
Date column
The field that should be shown as the date in the message. I usually use “createdOn”.
Read column
The field that indicates whether the customer read the messages. It could be any type. If it contains a value it will be considered at read.
Published column
The field that indicates whether the messages was send. It could be any type. If it contains a value it will be considered at sent.
Has attachments column
A two-option field that indicates whether the message contains attachments.
General Configuration
The following configurations are done on the control level. You do not have to add those to the view.
Show Scrollbar
Defines whether to show the scrollbar. If you choose to not show the scrollbar the control will expand to use as much space as needed to show all the messages.
Max height
The maximum height the conversation should have before the scrollbar appears. Will only have effect if the scrollbar is shown.
Open Strategy
Indicates how the message should be opened if the user clicks it in the conversation. You could choose out of four options.
- Modal Center: The record will be opened in a centered modal.
- Modal right: The record will be opened in a modal that is sticks to the right side of the browser.
- New Window: The record will be opened in a new window.
- Current Tab: The record will be opened in the current tab.
Modal width
If you choose one of the first two options as the open strategy this option will define the width (in percentages) the modal should have.
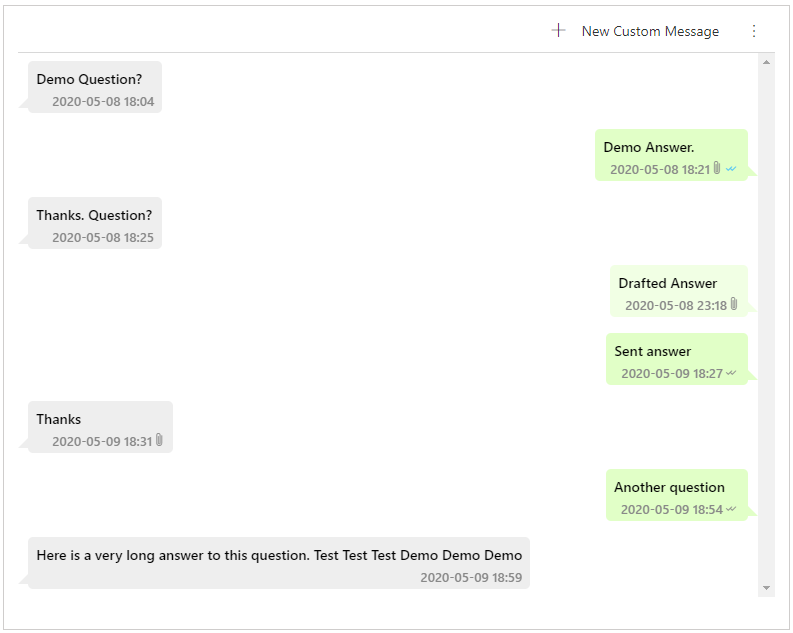
If you configure all of them your subGrid should look like this.
Customization
Like you properly noticed are there some more configurations left. With those you can customize the colors of various parts of the control. All of them accept CSS color definitions (either hex or rgb).
You can customize the following things
- Background color of received messages
- Background color of outgoing messages
- Background color of outgoing messages which are not yet published
- Text color of received messages
- Text color of outgoing messages
- Text color of outgoing messages (unpublished)
- Metadata color of received messages
- Metadata color of outgoing messages
- Metadata color of outgoing messages (unpublished)
- The checkmark color if the messages was read
If you configure all or some of them you control could look like this

Advanced configuration
In the last release (v. 1.9.4) of the control I have added the possibility for a rather advanced configuration.
With the control configuration “Use Subgrid Data” it is now possible to configure the control in a way to not use the data that will be provided by the subgrid. Instead the control will load the needed data via the WebApi.
Use case
This may sound like a weird thing to do. Let me explain the use case we had.
The customer would like to be able to see the conversation even on the message form. This would mean to have a subgrid on the message form that shows all the messages that are related to the “parent” Case/Conversation entity. All the messages are activities and “only” related to the Case/Conversation entity via the “regardingobject” field. Since there is no relation between messages and messages, most certainly no N:N relation, it is not possible to show a subgrid that contains the correct data.
Since “quick view forms” are read-only they do not support PCF controls at the moment. That is why those are unfortunately no option either.
This solution is only a workaround until Microsoft releases the new "form component". Those will make it possible to have fully functional forms inside of forms and support PCF. The "form components" will hopefully be released in Release 2020 Wave 2
Function
That’s where the new functionality comes in the game. The new functionality ignores the data present in the subgrid and loads the needed data itself. It will construct a fetchXml to load all the different fields that were configured earlier. At the moment it is only working with activity entities.
Configuration
The configuration is not more than switching the “Use Subgrid Data” from “Yes” to “No” and providing the schema name of the activity entity that should be loaded in the control configuration “Entity Name”.
Add message button
There is actually one thing that might be a bit complicated. The Control shows the standard “add” button.
To get this working properly we have to add a relation between our message entity and our message entity. In the relation mapping we add a mapping from “regardingobject” to “regardingobject”. The last step is to show a subgrid with the related messages on the message form.
After that, the “add” button will add another message that will have the regarding object prefilled correctly.
Delimitation
The control has some delimitations.
- It only supports one entity at the moment
- The order is defined by the view
- All used fields must be in the view
Conclusion
The control is a fantastic way of displaying a conversation in a user-friendly way. It could be difficult to understand the configuration at the beginning. But it can be highly customized if you have figured it out.
I hope this blog post helped. Please let me know what you think and if you any questions. I am always happy to help.
You can also subscribe and get new blog posts emailed to you directly.
About The Author
Benedikt
Power Platform Consultant @ CRM Konsulterna
Hi. I’m trying to get the colors to change for records that have errors. I have the “Has errors column” populated. Is there something else that needs to be set? Does it need to be a boolean? Any information would be helpful.
Hej Alicia,
thanks for your comment and reaching out to me with that question.
The “has errors” field needs to be a two options set field, it has to be a column in the view and you need to configure it in the PCF configuration. If all this is done it should show the chosen colour for errors (or red as a fallback) if the message has “Yes” in the “has errors” field.
Feel free to contact me with any further questions. We could schedule something to take a look at it as well.
//Benedikt
Hey Benedikt!
Thanks for this incredible control – it’s exactly what I need. I’m working on configuring it right now.
Quick question – you posted this in May 2020. Any updates to it since the last couple of release waves hit?
Great to hear.
I have not made any changes to it. As far as I know it still works. Let me know if you have any problems.
Hey Benedikt,
Thanks for this wonderful control. I am working on its configuration . I added little bit changes in CSS because I want all messages left align .
I want to ask that , if I want to add another field of my entity in configuration like we have createdon, so what are the changes I have to do in code ?
I want to display the name of the person who created that message , so I have that field in my entity , but want to fetch that in this control and display that with text message . Will you please guide me ?
Hej Sayali,
thanks for your comment. I am glad you like the control.
This is actually a pretty good idea, I think.
Here is what you have to do:
As you can see it is not very easy. I might easily have missed something.
Feel free to create a Pull Request for it. I would be happy to include this feature in the main branch.
Another option would be to create an issue with your request. Then I could implement it for you when I have time.
//Benedikt
Hi Benedikt
Thanks for such a quick response . It will be very helpful .
hello, great idea for the PCF. It will be useful espacially for messages like on Portal. I tried to configure it on my incident form for the portal messages but the subgrid on the form keep the standard view layout but when I click to see the messages on a view the messages control is shown.
Is there anything I missed on the configuration?
Best regards,
Ala
Hej Ala,
sounds like the PCF isn’t configured on the subgrid. You have to add it to the subgrid on the incident form directly.
Hi Benedikt,
I have configured all the required fields, but I don’t see posts in the grid.
Also, I added all the entered fields to the view, created a lookup on messages on the entity where I want to place the chat.
Please help.
CONTROL:
Active Chat
Text columnRequired ap_description (SingleLine.Text)
Sender columnRequired ap_sendercode (SingleLine.Text)
Customer IdentifierRequired 778210001 (SingleLine.Text)
Date column createdon (SingleLine.Text)
Read Column
Published column
Has attachments column
Has errors column
Show scrollbarRequired Yes (Enum)
Max height 650 (SingleLine.Text)
Open strategyRequired Centered Modal (Enum)
Modal width 100 (Whole.None)
Show empty messagesRequired No (Enum)
Sent message background color
Sent message text color
Sent message metadata text color
Sent message read checkmark color
Sent message with error background color
Sent message with error text color
Sent message with error metadata text color
Sent message not published background color
Sent and not published message text color
Sent and not published message metadata color
Received message background color
Received message text color
Received message metadata text color
Use Subgrid dataRequired Yes (Enum)
Entity name
Lookup Column
Sorting coloumn
Sorting orderRequired ASC (Enum)
solved the problem 🙂
Tell me, can I display the responsible person who created the message?
Hej Artem,
I am glad you were able to fix your problem. Unfortunately, there is currently no way of showing the responsible person. If this as a requirement you have feel free to add an issue to my GitHub project. I can then consider this feature for the next version.
Hello Benedikt,
I have followed your convestation control long back. I wanted to create new pcf control I have some doubt regarding it. Please Help me.
I want to access 5-6 fields of same entity in pcf control how can I get that data.
I mean in conversation control we used subgrid so we have pass all the data via a view. so here I will not be able to use subgrid. So how I can access the data ?
Hej Sayali,
thanks for your comment.
You have to create a new PCF of type “field”. Then you can add input values which you can bind to a field on the form.
Basically what I did in this post
https://benediktbergmann.eu/2020/05/01/pcf-prevent-saving-the-form-when-input-is-invalid/
Hi Benedikt, I have used this control to display messages from my custom entity. However this diplays only 25 messages at a time and then shows “Load more”. I want all messages to be displayed at once and it should not show Load more. Is there a way to do this? I have tried setting “Show scrollbar” to No and also tried increasing the Number of rows property of the subgrid in the form, none of these helped me to achieve my requirement.
Hej Komal,
I just rechecked in the code of the component. The “Load more” button will be shown when subgrid data is used and there are more pages to load.
From you message I assume there are more than 25 rows? How many rows are shown when you show the subgrid directly and not the PCF?
Might it be possible you have configured to show 25 rows per page in your personal settings?
Thanks for your reply . Yes it shows more than 25 rows and I am using subgrid data. Also when you say personal settings does it mean the “Number of rows” setting configured in form at the subgrid level because I changes that to 100 , still only 25 rows load for me and “Load more ” button shows.
Just checked : Personalization setting is set to 50
I am applying this on incident and portal comments. Do i need to make a Custom Message entityor can i just use the portal comment entity?
Hej,
I have never tried with the portal comments table. But the PCF should work with any table of type activity. Do you know whether portal comment is a activity?
Hello¡ the control seems wonderful to me, I am doing the initial configuration, as you indicate it but the control does not appear.
I set the name of the fields as you indicate with the schema_name and the value of the option.
But it does not appear.
Can you help me?
Is there any additional error in the developer console (you can open it with F12 in your browser)?
Hi, your control is amazing but i cant used yet , i have the next error.
Access to XMLHttpRequest at ‘https://browser.pipe.aria.microsoft.com/Collector/3.0/?qsp=true&content-type=application%2Fbond-compact-binary&client-id=NO_AUTH&sdk-version=AWT-Web-JS-1.8.9&x-apikey=0b14a44360bf4cae8e1e090ac91a04e5-3c17b97e-6b3a-4a9b-8407-6e450ff03cd2-7084&client-time-epoch-millis=1711656066845&time-delta-to-apply-millis=360’ from origin ‘https://operationsxxx.crm2.dynamics.com’ has been blocked by CORS policy: No ‘Access-Control-Allow-Origin’ header is present on the requested resource.
browser.pipe.aria.microsoft.com/Collector/3.0/?qsp=true&content-type=application%2Fbond-compact-binary&client-id=NO_AUTH&sdk-version=AWT-Web-JS-1.8.9&x-apikey=0b14a44360bf4cae8e1e090ac91a04e5-3c17b97e-6b3a-4a9b-8407-6e450ff03cd2-7084&client-time-epoch-millis=1711656066845&time-delta-to-apply-millis=360:1
Failed to load resource: net::ERR_FAILED
can you help me?
thanks
Are you using the data provided in the subgrid or do you load other data?
The error is a CORS error, which only should appear if you try to access data from another domain.
CommentHi Benedikt, your job is amazing!!
Did you maybe had a chance to try the ConversationControl in a Power App (Canvas app)?
I was able to add it to a CRM case form, but adding the component in a canvas app is a bit tricky. Can you maybe help with the configuration? I have created a custom table that contains messages, sendertype and a lookup to incident table.
Hej James,
sorry for the late response. I, unfortunately, have not tested it properly with a canvas app.
Do you get any errors?
Hi Benedict,
thank you for this great PCF, I have a question. I want to instead of creating a custom table, use the OTB Table ‘Portal Comment’ on incident form . I’ve tried to configure PCF according this table, but first of all Customer identifier doesn’t make sense for it, so I had to just put some static Value in the field. And as soon as I saved and published the form, the subgrid disappeared! could you help me with that
It should work with any table. Having said that is the question whether you get some error in the dev console of your browser?