Unpack Canvas Apps in a Pipeline
In this blog post, we will learn how to unpack Canvas Apps in a pipeline to be able to see and track changes in our repository.
The PASopa is now available directly from the Power Apps CLI (pac). I created a new blog post explaining this approach.
Problem
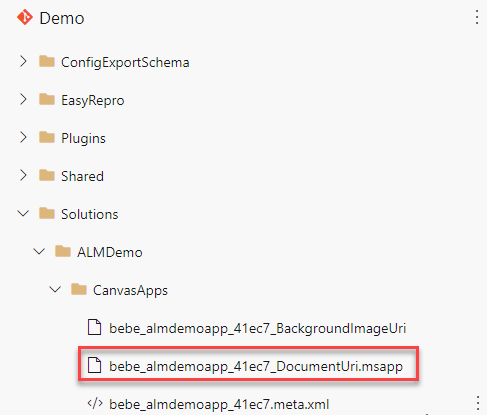
As you might know the step “Unpack Solution” of the Power Platform Build Tools will not unpack Canvas apps. When you run the mentioned step (as described in one of my previous posts) canvas apps will be stored in your repo as .msapp-files.
This isn’t optimal at all since it’s impossible to open those files. If you would try you get the following message.
In addition to that the msapp file (which is basically a zip-file) obscures the changes. We can’t see what was changed and when.
Solution
Fortunately, Microsoft released an experimental feature on January 14th, the Power Apps Solution Packager. Here is the related blog post. The Power Apps Solution Packager or PASopa is exactly fixing the problem I described earlier. It can pack and unpack msapp-files/Canvas Apps.
The PASopa is still experimental. So if you use it you do that on your own risk.
Since it is an experimental feature it is not included in the mentioned “Unpack Solution” step of the Power Apps Build Tools. It will be included eventually but isn’t just yet.
As mentioned the PASopa is experimental. That is also the reason why there is no direct download of the exe-file you’ll need to run the tool. We will only store the PASopa.exe (and all the needed dependencies) in our repository.
There are different ways of achieving this. One could store the source code of PASopa in the own repository and creating the exe whenever the pipeline runs. This will increase the runtime though.
Another approach would be to have a separated pipeline that creates the exe and use this pipeline as the input to all the other pipelines.
The last approach I could think of is to fetch it from GitHub in the pipeline to always have the latest and greatest.
I just choose the one where I store the exe directly. To make the build quicker and the blog post easier to understand.
Generating the PASopa.exe
In the “Distribution” section of the blog post they describe the process on creating the exe file.
- Install .Net Core 3.1.x (x64)
- Download the source code from the GitHub repo
- Run the build.cmd file
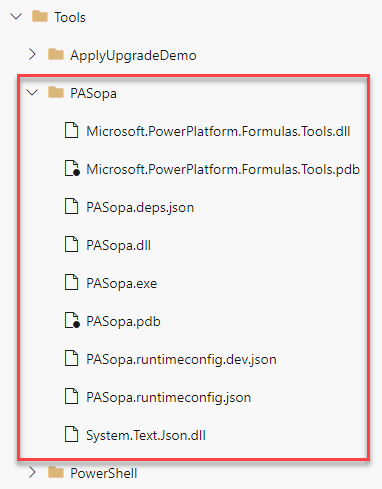
After that you can find the PASopa.exe and all the dependencies in the “bin\Debug\PASopa” folder.
Add PASopa to Repository
We now store the content of the mentioned folder (bin\Debug\PASopa) in our repository. I usually have a “Tools” folder where this fits in perfectly.
Run the PASopa
Everything that is left now is to run the PASopa on our msapp file whenever we have unpacked our solution.
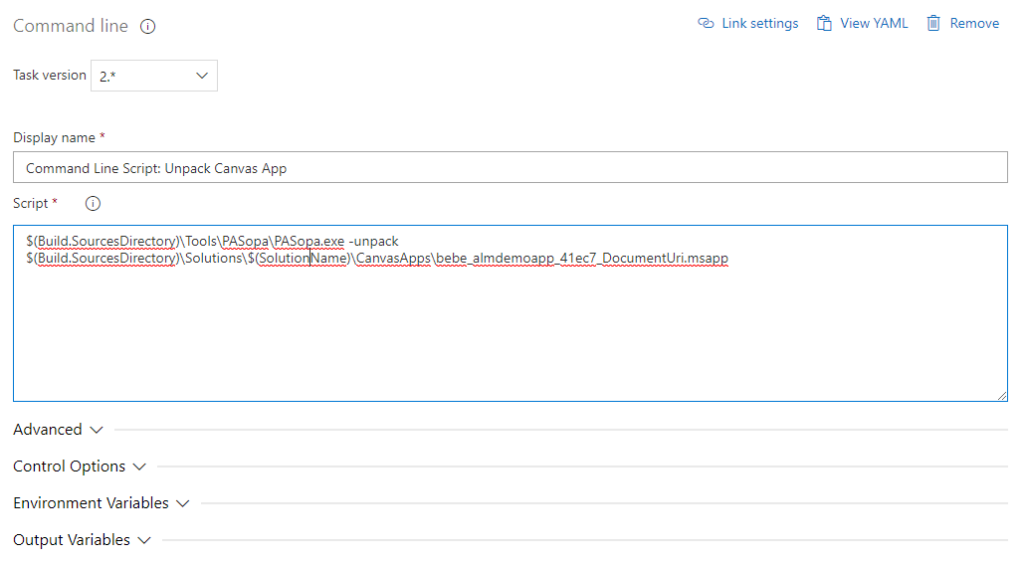
To do so we add a new Command line task after our unpack Solution task.
In the Script part of the task we add the following code.
$(Build.SourcesDirectory)\Tools\PASopa\PASopa.exe -unpack $(Build.SourcesDirectory)\Solutions\$(SolutionName)\CanvasApps\bebe_almdemoapp_41ec7_DocumentUri.msapp
The first part refers to our PASopa.exe file which is located in the Tools folder.
The second part, -unpack, defines what the PASopa should do. In our case unpack the file
The last part points to the msapp file to handle.
There is a third optional parameter which would define the output path. I choose to store the extracted Canvas App in the same folder structure for 2 main reasons
- Be clear which Canvas App is related to which Solution
- Make it possible to do changes directly in the repo and still be able to pack a working solution in the end
You could choose to store the files in a different folder if you only use the change tracking features of your repo (see LinkedIn comment about it).
Please notice that I use a custom pipeline variable called “SolutionName” to define the solution name in a dynamic way.
Unfortunately, the PASopa only handles a single msapp-file at the time at the moment. If you have several Canvas Apps in your solution you would like to run this task several times (or bundle it in a Task group).
Following you can find the YAML of this step.
- script: '$(Build.SourcesDirectory)\Tools\PASopa\PASopa.exe -unpack $(Build.SourcesDirectory)\Solutions\$(SolutionName)\CanvasApps\bebe_almdemoapp_41ec7_DocumentUri.msapp'
displayName: 'Command Line Script: Unpack Canvas App'
Cleanup
At the moment we would store our Canvas App twice in our repo. Once unpacked and once in the msapp-file. To have our repo clean we will delete all the msapp-files in the “CanvasApps” folder.
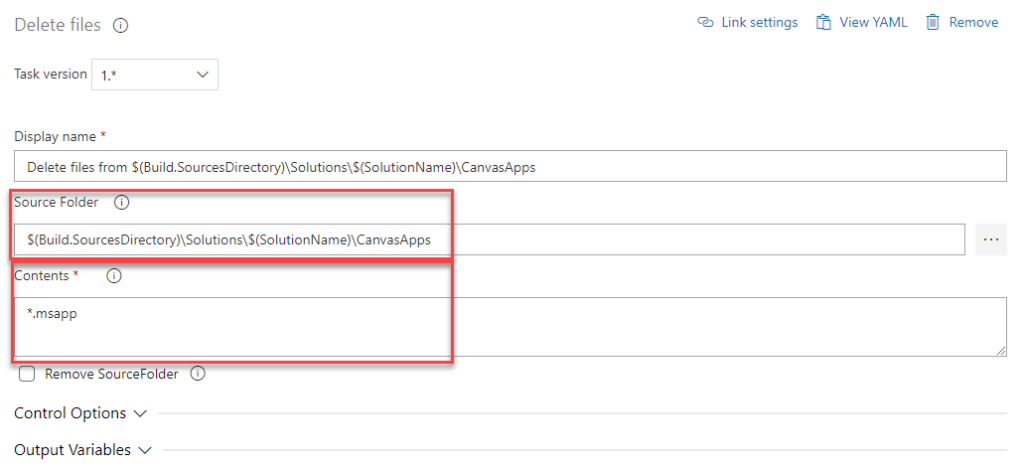
That will be done with the “Delete Files” task which will be added after the previous task.
As the “Source Folder” we configure the CanvasApps folder within our extracted Solution as follow.
$(Build.SourcesDirectory)\Solutions\$(SolutionName)\CanvasApps
Note: Here again we use the variable “SolutionName”.
As the “Contents” we use the following pattern to select all the msapp-files.
*.msapp
Here is the YAML definition of the step as well
- task: DeleteFiles@1
displayName: 'Delete files from $(Build.SourcesDirectory)\Solutions\$(SolutionName)\CanvasApps'
inputs:
SourceFolder: '$(Build.SourcesDirectory)\Solutions\$(SolutionName)\CanvasApps'
Contents: '*.msapp'
Result
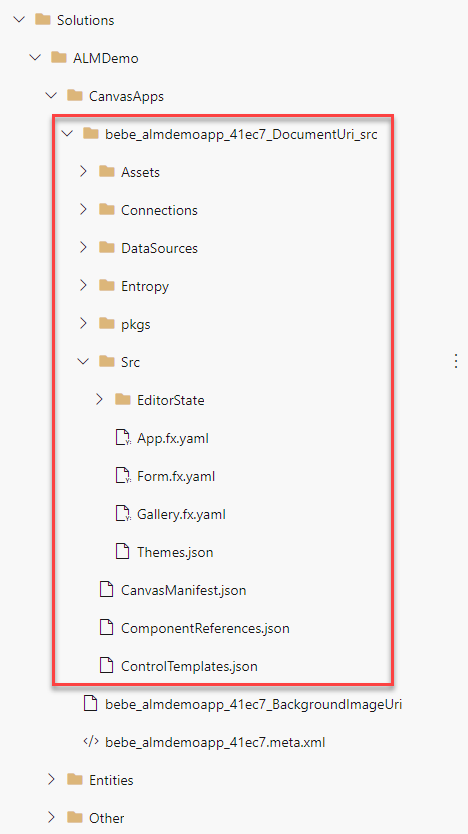
After you run the changed pipeline you will have the unpacked Canvas App in your source control and can use all the good stuff that comes with it.
Conclusion
When the PASopa is in your repo it is rather easy to unpack canvas apps in a pipeline. I hope this functionality gets included in the standard “Unpack Solution” step soon to get rid of the workaround described in this post.
Now if you follow the process I describe in the mentioned blog post you would pack the solution from source control and “convert” it to a managed solution via a Build environment. To get that working you have to pack the Canvas App to a msapp-file again. This is basically done exactly the same just that you say the script to pack the canvas app and then deleting the unpacked stuff.
Shoutout to Scott Durow for taking your time discussing and confirming my approach!
I hope this article helped you. Feel free to contact me if you have any questions. I am happy to help.
You can also subscribe and get new blog posts emailed to you directly.



Hi There!
Great article. I am facing weird issue with that approach. Even though console shows me success there is no folder nor unpacked files after successful run. Have you ever experienced something like this?
Hej,
unfortunately, I have not had this issue earlier. Which version of the PASopa do you use? Is the specified outputfolder a subfolder?
It is now also possible to run the PASopa directly from the Power Apps CLI. Maybe that fixes your issue. I try to write together a blog post about this approach soon.
I have the same problem… (PASopa v 0.3.8)
1) if I use pipeline: pool vmImage ubuntu-latest – pipeline end with error Permission denied
2) if I use pipeline: pool vmImage windows-lates – pipeline end successful but there is no unpacked folder/files in repo
3) if I use PASopa on local machine, works fine.
That is unfortunate. Could you provide me with the exact command you are running (you can also email it to me)?
As I mentioned in the response to the last comment: There is the possibility to run the PASopa directly from the Power Apps CLI now.
I wrote an article about that as well, Execute Power Apps CLI in Azure DevOps. Might this be of any help?