CDS – Basic ALM process
In today’s article, I will explain a Basic ALM Process inside of CDS. This article is split into 3 Areas
- Explaining ALM
- Goal process
- Implement the process
For the implementation, I will use Azure DevOps and the PowerApps BuildTools.
Update: As of 16. June 2020 the PowerApps BuildTools are deprecated and will be replaced by the Power Platform BuildTools. Those are GA and fully supported. I have tested the Basic ALM process described in this post with the new BuildTools. Everything is working as described below.
You can find the yaml files of the pipelines on my GitHub.
I have created a video covering the same topic. You can find it on my YouTube channel and at the end of this article.
Explaining ALM
The application lifecycle describes the complete circle an application normally does over and over again. The following image describes which elements are included in the Application Lifecycle.
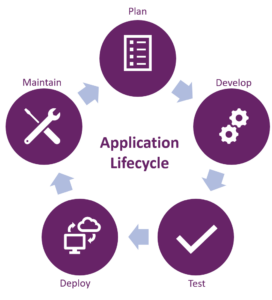
The Management of this lifecycle is called ALM, Application Lifecycle Management. In the ALM process, each of those 5 aspects should be included. However, do we normally focus on only 3 of those steps when we talk about ALM. Those 3 are: Test, Deploy and Maintain.
In the world of Dynamics 365 MDA or the Power Platform/CDS, those steps could be automated.
Goal process
The goal of this article is to describe a basic ALM process in CDS.
What should this Process look like?
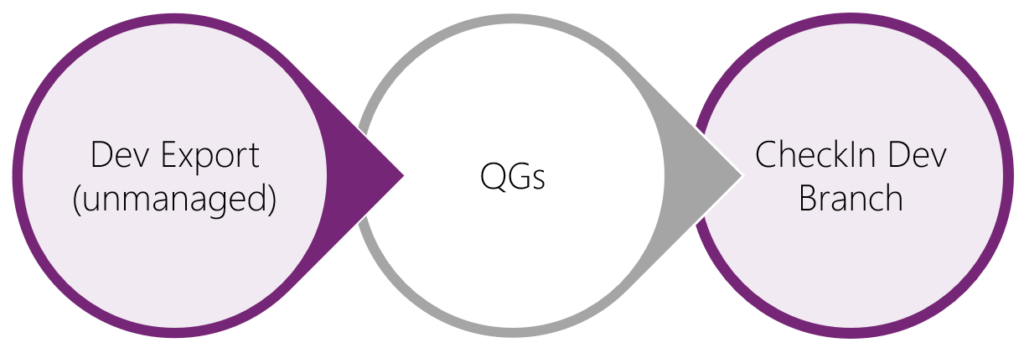
The basic process could look like this:

The QG’s, Quality Gates, are in a gray color because we will not talk about those in this article. I will go into details regarding different QG’s (like Solution Checker and automated Tests) in separate articles.
I split this rather huge process into 3 sub-processes. Those are:
- Create Export from Dev
- Build Managed Solution
- Release to Test
In the following sections, we will talk about each of them and what they will do. In the next chapter, we will see how to implement those processes in Azure DevOps with pipelines.
Create Export from Dev
In this process, we would like to export an unmanaged solution from our development environment, extract the Zip-file and store the sources in our repository.
This process is following the recommendation and best practice from Microsoft. Microsoft’s approach, and the approach they recommend to everyone, is the “Source-Controle centric” approach. This means that you always should store a functional version of your Solution in your Source-Controle. I do see the following main reasons for this approach:
- Recover your development environment
- Merge several development environments
- See historic changes in a solution
Build Managed Solution

The Solution we stored with the first sub-process will be changed to a Managed solution in this sub-process. To do so we have to import the solution to a JIT Build (Just-In-Time Build) environment, export it as Managed and store the Zip-File as an artifact inside of DevOps.
We do need the extra JIT Build environment because this process will run independently from the first one. This could result in having a different version in our development environment than the version we would like to package. In the best case, we would create a blank new environment when starting this process. I will not go into detail in this article but will publish another one specifically on this topic.
Release to Test

Like you can see, this process will be a rather simple one. It will just take the last artifact there is in DevOps and deploy it to test. Obviously there has to be at least another one for deploying to Prod, but there might be more QG’s or other environments in between.
Implement the process
Finally, we are coming to the really interesting part of this article. We will answer the Question:
How do we do this in Azure DevOps using Pipelines?
This chapter will also be split into 3 sections, each of those will cover the implementation of our 3 sub-processes.
As mentioned earlier we will use the PowerApps BuildTools for Azure DevOps from Microsoft. There are several other tools out there (for example the Dynamics 365 Build Tools from Wael Hamez), but I will focus on those from Microsoft directly.
Note: The Microsoft first-party tools are still in preview.
Create export from Dev
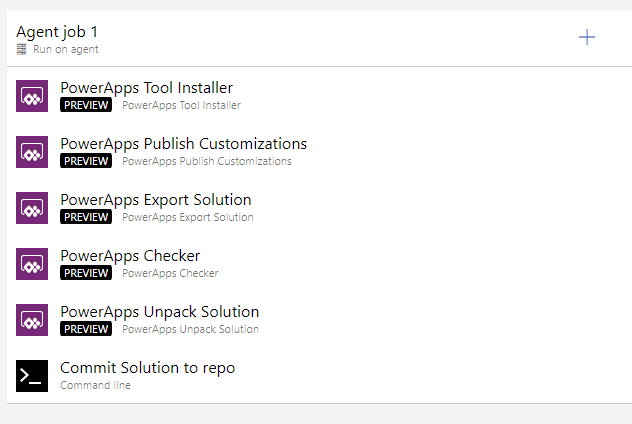
This pipeline is a Build-pipeline and will include the following steps
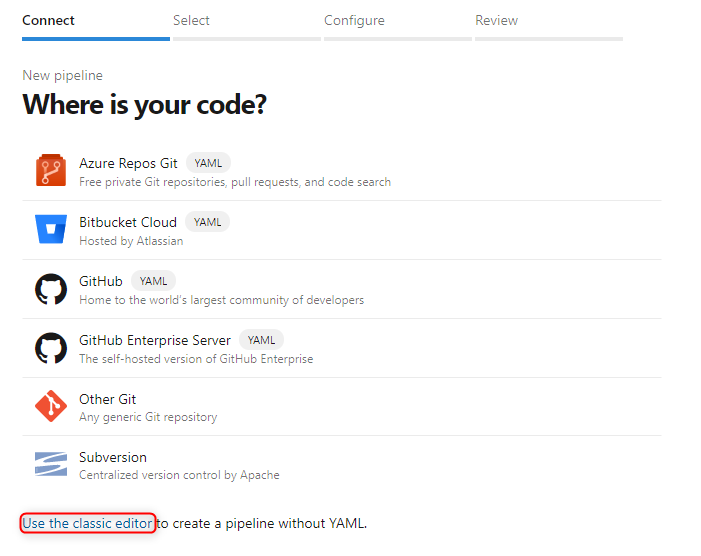
First of all, we have to create the pipeline. To do this you open “Pipelines” in the menu on the left and then press the “new pipeline” button. If you already have another pipeline it will be in the upper right corner otherwise it will be in the middle of the screen. In the next screen, you have to choose “use the classic editor”.
On the second screen, you can leave the defaults like they are. On the third and last screen, you choose “empty Job” at the top of the page.
1 – PowerApps Tool Installer
Every pipeline that uses the PowerApps BuildTools has to install them as a first step. This ensures that they are really installed on the Agent.
2 – PowerApps Publish Customizations
As a second step, we do publish all customizations. In this step, you only have to choose your connection.
Sidenote: If you did not already have a connection to your dev environment you should create one. You have to choose a Connection of the type "Generic" and fill it out like on the following picture.
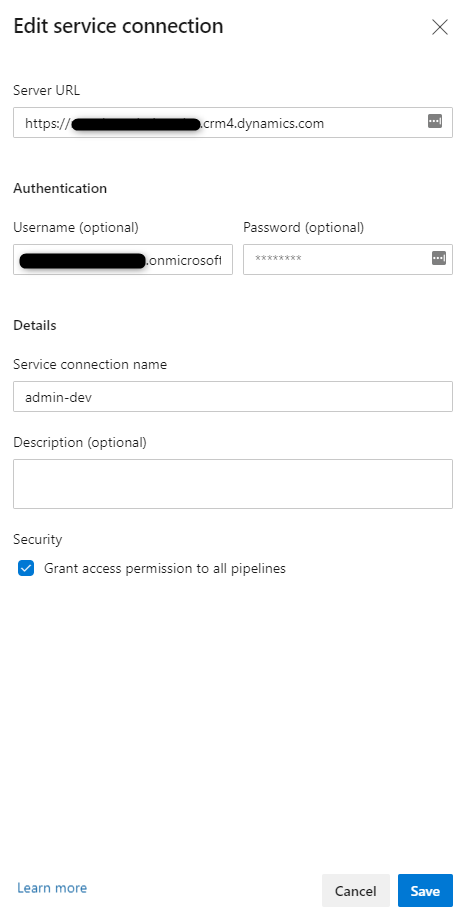
Update 2020-05-28: Yesterday Colin Vermander released a blog Post about changes in the newest update of the PowerApps BuildTools (version 0.3.3). From now on you are not limited to username/password connections. You can also configure Non-Interactive Users/Service principal connections.
3 – PowerApps Export Solution
Now we have to export the solution as unmanaged so that we can later store it in our repo. To achieve that we do add a step called “Export Solution” with the following configuration.
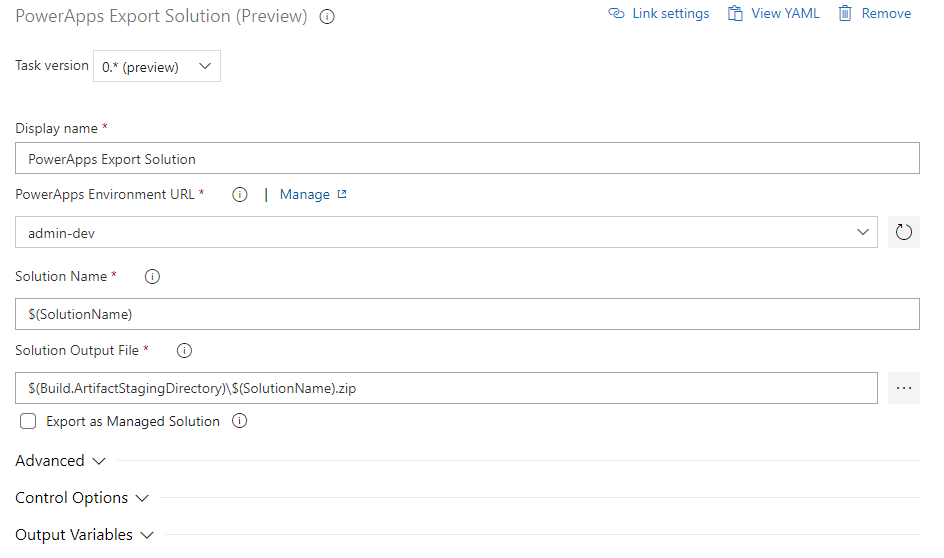
Solution Name should be:
$(SolutionName)
Solution Output File should be
$(Build.ArtifactStagingDirectory)\$(SolutionName).zip
4 – PowerApps Unpack Solution
We do skip the Solution Checker step you can see in the Screenshot above since this is one of the QG’s we will talk about later.
The next step is to add an “Unpack solution” step to our pipeline. It should be configured as shown in the next screenshot.
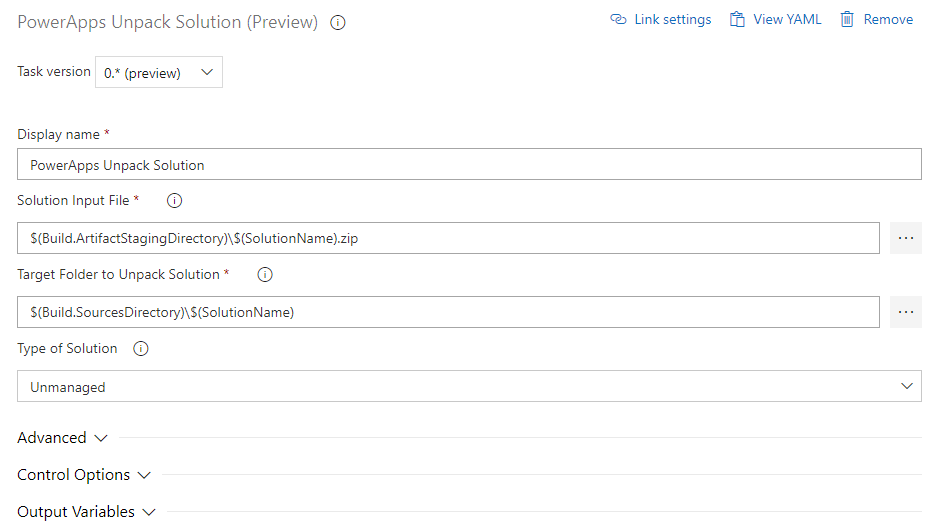
Solution Input File should be the same as the output in the last step. In our case:
$(Build.ArtifactStagingDirectory)\$(SolutionName).zip
Target Folder to Unpack Solution should be the folder where you would like to store your unpacked solution in the repo. In our case, we will have a folder in the root which has the name of the solution.
$(Build.SourcesDirectory)\$(SolutionName)
5 – Commit solution to repo
The last step in the pipeline is to add the extracted solution to our repo. To do this we will add a standard “Command Line” step. There you will add the following code to “Script” field:
echo commit all changes
git config user.email "<email>"
git config user.name "Automatic Build"
git checkout master
git add --all
git commit -m "solution init"
echo push code to new repo
git -c http.extraheader="AUTHORIZATION: bearer $(System.AccessToken)" push origin master
You have to replace “<email>” with the email of the user you would like to use to push your changes.
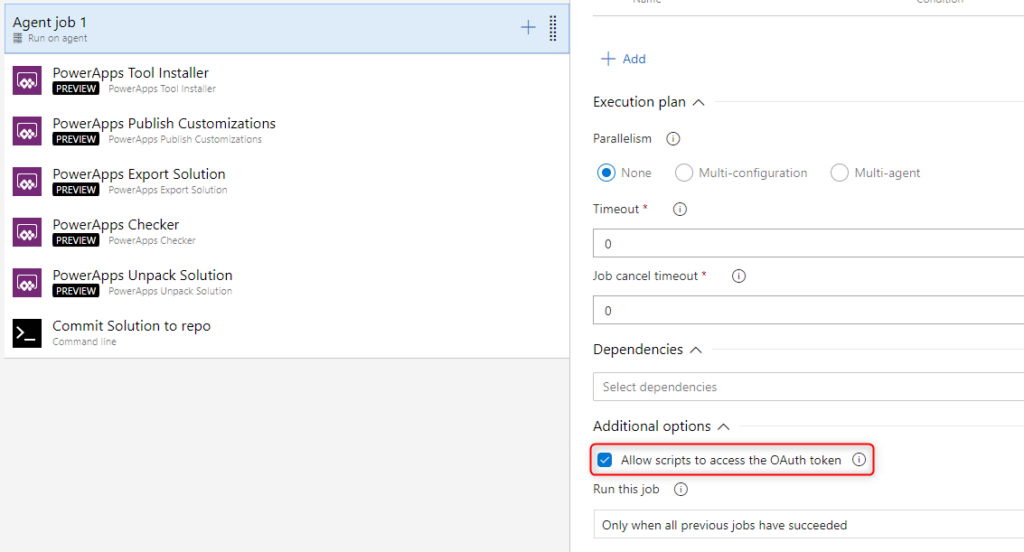
6 – General Pipeline configuration
There are some general configurations you have to do to this pipeline.
For the agent, you have to allow scripts to use the OAuth token. If this is not configured our command-line script will not be able to connect to the repo and push our solution. The configuration should look like this
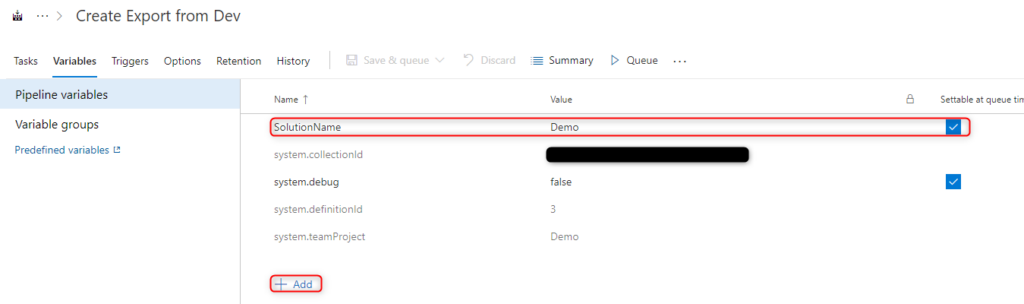
In our steps, we always used a variable called “SolutionName”. You change to the second tab of your pipeline, called “Variables”. By clicking on the “+ Add” text at the bottom you can add a new variable. The name should be “SolutionName” and the value should be the name of your solution. In our case “Demo”. The checkbox at the end of the line allows you to set change the solution name on queue time.
Now you can test the pipeline by running it. This can either be done via the “Queue” text if you are still in the edit mode
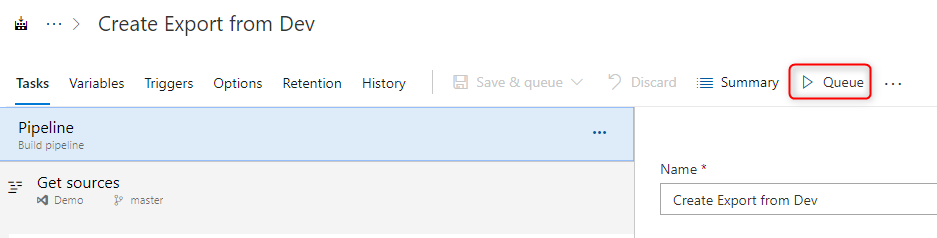
or by using the “Run pipeline” button

Build Managed Solution
The second pipeline we discussed is the one that will build a managed solution out of the unpacked solution we stored in our repo. It should have the following steps.
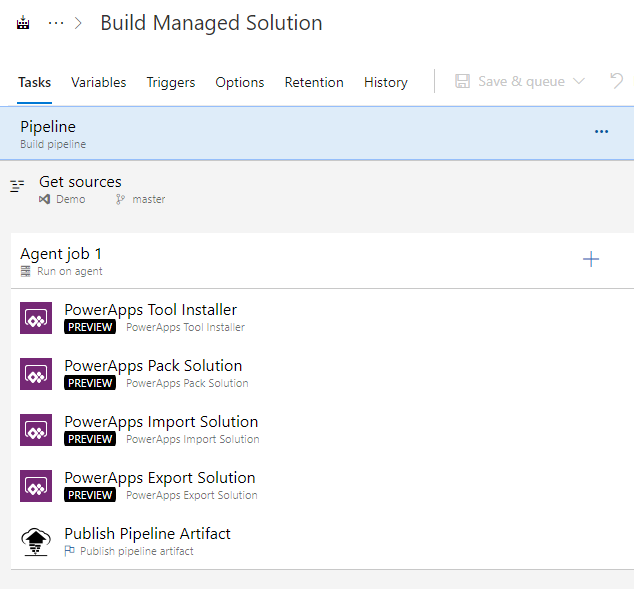
We will as well use the pipeline variable “SolutionName”.
1 – PowerApps Tool Installer
Like mentioned every pipeline needs this step.
2 – PowerApps Pack Solution
The second step is to create an unmanaged solution out of the unpacked solution we have stored in our repo. This will be done via a “Pack Solution” step which needs the following configuration.
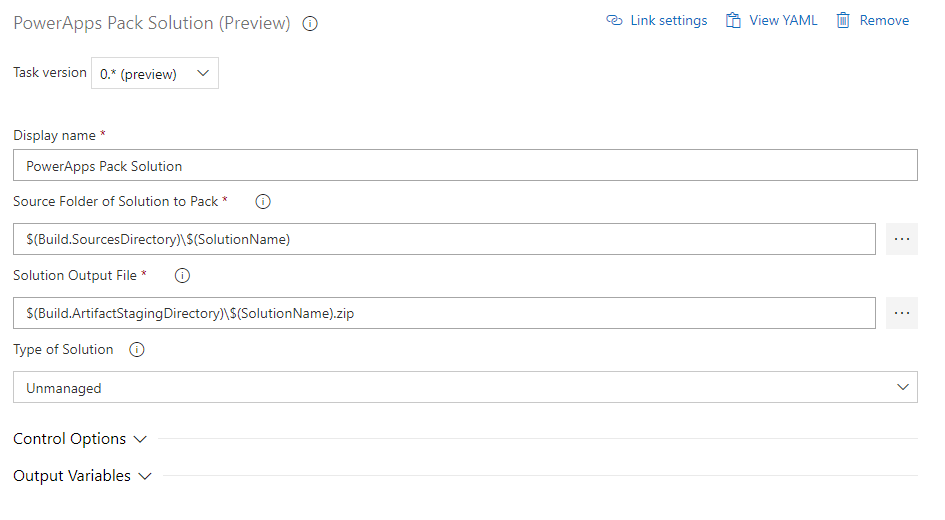
The Source Folder should be the same as you have configured in the first pipeline as the output folder. In our case
$(Build.SourcesDirectory)\$(SolutionName)
As the output folder, we do configure
$(Build.ArtifactStagingDirectory)\$(SolutionName).zip
It is important, that you choose “unmanaged” as the solution type since we stored the unpacked unmanaged solution in the repo.
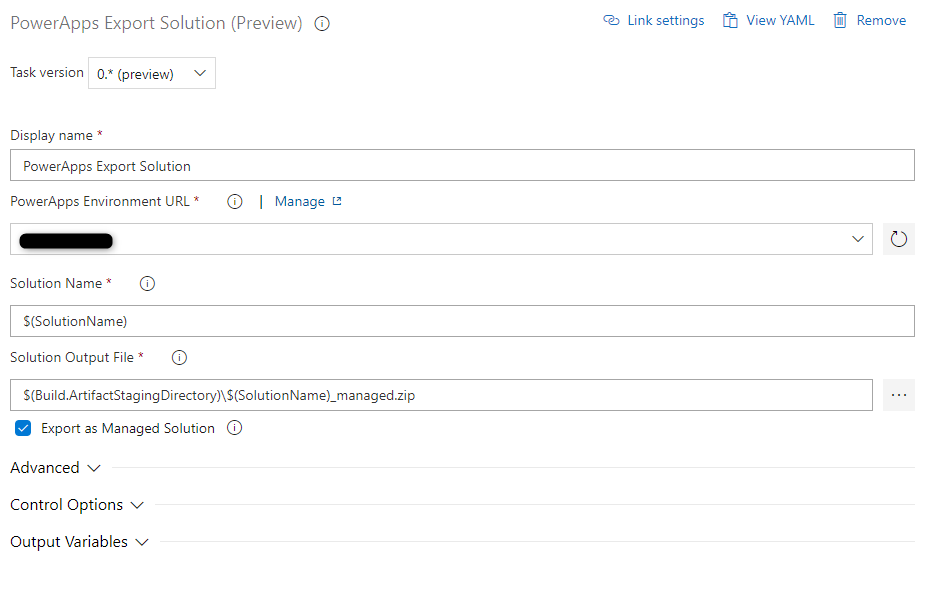
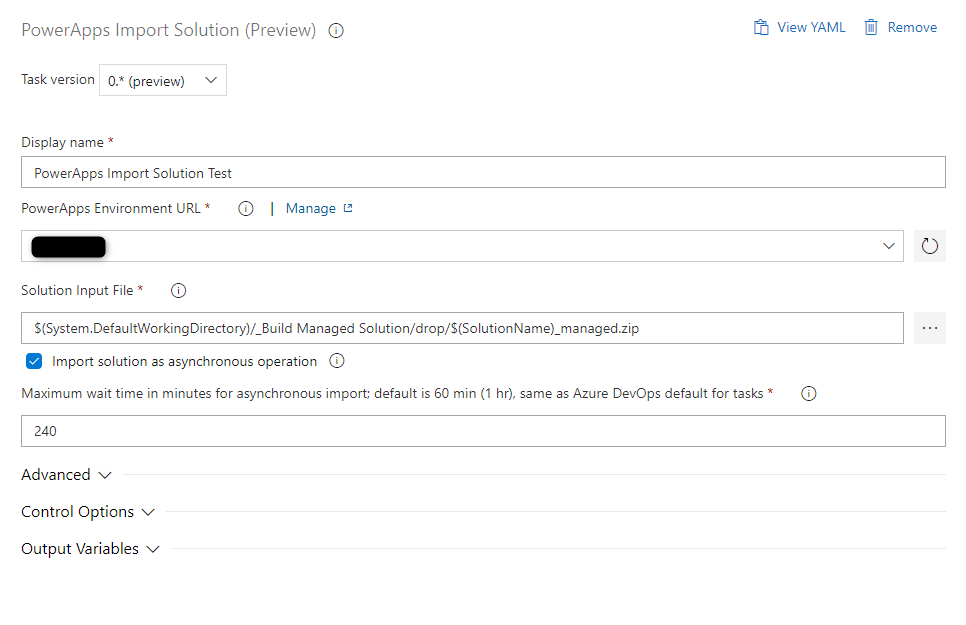
3 – PowerApps Import Solution
Now the just created unmanaged solutions need to be important in your build environment. To do this we will add an “Import Solution” step.
As an environment, you choose your build environment, which should not be your test or dev environment.
As the Solution Input, we choose the output of the previous step. For the demo, it should be
$(Build.ArtifactStagingDirectory)\$(SolutionName).zip
In one of the following posts, I will explain how to create an environment on the “fly” for this step.
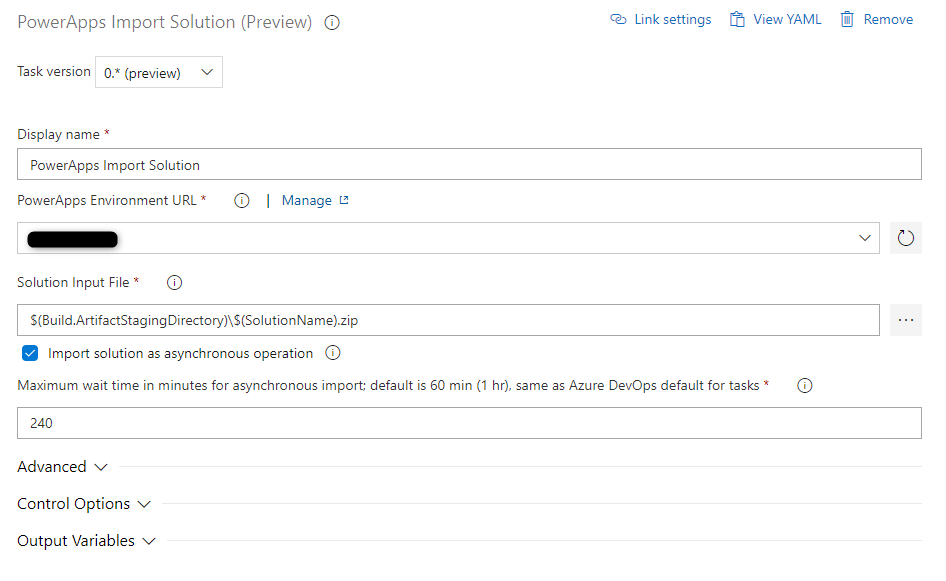
4 – PowerApps Export Solution
The next to last step is to export the solution as managed from the built environment we just have imported it to. To achieve this we will use an “Export Solution” step with the configuration you can see on the screenshot.
As the environment, you choose the same as you have configured for the import solution step. Solution Name should be our variable
$(SolutionName)
The Solution Output File should be in our artifact directory and contain “_managed”.
$(Build.ArtifactStagingDirectory)\$(SolutionName)_managed.zip
Important is to check the checkbox beside “Export as Managed solution”.
5 – Publish Pipeline Artifacts
The last step is to publish the artifact we just created. For this, we do use the step called “Publish Pipeline Artifacts”

The name of the artifact is up to you. I have chosen “drop”.
The “Path to publish” should be the same as the output oath in the previous step. In our case:
$(Build.ArtifactStagingDirectory)\$(SolutionName)_managed.zip
Release to Test
Like mentioned is the last pipeline a rather short one. It should be a release pipeline that looks at the end like this.
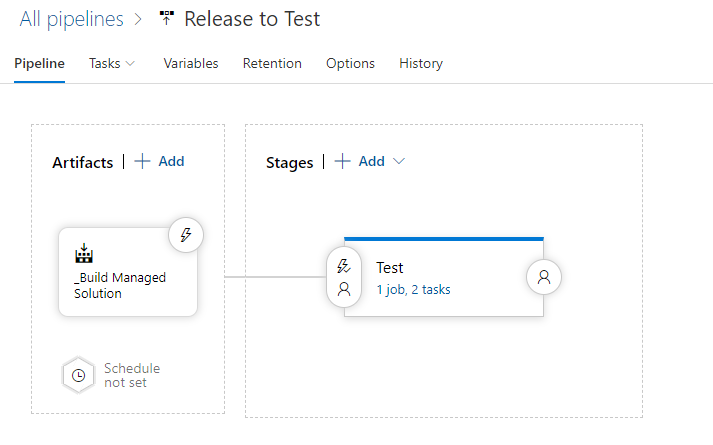
1 – Artifacts
First of all, we have to choose the artifact of the build pipeline.
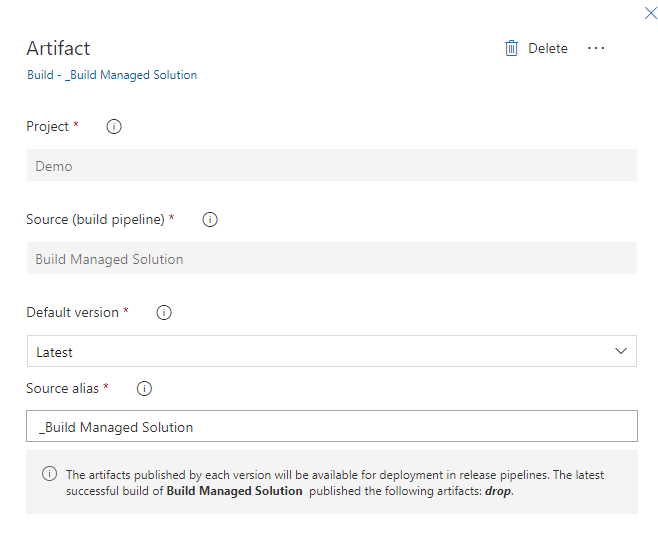
We choose our “Build Managed Solution” as the source.
2 – Tasks
The Tasks are like build pipelines. That means we do have to install our PowerApps tools first. In addition to that, we only have one more step. This is an “Import Solution” step with the following configuration.
As the environment, you choose your destination environment, in our case Test.
As the Solution input, you choose the artifact you configured above.
$(System.DefaultWorkingDirectory)/_Build Managed Solution/drop/$(SolutionName)_managed.zip
Summary
It does not take to long to set up a basic ALM process. When you are doing it for the first time it will take a bit longer, but you will have a fast learning curve.
Until now none of the pipelines is running automatically. All of them need manual queueing. I might create a post about how to automate those.
I would like to close todays post with a quote.
No project is to small for ALM.
Nick Doelman
This is a very good quote Nick Doelman said during one of his last Community sessions. I could not have expressed it better! With this said I can only encourage you to start with ALM. It will make your life easier.
In the upcoming posts, we will learn more about QG’s.
If you do have any questions do not hesitate to contact me.
Video
I created a video that explains the content of this blog post as well.
You can also subscribe and get new blog posts emailed to you directly.
About The Author
Benedikt
Power Platform Consultant @ CRM Konsulterna
Great post Benedikt! I’m currently reviewing our ALM process and this will help loads. Thanks!
Thank you very much!
I will add more posts around ALM in the future. I plan to write about Quality Gates for example. So make sure to come around every now and then :).
I would be interested how solution patches would fit into this approach since the solution patch would be a targeted subset of system components and would differ in name, version and content each time.. rather than being the same single “monolithic” solution that is deployed in its entirety for each deployment. Are patches fundamentally not practical in the above ALM scenario therefore?
Hej Stuart,
thanks for your comment. It is actually a really good question. The shown process is a rather simple one. What you could do is split your “monolith” into several small solutions that could then be deployed separately. Please be aware of the dependencies between the solutions in this case.
Regarding patches: Since the variable, “SolutionName” is settable at queue time and the process above is completely manual you could just specify a different solution while queueing the pipeline.
Even though this could result in problems while storing the solution in the repository. I would say, as you mention as well, the process above is not usable with patches.
Like you mentioned: The process above is created for solutions without patches.
But it can be altered to fit your needs.
When I talked to MS about the ALM process and the missing of an “increase version” step in the PowerApps BuiltTools the answer was something like: The increase of a version is and should be a manual process and decision. Therefore it is not necessary to automatically increase the version on every build/pipeline run.
Now that is a thing that could be discussed! At least what I think.
Why would you need to import it into a JIT build environment only to export it as managed? Why not export it as managed and unmanaged from the Dev environment and store both configurations? Not sure if I’m missing something here, but it seems an unnecessary extra step?
Hej Jeffry,
thanks for your comment.
If we store the unmanaged solution unpacked in the SourceControle we only can pack it up as an unmanaged solution. This means, that it is not possible to create a managed solution out of our source control.
One solution for that could be, that you, as you mention, store both an unmanaged and a managed version in source control. This will though create a lot more data in the source control and make it a bit more complex to understand.
Another reason why I prefer this approach is that we might wont to store the newest version of the unmanaged solution quite often in our SourceControle, whereas we only want to deploy a managed solution to test once a day or week for example. In this case, we do not want to create a managed solution as well all the time. Again to not pollute our check-ins and histories in Azure DevOps.
If we look at the future of a project there could be another reason. If a project has several development environments (i will write a post about this in the future) we could use the JIT-environment to merge several solutions together and test if those work with each other.
Since environments do not cost more any longer (when you purchased the licenses after October first, 2019) it does no harm to go via the JIT-environment either.
Hope this explained it a bit. Feel free to ask more :).
I thought about your question once more on my way to work today. There are actually two more reasons for the additional JIT-Build environment.
You should actually reset or fire up (create from scratch) the JIT-Build env. before every deployment. This will have 2 effects:
When you do this you can test whether you can recover from the loss of your dev environment. The question is: Can you reinstall dev when it’s lost? That can be tested when deploying to a clean environment, like the JIT-Build environment.
The other effect is, that you minimize cross-dependencies since you deploy to a clean environment and really just export the stuff you need in your solution.
Hi Benedikt
Any signs of the blog on the Quality Control Gates yet ?
Or did I miss it ?
Regards
Nigel
Hej Nigel,
at the moment there is only one. It’s about the Solution Checker (https://benediktbergmann.eu/2020/02/23/alm-using-solution-checker-in-a-pipeline/).
I do have some more on my list. I can prioritize those posts. Is there some specific Quality Gate you would like to see a post about?
//Benedikt
Hi Benedikt
Thank for posting this it’s incredibly useful.
When I am Committing the solution to my repo, where do I alter the command line script to push the solution to be a sub folder in another folder under my Master branch?
Thanks
Hej Sonny,
Thanks for your comment. Glad I could help/inspire you.
To change the folder the extracted solution would reside you actually have to change the output path of the unpack solution step (step 4 of the first pipeline). For example you could use “$(Build.SourcesDirectory)\Solutions\$(SolutionName)” to store the solutions in a folder called “Solutions”.
If you do so you also have to change the input path of the “pack solution” step of the second pipeline.
Brilliant, that worked perfectly.
One more question, when committing to the repo with the CMD line script how would I commit to another branch than master, I have simply changed the branch in the script from master to my new branch but this is failing, example of this is where i have changed master to NewBranch.
I have followed the rest of the steps above change email address etc.
echo commit all changes
git config user.email “”
git config user.name “Automatic Build”
git checkout NewBranch
git add –all
git commit -m “solution init”
echo push code to new repo
git -c http.extraheader=”AUTHORIZATION: bearer $(System.AccessToken)” push origin NewBranch
Thanks for the post! it helps me go thru my first ALM for D365.
As a newbie to dynamics and ALM, do you have a follow post to explain “how to create an environment on the “fly” for this step.” for the build step?
Also, as commit the code to git, can I also create a commit solution to dev branch and then merge it to master? what best practice do you recommend?
I don’t have a follow post on how to create a JIT environment, no. There is a task in the Power Platform Build Tools called “Create Environment“, which can be used to achieve that. I do unfortunately have som issues with creating environments on the fly though. Those are:
So I actually tend to go with an environment that will be recreated every x weeks manually.
In regards to your git question: It depends on the project and personal preferences. I usually commit directly to master, but if you follow some standard branching strategy you actually only want to have stuff in master/main which is in production. So in that case a separate branch which will be merged into master/main whenever you deploy to production would probably be more in line.
Everything worked excellent, the only doubt I have is the following.
We have flows inside a solution to make it easier for deploy update to client environments.
We have pipelines to deploy updated solution (managed) to environment.
I find that these imports will turn off the flows what’s the best practice for this scenario? should I be saving a copy of the flow into the environment instead of running it from inside deployed solution? or any way to stop them from turning off?
Hej Lucas,
flows are still a bit problematically. To get them working you still need some custom scripts. Scott Durow has a good Blog post on that topic. https://www.develop1.net/public/post/2021/04/01/connection-references-with-alm-mind-the-gap
In general, it helps to deploy flows manually the first time to be able to set the connections.
It also might be still good to have flows in a different solution.