Execute Power Apps CLI in Azure DevOps
A few months ago I wrote a post about how to “Unpack Canvas Apps in a Pipeline“. The first function of the Power Apps CLI (PAC) was around PCF creation. Since then a lot was added to it and there is still more to come I do assume. Since a few weeks the Power Apps Solution Packager (PASopa) is included in the PAC, which means the approach I explained in the other post is not needed anylonger. In this Post you will learn how to execute Power Apps CLI in Azure DevOps.
Shout out to Natraj and Mike for giving me some hints on how to do it.
You can find a yaml file that includes the complete example in one of my GitHub repos.
To make the explanation more visual and easier to understand I will, as always, not use yaml in this blog post.
Situation
Unfortunately, neither the PAC nor the PASopa is currently included in the Power Platform Build Tools which are available for Azure DevOps. This means we have to run it in some other way.
The solution is to install the NuGet of the PAC manually in our pipeline. After that, we need to find the path to it so that we can use it in our script.
Implementation
Let’s see how to implement it. There are different things to do.
Pipeline steps
We will start by adding the necessary steps to the pipeline.
Use NuGet
First, we have to install the NuGet tooling to the Build Agent. This step can be used with the standard configuration.

NuGet
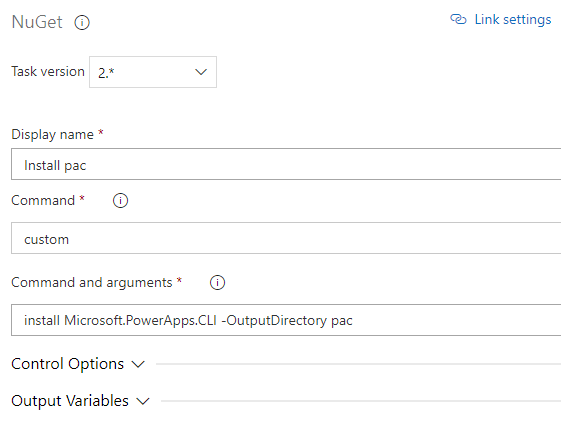
The second step we need is called “NuGet”. As a command we use “custom” and add the following line to install the PAC and define pac as the output folder.
install Microsoft.PowerApps.CLI -OutputDirectory pac

PowerShell – Find pac folder
After we have installed PACs NuGet we need to find the path to the exe file so we can execute it later.
To do so we use a “PowerShell” step with the following script.
The script will first get the children of the pac folder and then selects the one which contains “Microsoft.PowerApps.CLI.”
The second step is to add “\tools” to it.
The last step is then to output the generated path back to the pipeline so it can be used in the following steps.
$pacNugetFolder = Get-ChildItem "pac" | Where-Object {$_.Name -match "Microsoft.PowerApps.CLI."}
$pacPath = $pacNugetFolder.FullName + "\tools"
echo "##vso[task.setvariable variable=pacPath]$pacPath"


PowerShell – Execute PAC
This step will actually execute the PAC. Insert a second “PowerShell” step and add the following script to it.
First, we will add the outputted path of the previous step to the path environment variable.
Then we execute the pac to unpack a canvas app, which is our demo scenario.
$env:PATH = $env:PATH + ";" + "$(pacPath)"
pac canvas unpack --msapp $(Build.SourcesDirectory)\Solutions\$(SolutionName)\CanvasApps\bebe_almdemoapp_41ec7_DocumentUri.msapp --sources D:\a\1\s\Solutions\$(SolutionName)\CanvasApps\bebe_almdemoapp_41ec7_DocumentUri_src

We could have done the last PowerShell scripts in one step. I tried to show an approach you could execute the pac several times. You only have to add it to the PATH variable in every step.
If you try to run a command of the Power Apps CLI which will request Dataverse you have to create a connection first. To do so you can run the “auth add” command to establish a connection. If you would like to create it with an App Registration the command looks something like this:
pac auth create -t <your tenantID> -id <AppReg ID> -cs <ClientSecred> -n <Name> -u <URL>
You can find more information about the command in the MS docs.
Change .gitignore
Since the install NuGet step installs the pac in a certain folder this would be added to the repository. So we have to add the folder to our .gitignore file. To achieve this we add “pac/” to our .gitignore file.
Conclusion
The approach explained in this post could be used in different ways. For example to unpack/pack a Canvas app as demonstrated in this post. But there are other areas, for example, administer environments (backups, deletion, reset, copy or restore), push a pcf, download or upload portal content or many more.
Now you know how to execute the Power Apps CLI in Azure DevOps. To find the path one needs some lines of code, but once the path is found it can easily be reused in the pipeline.
I hope this post helped you. Feel free to contact me if you have any questions or suggestions.
You can also subscribe and get new blog posts emailed to you directly.
About The Author
Benedikt
Power Platform Consultant @ CRM Konsulterna
Excellent tutorial Benedikt. I got stuck on the last PowerShell section where we unpack the canvas app and received this error message. Any ideas why?
“Error: PA3012: Bad parameter: Must provide path to either empty directory or a directory where the app was previously unpacked.”
Glad I could help with the article.
I tested my pipeline once more and got the same error.
I had to add the output folder with –source. I have updated the post accordingly.
It works now. Thanks for the quick reply Benedikt. This is SO COOL!
Hi Benedict,
This is a great article!
I’m building a pipeline to export power portal using pac (similar to power apps, but anoither command) and stumbled on the pac command execution as it says “Error: No profiles were found on this computer. Please run ‘pac auth create’ to create one.”
I’m not sure how did you do authentication for pac? I added steps for power platform installer and can do “Who I am” task confirming my connection to DAavaerse is OK, but it seems not what pac expects.
Any tips?
Hej Andrew, -id -cs -n -u
Thanks for your comment. The part I am using does not need any authentication since it only does an unpack locally in the pipeline without requesting anything from Dataverse.
What I would suggest is to run the pac auth create command before your actually pac command. You can find the documentation of it at ms docs. An example using an app registration would be the following:
pac auth create -t
I will test it myself and add id to the blog post. Thanks for bringing that up.
Thanks, Benedikt!
I did try and it worked:
pac auth create –name … –url … –applicationId … –clientSecret … –tenant …
Obviously, a service principal had to be created in the Azure AD of the tenant organisation AND this application user to be added to the environment as described here: https://docs.microsoft.com/en-us/powerapps/developer/data-platform/use-single-tenant-server-server-authentication#azure-application-registration
Great to hear. I’m glad I could help.
Thanks for taking the effort to post.
I have used it in an AzDO pipeline after unpacking an unmanaged solution and putting in repository. This extra picks up the canvas app. I soon sussed your example, tad confused with –source and –sources, one in your screenshot, the other in the code copy. I made the app name a variable so probably each pipeline will have to be tailored to each solution to cater for N apps. I do a ‘Git add –all’ at the end to get it all in the Repo, maybe someday I’ll work out how to ignore saving the pac folder. All the best, cheers, Richard
Hej Richard,
glad my post could help you and thanks for the feedback. I have updated the post to bring the code snippet and screenshot in sync. Both do now read “–sources”.
In response to your concern about the pac folder in the repo: Have you seen the last paragraph of my post? There I write what you have to add to your .gitignore file to ignore this folder. Please let me know if you have any issues with that, I would be glad to assist you.
Thank you for this article, it’s been super useful to help achieve an outcome where I’m looking to generate a deployment settings file for automating deployment.
Hi Benedikt,
Is it possible to create a docker image that includes the Power apps CLI?
I never tried that, but spontaneously I would say it should be possible.
What would be your use case for that?
Hi Benedikt,
We’re using Gitlab CICD and need to use Power Apps CLI via shell script as part of pipeline. I have the docker image but it wouldnt recognized the “pac” cli command in the shell script.
Hi Benedikt,
I am facing this error with the latest Update version of power apps CLI 1.13.4. Here is the error,
pac : The term ‘pac’ is not recognized as the name of a cmdlet, function, script file, or operable program. Check the
spelling of the name, or if a path was included, verify that the path is correct and try again.
At D:\a\_temp\b410d2be-6ba4-4be6-afe7-308650b3cb7c.ps1:4 char:1
Can you able to provide any Suggestions/Solution.
I had the same problem when the VS Code Dataverse extension was active. Do you have it installed? Are you trying to update the pac from within Visual Studio Code?
Thanks a lot for the article Benedikt, this info was very useful for me.
Hi Benedikt,
Thank you so much for the article. The pipeline is running successfully for my but I don’t see any change in my repository branch. I tried with both pack and unpack commands but no new files are being added. Can you please help me in figuring out what might be the issue?
Thank you
Two things I would check:
– Is the pipeline working on the same branch as you?
– Is the unpack command unpacking the App to the correct folder? It might unpack it to some local folder which isn’t associated with the repository.
What is the use of generating the deployment file, and in what scenarios would you do so?
Kind regards 🙂
Najtreg
Which deployment file do you mean?
Just replaced the NuGet etc explained in this article with the «process canvas app» setting in the build tools unpack solution step. Works lile a a charm!
Hej Lars,
thanks for the input. This is true. the unpack solution step can handle this now, which was not the case when I wrote the article.
I’ve been using the pac CLI in my pipeline for a couple of weeks now! Thank you for a great article Benedikt.
I ran into an issue today where “The term ‘pac’ is not recognized”. After a bit of digging, it turns out there were 2 conflicting versions of the pac CLI installed, a previous version and the latest. This meant that the PowerShell script which sets pacPath in my pipeline, was setting it to 2 paths so my pacPath variable looked like this;
D:\a\1\s\pac\Microsoft.PowerApps.CLI.1.24.3 D:\a\1\s\pac\Microsoft.PowerApps.CLI.1.25.5 \tools
Really strange! Anyway, I wanted to comment as a simple hotfix was to filter them to get the latest modified back so the updated first line of my Powershell script looks like this;
$pacNugetFolder = Get-ChildItem “pac” | Where-Object { $_.Name -match “Microsoft.PowerApps.CLI” } | Sort-Object LastWriteTime -Descending | Select-Object -First 1
My pacPath variable now looks more normal: D:\a\1\s\pac\Microsoft.PowerApps.CLI.1.25.5\tools
This meant the latest version was returned and the pipeline would carry on as normal. Keen to hear if there is a cleaner way to ensure the Nuget installer force removes the old one?
Thanks for the comment, Tom.
This is very useful information.
Hi Benedict,
This is a great article!
I’m building a pipeline to delete a solution from Test environment. Using Power Apps CLI Please provide a Yaml code to delete the solution from other environments (Test,UAT,PROD).
Thanks in advance.
Regards,
Jeeva
Hej Jeeva,
I wonder what the use-case is to delete a solution via a pipeline.
Could you elaborate on this?
To achieve this you could run the “pac solution delete” command as described in the MS docs
https://learn.microsoft.com/en-us/power-platform/developer/cli/reference/solution#pac-solution-delete
Hi Benedikt,
Thanks for your prompt response. I have implemented a pipeline to deploy solution from DEV to TEST, UAT and PROD.
Here, we have provided an option to select holding solution value for each stage deployment. If we selected holding solution value as true solution will be imported and act as a stage for upgrade. Once we provide manual validation as “Resume” it will upgrade the solution in that Stage. If we select “Reject” we will end up with two solutions (1 Original Solution and 1 upgrade solution).
My use case is if user selects the “Reject” option we should delete “Upgrade solution”. I have implemented it using below task.
– task: PowerPlatformDeleteSolution@2
inputs:
authenticationType: ‘PowerPlatformSPN’
PowerPlatformSPN: ${{ parameters.devOpsSPN }}
SolutionName: ${{ parameters.solutionName }}_Upgrade
However, It is working as expected (I’m able to delete the solution from other environments).
But, my pipeline is throwing an error as below. Could you please help me to resolve this issue.
Is there any CLI commands to delete the solution from Other environments?
Kindly provide the YAML code if you have any?
023-11-20T12:00:10.1731662Z ##[section]Starting: PowerPlatformDeleteSolution
2023-11-20T12:00:10.1883595Z ==============================================================================
2023-11-20T12:00:10.1883924Z Task : Power Platform Delete Solution
2023-11-20T12:00:10.1884137Z Description : Power Platform Delete Solution
2023-11-20T12:00:10.1884354Z Version : 2.0.47
2023-11-20T12:00:10.1884476Z Author : Microsoft
2023-11-20T12:00:10.1884594Z Help : https://aka.ms/buildtoolsdoc Ideas, feedback: https://github.com/microsoft/powerplatform-build-tools/discussions
2023-11-20T12:00:10.1885197Z ==============================================================================
2023-11-20T12:00:10.5278906Z Discovered environment url from explicit input parameter ‘Environment’: $(BuildTools.EnvironmentUrl)
2023-11-20T12:00:10.5284168Z Discovered Azure DevOps variable expression that needs resolving: $(BuildTools.EnvironmentUrl) -> BuildTools.EnvironmentUrl
2023-11-20T12:00:10.5299118Z Falling back to url from service connection, using: https://*****-test.crm4.dynamics.com/
2023-11-20T12:00:10.5332071Z [
2023-11-20T12:00:10.5333012Z ‘authN to env. authType:SPN authScheme:None; cloudInstance: Public; envUrl: https://*****-test.crm4.dynamics.com/‘
2023-11-20T12:00:10.5333925Z ]
2023-11-20T12:00:22.7509188Z [
2023-11-20T12:00:22.7510822Z “‘***’ authenticated successfully.”
2023-11-20T12:00:22.7531500Z ]
2023-11-20T12:00:22.7544679Z [ ‘Validating connection…’ ]
2023-11-20T12:00:25.7211020Z [ ‘Connected to… ***** – Test’ ]
2023-11-20T12:00:25.7212526Z [ ‘Connected as ***’ ]
2023-11-20T12:00:27.2601637Z [ ‘Authentication profile created’ ]
2023-11-20T12:00:27.4069566Z [
2023-11-20T12:00:27.4071238Z ‘ * DATAVERSE https://*****-test.crm4.dynamics.com/ : *** Public’
2023-11-20T12:00:27.4071992Z ]
2023-11-20T12:00:27.4072411Z [ ” ]
2023-11-20T12:00:30.3224917Z [
2023-11-20T12:00:30.3229838Z “The Authentication Result: ‘***’ authenticated successfully.,Validating connection…,Connected to… ***** – Test,Connected as ***,Authentication profile created, * DATAVERSE https://*****-test.crm4.dynamics.com/ : *** Public,”
2023-11-20T12:00:30.3237146Z ]
2023-11-20T12:00:30.3238769Z [
2023-11-20T12:00:30.3239758Z ‘Calling pac cli inputs: solution delete –solution-name *****_Upgrade’
2023-11-20T12:00:30.3240574Z ]
2023-11-20T12:00:34.4702447Z [ ‘Connected to… ***** – Test’ ]
2023-11-20T12:00:34.4716224Z [ ‘Connected as ***’ ]
2023-11-20T12:00:34.8939077Z [ ” ]
2023-11-20T12:00:34.8940057Z [ ‘Deleting Dataverse Solution…’ ]
2023-11-20T12:05:19.2985851Z [ ‘Microsoft PowerPlatform CLI’ ]
2023-11-20T12:05:19.2988204Z [ ‘Version: 1.28.3+g4ba7dfd’ ]
2023-11-20T12:05:19.2988987Z [ ‘Online documentation: https://aka.ms/PowerPlatformCLI‘ ]
2023-11-20T12:05:19.2989891Z [
2023-11-20T12:05:19.2990565Z ‘Feedback, Suggestions, Issues: https://github.com/microsoft/powerplatform-build-tools/discussions‘
2023-11-20T12:05:19.2991269Z ]
2023-11-20T12:05:19.2991536Z [ ” ]
2023-11-20T12:05:19.2991750Z [
2023-11-20T12:05:19.2994430Z ‘Error: An error occurred while receiving the HTTP response to https://*****-test.crm4.dynamics.com/XRMServices/2011/Organization.svc/web?SDKClientVersion=9.2.49.4384. This could be due to the service endpoint binding not using the HTTP protocol. This could also be due to an HTTP request context being aborted by the server (possibly due to the service shutting down). See server logs for more details.’
2023-11-20T12:05:19.2997924Z ]
2023-11-20T12:05:19.2998312Z [
2023-11-20T12:05:19.2999058Z ‘ The underlying connection was closed: An unexpected error occurred on a receive.’
2023-11-20T12:05:19.2999818Z ]
2023-11-20T12:05:19.3000329Z [
2023-11-20T12:05:19.3001253Z ‘ Unable to read data from the transport connection: An existing connection was forcibly closed by the remote host.’
2023-11-20T12:05:19.3002051Z ]
2023-11-20T12:05:19.3004080Z [
2023-11-20T12:05:19.3004704Z ‘ An existing connection was forcibly closed by the remote host’
2023-11-20T12:05:19.3005261Z ]
2023-11-20T12:05:19.3005531Z [ ” ]
2023-11-20T12:05:19.3005754Z [ ” ]
2023-11-20T12:05:19.5563971Z ##[error]error: 1
2023-11-20T12:05:19.5588993Z ##[error]failed: Connected to… ***** – Test
Connected as ***
Deleting Dataverse Solution…
Microsoft PowerPlatform CLI
Version: 1.28.3+g4ba7dfd
Online documentation: https://aka.ms/PowerPlatformCLI
Feedback, Suggestions, Issues: https://github.com/microsoft/powerplatform-build-tools/discussions
Error: An error occurred while receiving the HTTP response to https://*****-test.crm4.dynamics.com/XRMServices/2011/Organization.svc/web?SDKClientVersion=9.2.49.4384. This could be due to the service endpoint binding not using the HTTP protocol. This could also be due to an HTTP request context being aborted by the server (possibly due to the service shutting down). See server logs for more details.
The underlying connection was closed: An unexpected error occurred on a receive.
Unable to read data from the transport connection: An existing connection was forcibly closed by the remote host.
An existing connection was forcibly closed by the remote host
2023-11-20T12:05:21.0201124Z [ ‘Authentication profiles and token cache removed’ ]
2023-11-20T12:05:21.9407958Z [
2023-11-20T12:05:21.9409375Z ‘The Clear Authentication Result: Authentication profiles and token cache removed’
2023-11-20T12:05:21.9410369Z ]
2023-11-20T12:05:21.9541357Z ##[error]Error: Connected to… ***** – Test
Connected as ***
Deleting Dataverse Solution…
Microsoft PowerPlatform CLI
Version: 1.28.3+g4ba7dfd
Online documentation: https://aka.ms/PowerPlatformCLI
Feedback, Suggestions, Issues: https://github.com/microsoft/powerplatform-build-tools/discussions
Error: An error occurred while receiving the HTTP response to https://*****-test.crm4.dynamics.com/XRMServices/2011/Organization.svc/web?SDKClientVersion=9.2.49.4384. This could be due to the service endpoint binding not using the HTTP protocol. This could also be due to an HTTP request context being aborted by the server (possibly due to the service shutting down). See server logs for more details.
The underlying connection was closed: An unexpected error occurred on a receive.
Unable to read data from the transport connection: An existing connection was forcibly closed by the remote host.
An existing connection was forcibly closed by the remote host
2023-11-20T12:05:21.9611811Z ##[section]Finishing: PowerPlatformDeleteSolution
Regards,
Jeeva
Okay now I understand the use-case. To be honest I never used the delete solution steps. Spontaneously I would guess it has something todo with the timeout. As the error suggested my recommendation is to open an issue on GitHub (https://github.com/microsoft/powerplatform-build-tools/discussions). The MS team behind those tools usually is very responsive there.
Let me know when it does not help.
Sure. Thanks for your suggestion.
I will reach out to you if i need any help!
Hi Benedikt,
I’m trying to check solution exist (or) not using below command and it is working fine as expected.
C:\Users\*****\Downloads>pac solution list –environment https://*****-dev.crm4.dynamics.com/ | findstr /i “DeploymentJsonTesting”
DeploymentJsonTesting DeploymentJsonTesting 1.0.0.0 False
However, When I trying to find the solution using same code in Azure DevOps Pipeline not working as excepted even though solution exists.
– task: NuGetCommand@2
displayName: ‘Install pac’
inputs:
command: custom
arguments: ‘install Microsoft.PowerApps.CLI -OutputDirectory pac’
– task: PowerShell@2
displayName: Find Solution
inputs:
targetType: ‘inline’
script: |
# Run the pac solution list command and store the result in a variable
$solutionList = pac solution list –environment https://eimskipnewport-dev.crm4.dynamics.com/ | findstr /i “DeploymentJsonTesting”
# Check if the solution exists by checking the length of the result
$solutionExists = $solutionList.Length -gt 0
# Set the result as an output variable
Write-Output “##vso[task.setvariable variable=solutionList]$solutionList”
Write-Output “##vso[task.setvariable variable=solutionExists]$solutionExists”
# Access the variable from a subsequent task
Write-Output “Solution List: $solutionList”
Write-Output “Solution Exists: $solutionExists”
I’m getting Solution Exists: False and no value for Solution List variables.
Kindly help me to get “true” if solution exists else “false”. I’m trying to filter with exact solution name.
Thanks in advance.
Hi Benedikt, this is very cool stuff – I’m just getting started with PAC, and I have commands running locally, but now I wish to automate them within Azure Devops. I’m trying to determine where exactly you are going to install Nuget. I’m in Azure Devops, I have a pipeline created, but I do not see where to add Nuget. Are you doing this from VSCode, or somewhere in the Azure Devops interface?
Hej Chris,
you mean in your Pipeline so that you are able to use NuGet packages?
You should add a step to your pipelines which installs the NuGet tooling. After that you can install any NuGet package you’d like/need and use it in your PowerShell or what ever script you’d like.
Hello Benedikt, first of all, very useful blog, I started following your post a lot since I am working on a lot of DevOps setups. Thanks for helping out the community.
I got stuck while trying to deploy a plugin from the DevOps pipeline, where I am getting error in my powershell script “##[error]The term ‘pac’ is not recognized as a name of a cmdlet, function, script file, or executable program.”
My Setup is like —
DevOps pipeline –
# Installs PowerPlatform Tools (including PAC CLI)
– task: PowerPlatformToolInstaller@2
inputs:
DefaultVersion: true
# Set PACEXEPATH variable : the path to the PAC CLI executable
– pwsh: |
$pacExePath = $env:POWERPLATFORMTOOLS_PACCLIPATH + “\pac\tools\pac.exe”
echo “##vso[task.setvariable variable=PACEXEPATH]$pacExePath”
displayName: ‘Set Pac.Exe path’
– script: echo “PACEXEPATH = $(PACEXEPATH)”
# Verifies an environment service connection
– task: PowerPlatformWhoAmi@2
inputs:
authenticationType: ‘PowerPlatformSPN’
PowerPlatformSPN: ‘${{parameters.serviceConnectionName}}’
Environment: ${{parameters.serviceConnectionUrl}}
displayName: Who Am I
WhoAmI is working fine. Further down the pipeline, I am executing a Powershell script like this —
– task: AzurePowerShell@5
inputs:
azureSubscription: ‘Azure D365 – Dev’
ScriptType: ‘FilePath’
ScriptPath: ‘.\psscript.ps1’
ScriptArguments: ‘-envName ${{parameters.d365InstanceName}} -envUrl ${{parameters.configurationName}} -pacPath $(PACEXEPATH)’
azurePowerShellVersion: ‘LatestVersion’
pwsh: true
And in Power Shell script, I am trying to deploy a plugin, like below —
$env:PATH = $env:PATH + “;” + “$pacPath”
pac plugin push -env $envUrl -id $($plugin.PluginId) -pf $varPluginDLLsFolder2\$($plugin.PluginName) -t $($plugin.PluginType) -c $($plugin.PluginDeploymentConfiguration)
and getting error that pac is not defined, I am wondering where this could be going wrong.
What all examples I have seens of executing pac command are all inline scripts. Does it not support script files?
Hej,
it should be possible in script files as well. It is hard for me to tell.
In your Power Shell script you set the $env:PATH with “$pacPath”, but I can’t see you setting “$pacPath”. I think you have to inject “$(PACEXEPATH)”.
[…] PAC (NuGetCommand@2): Once again, Benedikt Bergmann teaches me how to use PowerPlatform CLI tools in the Azure DevOps pipe…. The idea is because there is no action that we can use directly, we install Microsoft Power […]
how did you manage to set the name to be dynamic?
e.g.
bebe_almdemoapp_41ec7_DocumentUri_src
I’m using a variable for my solution name, but the _DocumentUri_src needs to be dynamic if I want to automate this.
Hej,
you could have a list of canvas app in some sort of configuration (a variable for example) and loop over it.
Unpack Solution now has setting “Process CanvasApps”. This avoids the need for the steps in this article right? Thanks.
It does and it is the same approach as described in this article (uses pac) just build into the unpack step. But if you pack the solution you should never have this setting on since it is in preview and a pack will probably fail. MS is working on an improved version.