Export Dataverse data to SQL using Data Lake and ADF
I recently had the challenge of exporting Dataverse data to an SQL Database. I ended up using an Azure Data Lake Gen2 in combination with an Azure Data Factory (ADF). Throughout the process of setting it up, I faced some issues. We will discuss those in this blog post.
Parts of the shown implementation are in preview as of writing this article.
Update 2023-05-29: Microsoft has released a new version of the ADF Template. The new version does address some of the problems I mention below (for example the prefix). This also means that not all parts of this Article still are 100% valid.
Disclaimer
The solution shown in this post will have a price impact. DES is a solution which was/is included in your Power Platform license.
Both Azure Data Lake Gen2 as well as Azure Data Factory do have extra costs. Espacially Azure Data Factory pipelines can be expensive. They will be charged by a combination of amount of runs and runtime for each run.
There might be other solutions which aren’t as expensive. Since the shown solution is the recommendation from MS and the setup is quite easy it is what I am describing here.
I might discuss other alternatives in posts later.
Background
One of my customers still uses the deprecated Data Export Service (DES) to dump all rows from specific tables into an Azure SQL database. This information is then used by both integrations and reporting tools. The idea of such a setup rather than both requesting Dataverse directly is to decrease the number of requests against the Dataverse APIs to both increase performance for the users as well as respecting the Throttling and API limits of Dataverse.
Since DES is deprecated and will reach “end of life” as well as “end of support” in the last half of November 2022 (see MS announcement) we had the need to replace this setup with something else.
Target Solution
Microsoft is recommending using Azure Synapse Analytics and feeding data to it from Dataverse using the Azure Synapse Link for Dataverse. There even is a playbook describing exactly how to move from DES to Synapse.
The downside of this is the cost of Azure Synapse Analytics as well as the recommendation is to “end” at Synapse. This would mean that a lot of integrations would have to change in a short timeframe.
As you can see on the page of the Azure Synapse Link for Dataverse this is either exporting to Azure Synapse or just to a Data Lake Gen2. That’s what our solution is aiming for. When the data is in the Data Lake we will move it to the already existing Azure SQL Database (currently used by DES) using ADF.
This means that we just change how data is stored in the Database but the structure as well as the Database itself will be exactly the same. This also means no integration has to change at the current time.
The long-term idea is to move all integrations to use the Data Lake directly and skip the SQL.
Problems
Throughout the implementation, I had the following problems which were not covered by the documentation.
Collation
Our Azure Database server was set up with one collation whereas the Database we used had a different collation. A part of the new process is to sync changes in the Dataverse table structure to the export database. To do this the template compares the incoming model with the system table “INFORMATION_SCHEMA.COLUMNS”. If the mentioned system table and the database we use have different collations any equal comparison will fail. This is more a problem we created ourselves, but still, I had to handle it in the new setup.
Table Prefix
While configuring DES one had the opportunity to define a table prefix. If you for example chose “sales” as the prefix and sync the contact table from Dataverse to the SQL using DES the table in the export database will be called “dbo.sales_contact” instead of “dbo.contact”.
The ADF template from MS is not taking prefixes into consideration.
Trigger
I had massive problems with my ADF pipeline getting triggered over 50 times every 15 minutes. This was basically me not reading the documentation carefully enough. So make sure you do!
Colum Data Type
The Template changes the data type of all int columns to bigInt. This could generate problems for integrations.
The solutions to those are included in the Setup part of this article.
Setup
Let’s dive into the setup and see what we have to do.
The documentation from Microsoft on this topic is actually quite good. I will therefore link to the articles explaining the setup in question and only add my additions to it to the post.
Create Data Lake Gen2
Important! Make sure you create your Data Lake Gen2 in the same Azure Tenant and Azure region as your Dataverse is installed in. Otherwise, you won’t be able to create the link between those two. If you go into the maker portal and try to create a new Link (Dataverse -> Azure Synapse Link) it will show you where your Dataverse environment is located.

Other than the mentioned region it is straightforward to create such Data Lake. The documentation is pretty clear on it. Either you create a new storage account directly with the Data Lake Gen2 capabilities or you upgrade an existing storage account.
The first storage account I created for this implementation I wrongly created without the Data Lake Gen2 capabilities which meant I had to upgrade it even though I just created it. Which were a few additional steps, but just took around 5 mins extra.
Link DL using Azure Synapse Link for Dataverse
For this part, there are different documentation created. There is general documentation on how to link Dataverse to a Data Lake using the Azure Synapse Link for Dataverse. From this documentation the Prerequisites are important!
For our ADF pipeline to work, you have to follow this documentation exactly (including the hacky addition to the URL in the middle of creating the link).
The documentation you should have to follow suggests you need to have an Azure Synapse Workspace. It works just fine by only using a Data Lake. Just don’t check the first checkbox when creating the link. It might be that you have to press enter (which reloads the site) when you add the additional parameter to the URL as written in the documentation.
There is the option to include your Azure Synapse Link for Dataverse configuration in your Solution. This allows you to deploy it as part of your usual deployment. Read more.
Create ADF
To begin with, you should follow the documentation on how to set up the template for this scenario.
Don’t make the same mistake as I did and forget to add “/model.json” to the “Blob path ends with” field in the ADF pipeline Trigger.
Now here is where the fun begins and I actually had to fix some stuff!
Collation
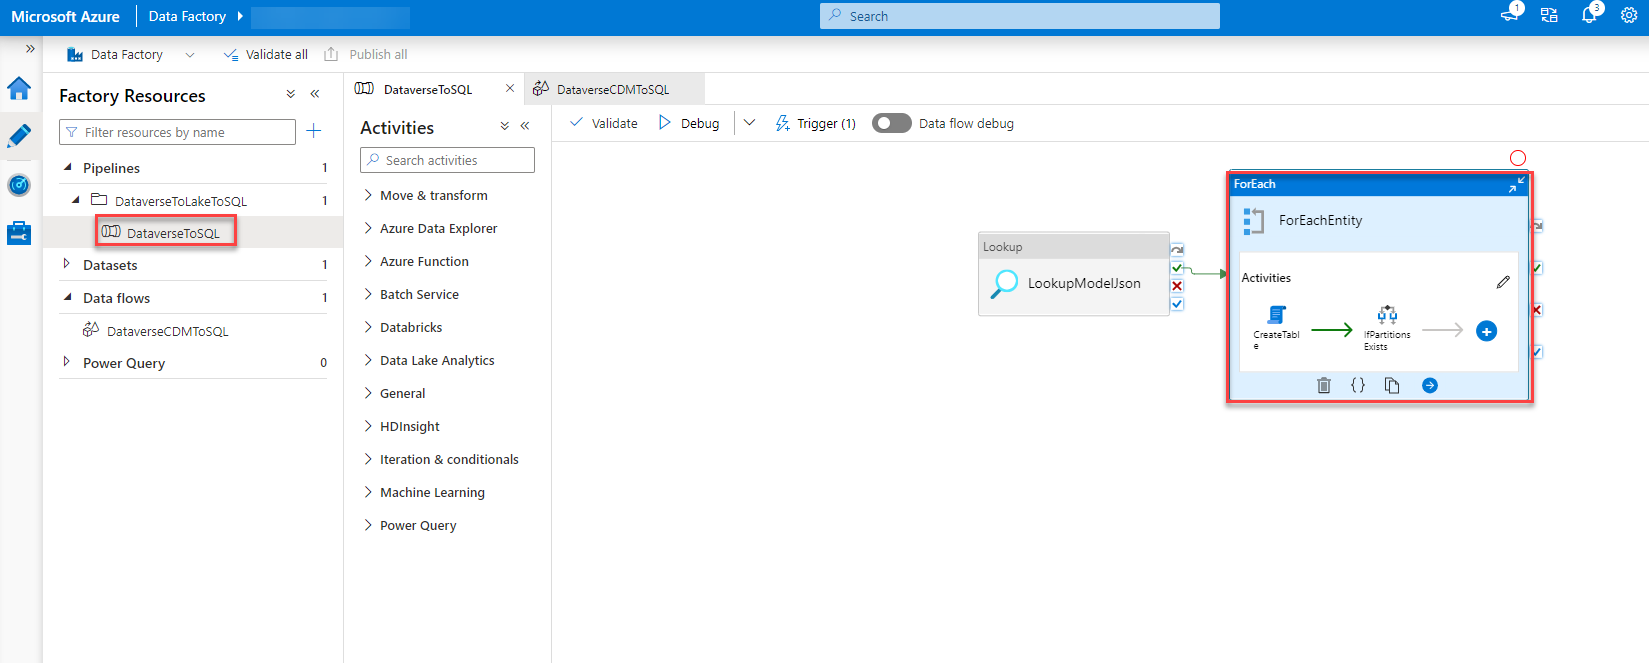
The first problem I had was the collation. To fix this I had to alter the script which gets executed in the “CreateTable” step of the ADF Pipeline. To do so you just click the “CreateTable” step within the “ForEach” when you are on your pipeline in the DataFactory studio. At the bottom, you will have some tabs where you go to “Settings”. By clicking into the script a editor will open.
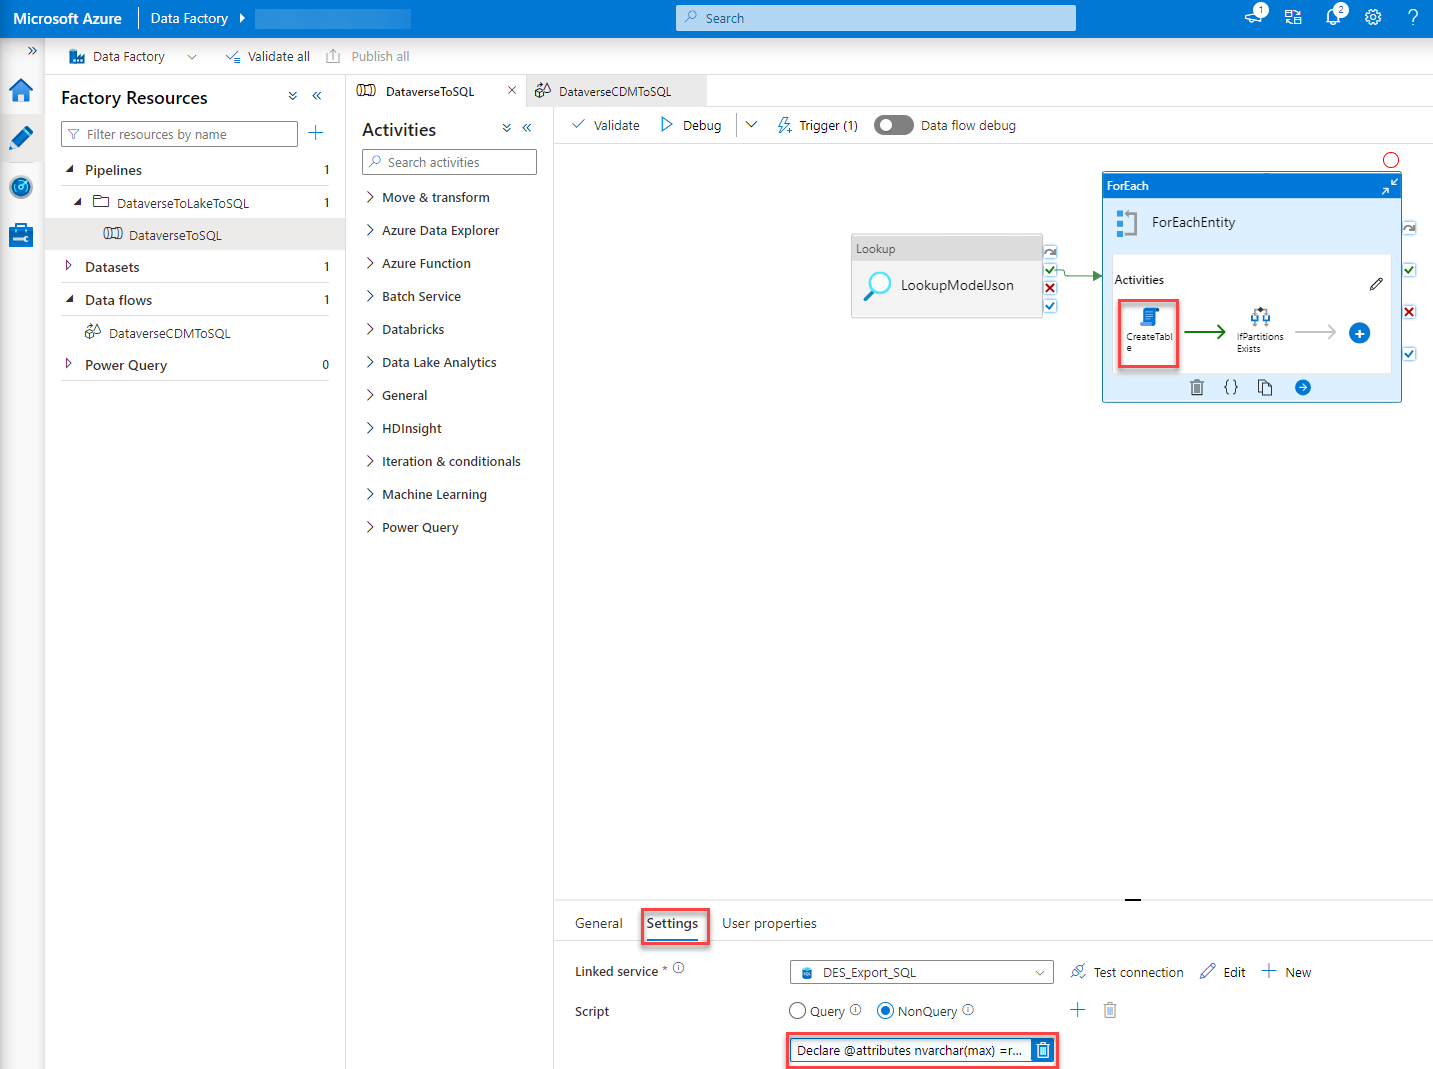
“Pro tip”: Copy the script to an editor of your choice, do your changes there and copy the changed scripted back into the ADF portal. This makes editing much easier than in the portal editor.
You basically have to add “COLLATE <Collation you’ll need>”, in our case it was “COLLATE Finnish_Swedish_CI_AS”, whenever a temp table is created or an equal operation is executed on a field of INFORMATION_SCHEMA.COLUMNS.
This basically ends in the following code/script:
Declare @attributes nvarchar(max) =replace(replace('@{item().attributes}', '\',''), 'cdm:traits', 'traits') ;
declare @entity nvarchar(200) = '@{item().name}';
declare @metadata table (
Name nvarchar(200) COLLATE Finnish_Swedish_CI_AS,
datatype NVARCHAR(50) COLLATE Finnish_Swedish_CI_AS,
maxLength int,
precision int,
scale int,
datatypeSQL nvarchar(100) COLLATE Finnish_Swedish_CI_AS
);
insert into @metadata
select
x.Name,  x.dataType,  x.maxLength,  x.precision,  x.scale,
case
when x.dataType = 'nvarchar' and x.maxLength < 0 then 'nvarchar(max)'
when x.datatype = 'nvarchar' and x.maxLength > 0 then 'nvarchar(' + convert(nvarchar(10), x.maxLength) + ')'
when x.datatype = 'decimal' then 'decimal(' + convert(nvarchar(10), x.precision) + ',' + convert(nvarchar(10), x.scale)+ ')'
else x.datatype end as datatypeSQL
from (
select Name,
case datatype
when 'guid' then 'UNIQUEIDENTIFIER'
when 'string' then 'nvarchar'
when 'int64' then 'bigInt'
when 'boolean' then 'bit'
when 'double' then 'real'
else datatype end as dataType,
case    when datatype = 'string' and  maxLength > 4000 then -1
when datatype = 'string'  then maxLength end as maxLength,
case  when datatype = 'decimal' then precision end as precision,
case  when datatype = 'decimal' then scale end as scale
FROM OPENJSON(@attributes)  WITH (  name nvarchar(200) '$.name',  datatype NVARCHAR(50) '$.dataType' , maxLength int '$.maxLength' ,precision int '$.traits[0].arguments[0].value' ,scale int '$.traits[0].arguments[1].value')  )x ;
Declare @CreateTableDDL nvarchar(max) = (SELECT
'IF OBJECT_ID(''dbo.' + @entity + ''',''U'') IS NULL
create table ' + @entity + '(' + STRING_AGG(CONVERT(NVARCHAR(max), + '[' + name + '] ' +  datatypeSQL) , ',') + '
, CONSTRAINT ' + @entity + '_ID PRIMARY KEY CLUSTERED (Id)' + ')'
from @metadata);
execute sp_executesql  @CreateTableDDL;
-- add Columns
Declare @AlterTableAddColumnDDL nvarchar(max) = (SELECT
'alter table ' + @entity + ' ADD ' + STRING_AGG(CONVERT(NVARCHAR(max), + '[' + name + '] ' +  datatypeSQL), ',')
from @metadata m
left join INFORMATION_SCHEMA.COLUMNS c on
c.TABLE_NAME COLLATE Finnish_Swedish_CI_AS = @entity and TABLE_SCHEMA = 'dbo'
and c.COLUMN_NAME COLLATE Finnish_Swedish_CI_AS = m.Name
where c.COLUMN_NAME COLLATE Finnish_Swedish_CI_AS is null);
execute sp_executesql @AlterTableAddColumnDDL;
--select @AlterTableAddColumnDDL;
Declare @AlterTableAlterColumnDDL nvarchar(max) = (SELECT
STRING_AGG(CONVERT(NVARCHAR(max), + 'alter table ' + @entity + ' ALTER COLUMN ' + '[' + name + '] ' +  datatypeSQL), ';')
from @metadata m
left join  INFORMATION_SCHEMA.COLUMNS c on
c.TABLE_NAME COLLATE Finnish_Swedish_CI_AS = @entity and TABLE_SCHEMA = 'dbo'
and c.COLUMN_NAME COLLATE Finnish_Swedish_CI_AS = name
where c.COLUMN_NAME is not null and (c.Data_type COLLATE Finnish_Swedish_CI_AS != datatype or c.CHARACTER_MAXIMUM_LENGTH != maxLength or NUMERIC_PRECISION != precision or NUMERIC_SCALE != scale));
execute sp_executesql @AlterTableAlterColumnDDL;
--select @AlterTableAlterColumnDDL;
Declare @CreateLogTableDDL nvarchar(max) =
'IF OBJECT_ID(''dbo.DeleteLog'',''U'') IS NULL
CREATE TABLE [dbo].[DeleteLog](
[Id] [bigint] IDENTITY(1,1) NOT NULL,
[EntityName] [nvarchar](64) NOT NULL,
[RecordId] [nvarchar](64) NOT NULL,
[SinkDeleteTime] [datetime] NOT NULL,
[VersionNumber] [bigint] NOT NULL,
PRIMARY KEY CLUSTERED
(
[Id] ASC
)
) ON [PRIMARY]';
execute sp_executesql  @CreateLogTableDDL;
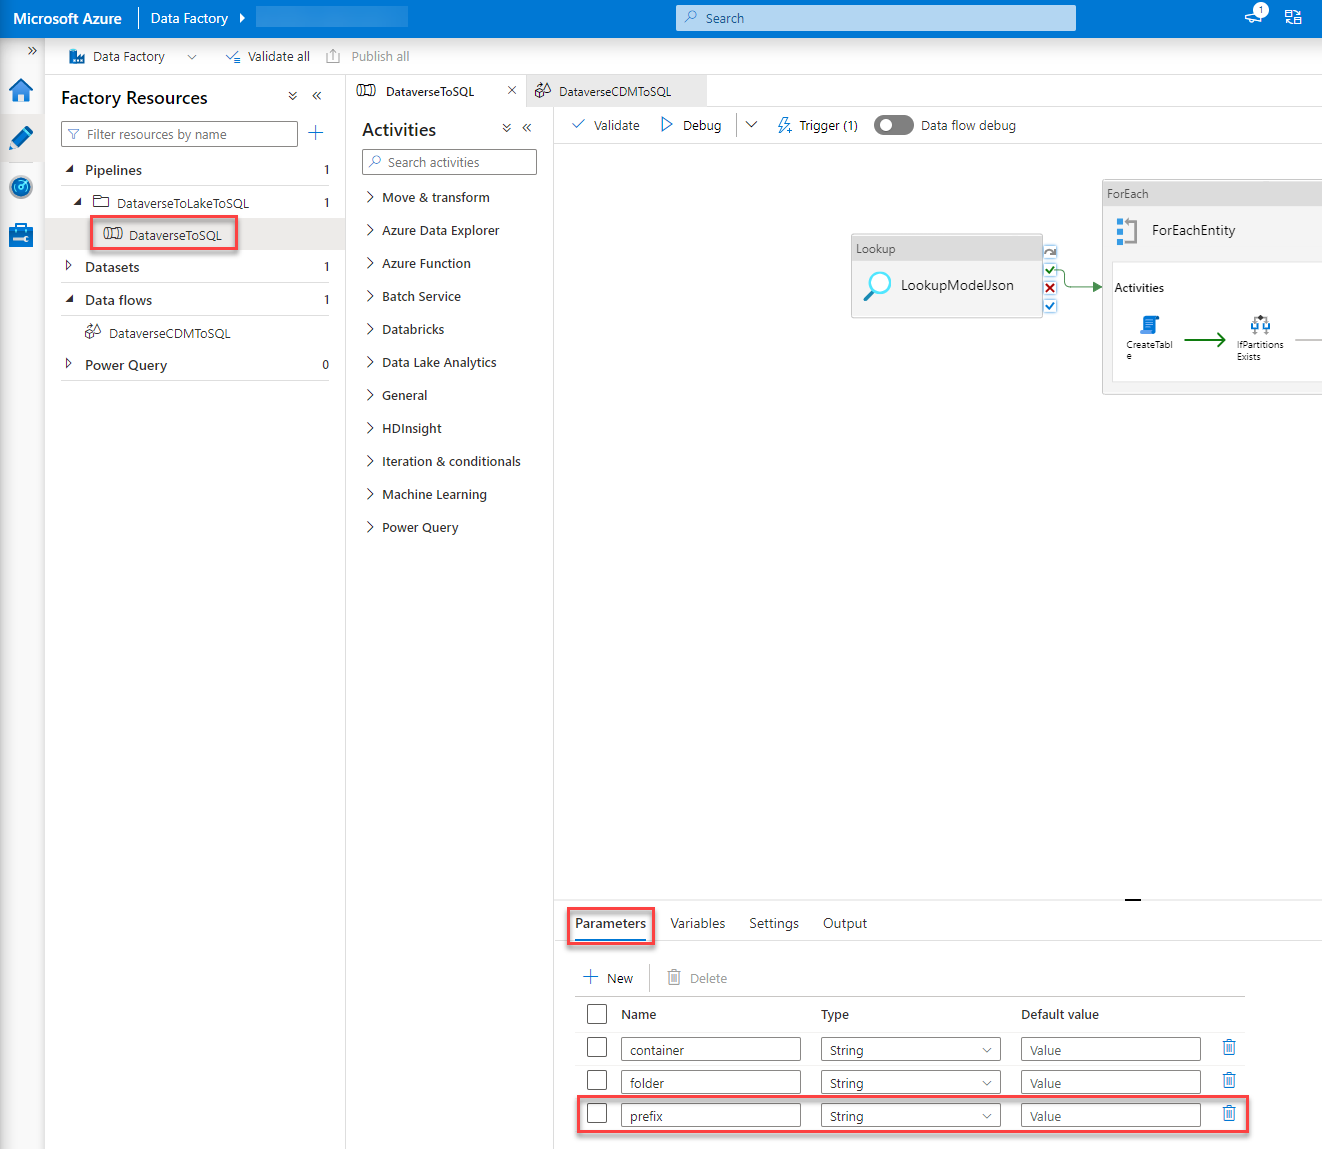
Prefix
A bit more work was it to fix the prefix problem. In our case, we used “sales” as a prefix in DES. Since we wanted to have our DES database exactly as is this needed to be handled.
Parameter
The first thing I did was add an additional Parameter, prefix, to the pipeline.
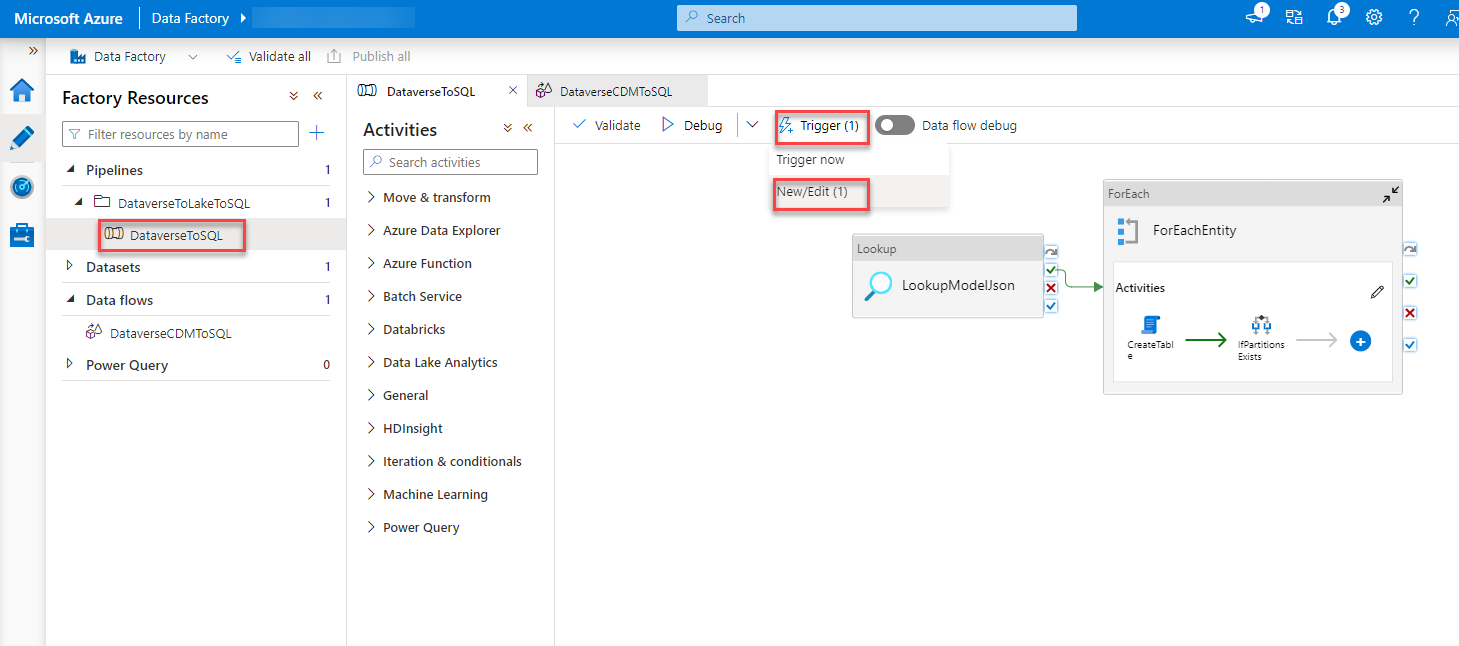
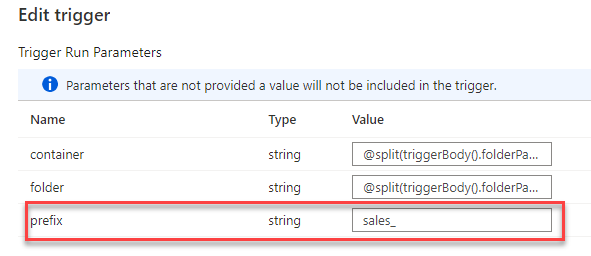
Trigger
Next, I would use the new parameter in the trigger and set it statically to “sales_”.
CreateTable script
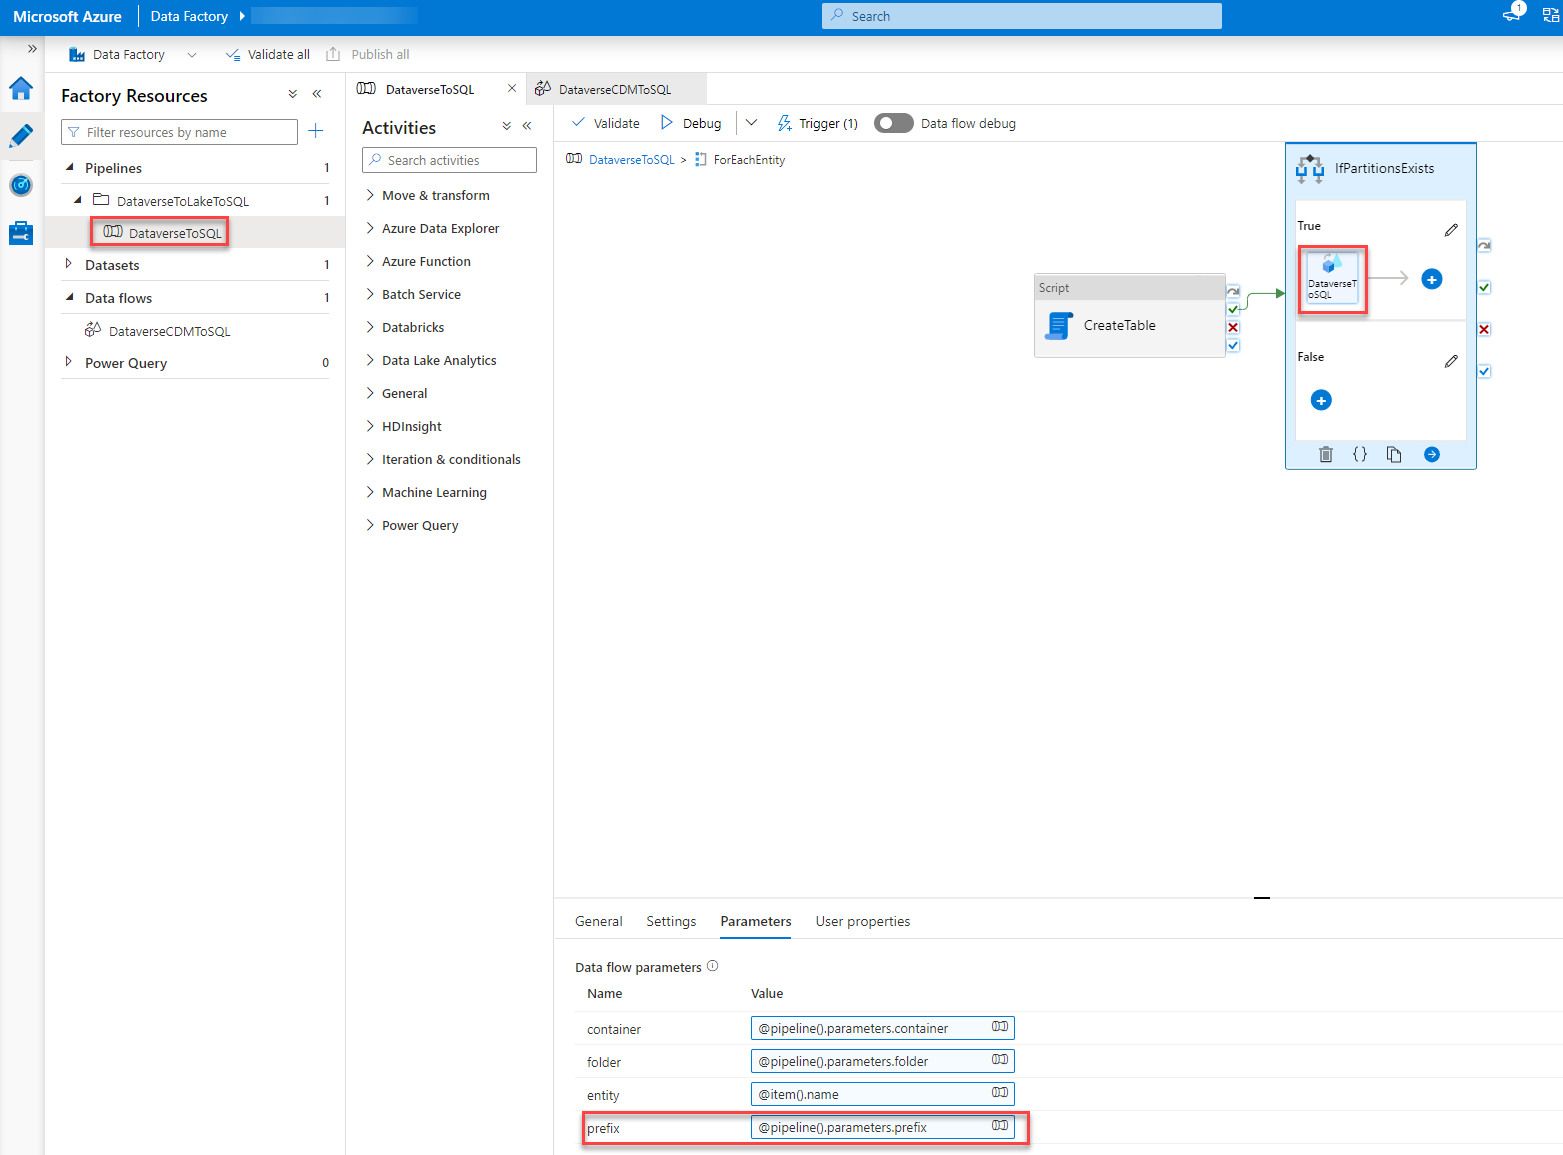
The third thing I changed is the CreateTable script we discussed while fixing the collation. I changed the second row to include the prefix
declare @entity nvarchar(200) = '@{pipeline().parameters.prefix}' + '@{item().name}';
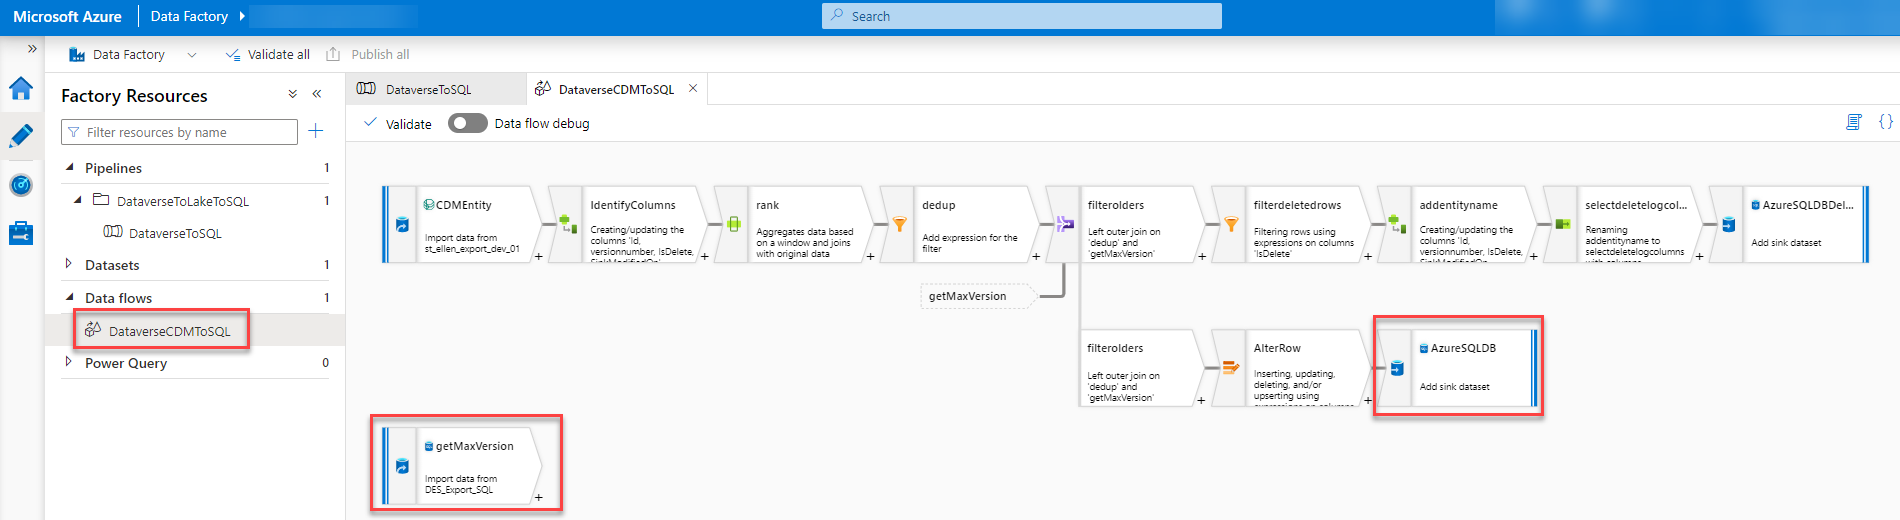
Data flow
The last part to change was the data flow. This part consists of different steps.
First, we have to add an additional parameter, prefix, to the Data flow as well.
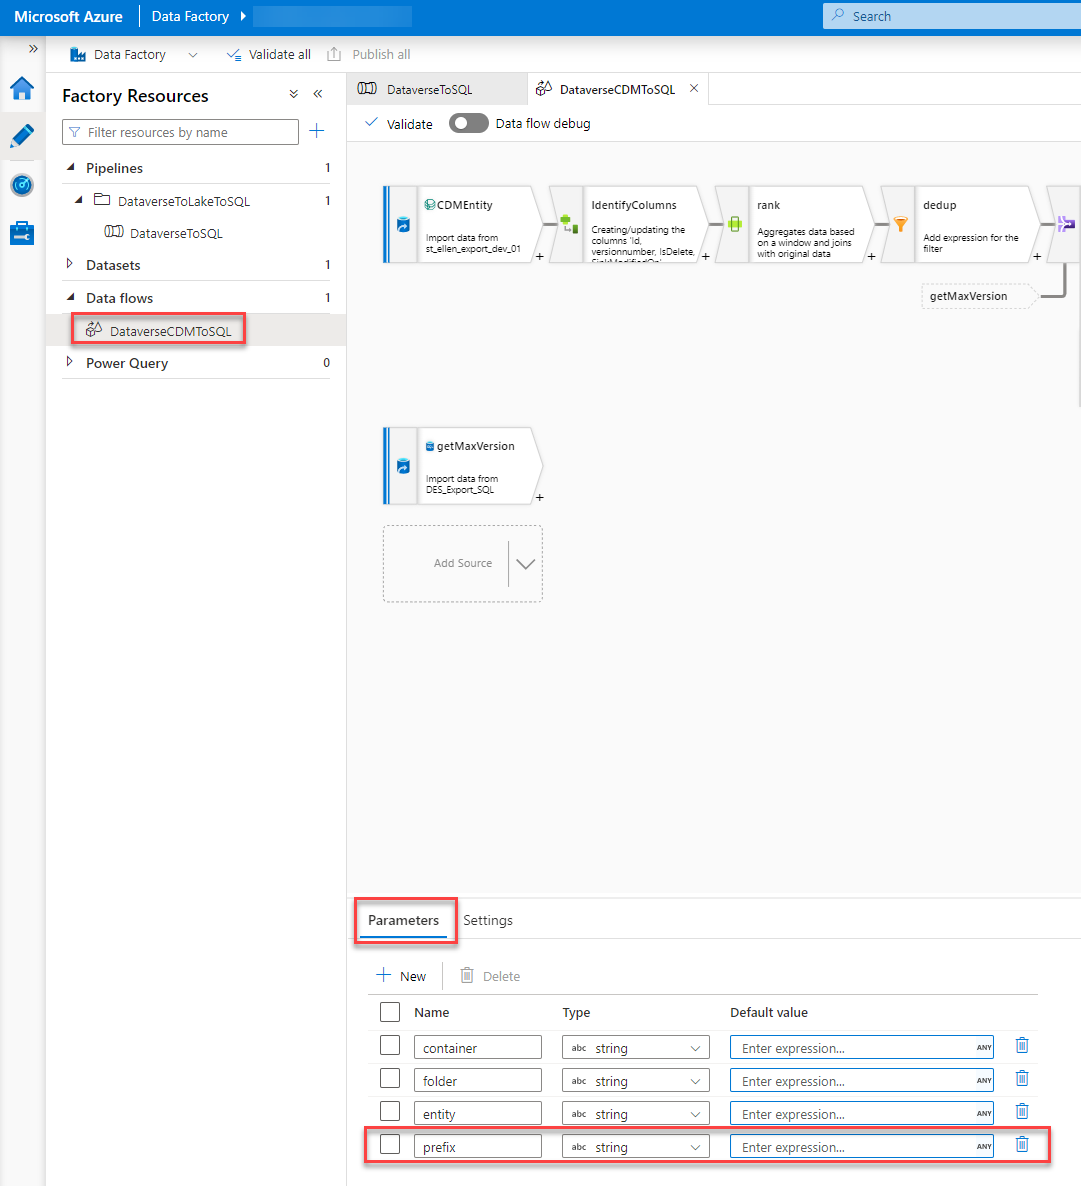
This parameter has to be used in two different steps within the Data Flow.
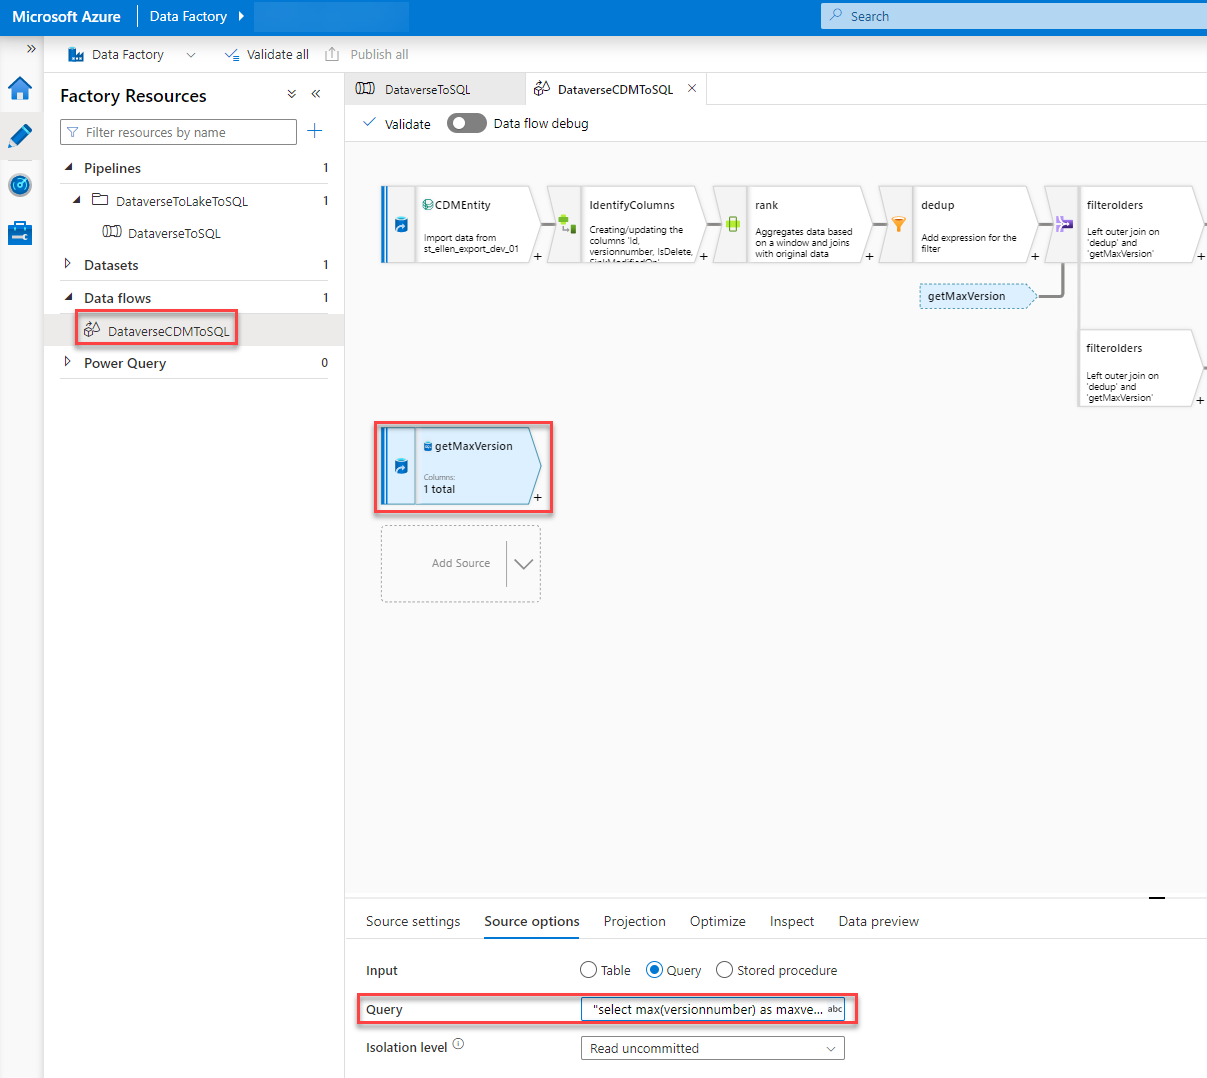
In the getMaxVersion step, we have to add the prefix at the end of the query so that the table we query on gets the correct name.
The Query should be like this.
"select max(versionnumber) as maxversion from dbo." + $prefix + $entity
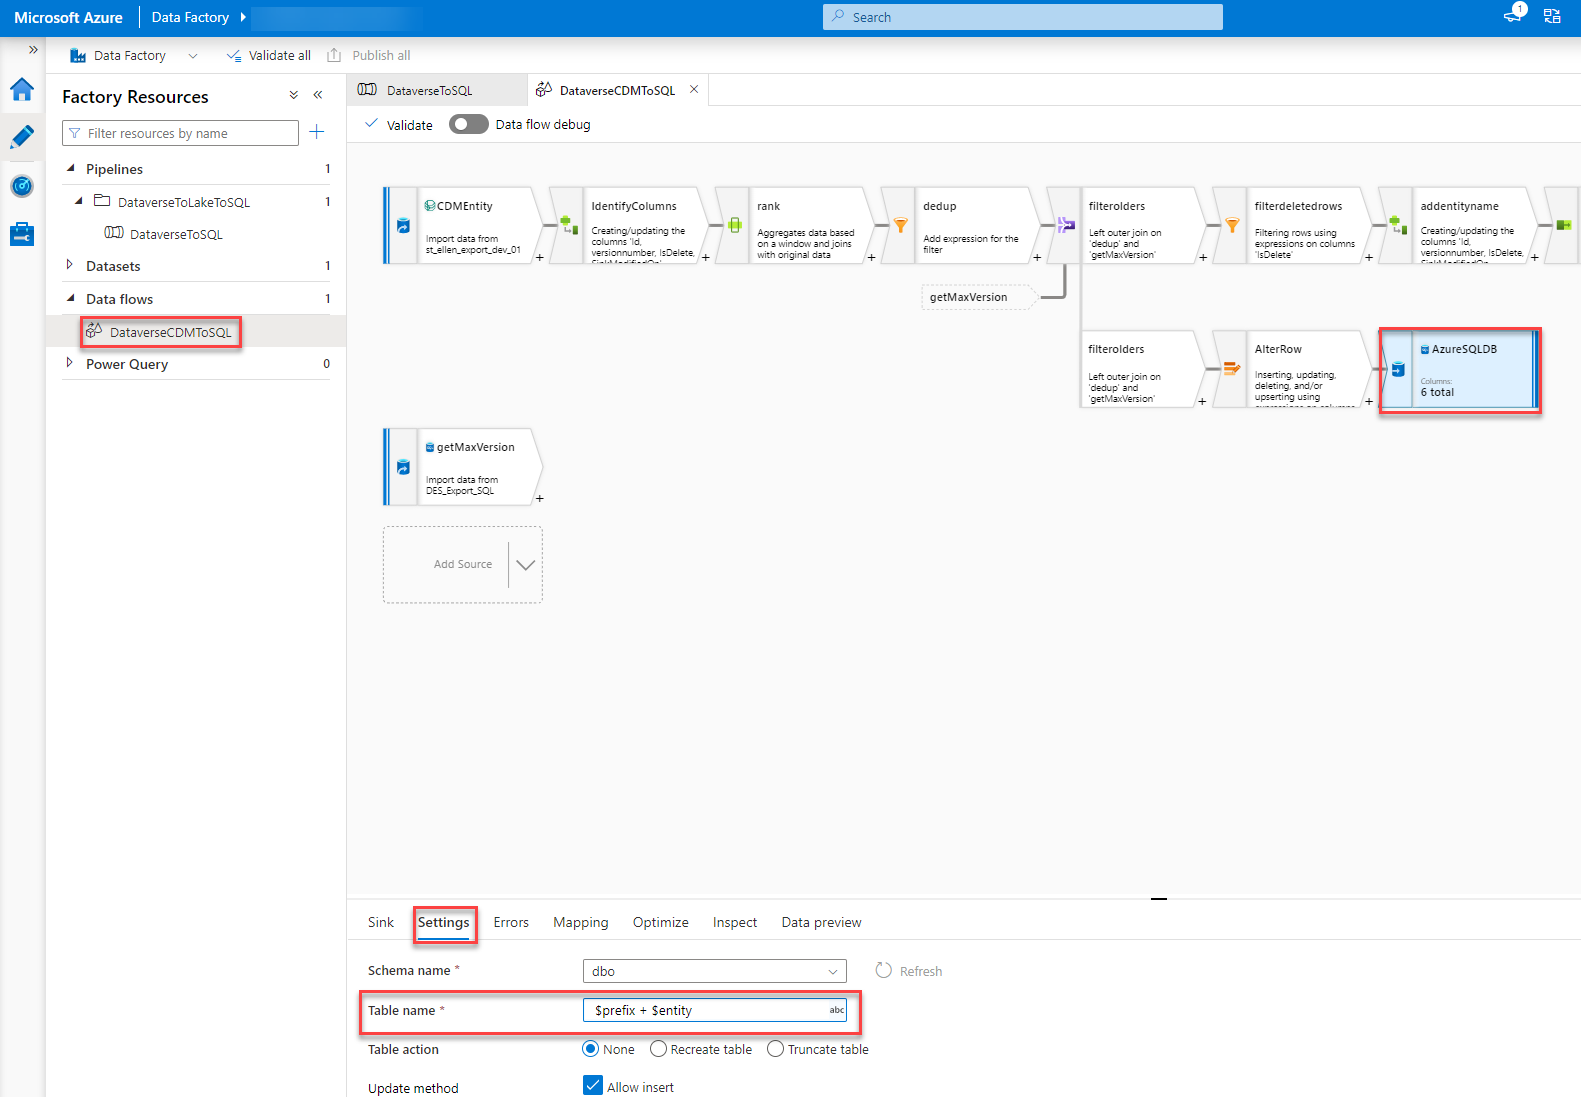
In the step called “AzureSQLDB” we have to add “$prefix + ” at the beginning of the “Table name” field under the Settings tab. This will, again, give the script the correct table name and honor the prefix we already have in the SQL.
Last but not least we have to set the parameter of the Data flow with the value of the parameter of the pipeline when the data flow is called.
To do so we go back to our pipeline, Dubbel click on the “ForEachEntity” and select the “DataverseToSQL” step (could be that you have to click it twice). In the Parameter tab, we add the following expression to the field of the prefix value.
@pipeline().parameters.prefix
Trigger
As mentioned I also had a problem with my trigger. The pipeline got triggered around 60 times every 15 mins. The Problem was me not reading the MS instructions correctly. It is important to add “/model.json” to the “Blob path ends with” field in the ADF pipeline Trigger.

The filter on the event in the Data Lake (also as described in the documentation) in combination with the above lets the pipeline trigger only once every sync timeframe.
Column Type
As I wrote earlier in this post the template from MS is changing the data type of some columns. In detail, it changes all “int” to “bigInt”. This is, in my opinion, the right thing to do since the value in Dataverse could exceed the max value of an int. It still can create problems in your integration. Since the intend of this setup was to leave the database as it is I changed the CreateTable script accordingly.
All you have to do is change line 31 of the script. It should be changed from “when ‘int64’ then ‘bigint'” to “when ‘int64’ then ‘int'”
In a future version, we will change it to BigInt.
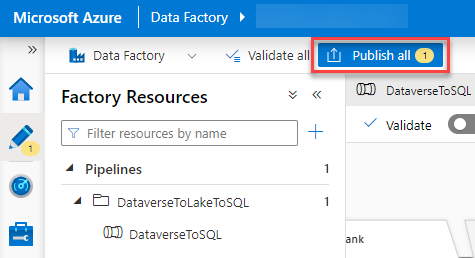
Publish
Now that we have made all the changes all that is left is to publish all our changes so that they get effective.
Conclusion
The new setup isn’t that hard to achieve if you know where the problems could be and how to mitigate those. Documentation on this topic is better than expected even though it is a bit hard to follow at times.
The Script which is delivered as part of the ADF template isn’t very optimal. There is a lot one could improve on it or even do differently. I might give an update when I had time to refactor it.
I hope this article was helpful. Please leave me a comment or contact me if you have any other questions or feedback.
You can also subscribe and get new blog posts emailed to you directly.
About The Author
Benedikt
Power Platform Consultant @ CRM Konsulterna
Great article but you didnt mention what the cause / fix was for the triggering 50 times ?
I did something similar but added the schema .
Glad you liked the article.
The trigger was fixed by adding “/model.json” to the “Blob path ends with” field in the ADF pipeline Trigger. As suggested/written in the MS documentation.
I will add a new paragraph explaining this as well.
Thanks for the feedback!
oh yes and dont forget the /
its important to note the experience also. I found that there is a delat before the data is sent from dataverse to datalake and then another delay before model.json is updated.
its also important to note that type of export when selecting the entities should be set to apend. I found that deletes were not actioned into the sql table if this was not the case.
Yeah, that is true.
The Link between Dataverse and the Data Lake (DL) works like this:
We assume it is configured to do an incremental update every 15 mins. The link will fill the folder of the current increment with all the updates. At the end of the interval (in my case after 15 mins) it creates the model.json and the folder of the new interval/increment. Then the process starts again.
That is why there is a delay between creation of new data and creation of the model.json.
Great article. Thanks Benedikt. I am waiting your DevOPs course. I hope soon you are going to announce.
Glad you liked it. It is in the final stage actually. We should release a proposal/service for this within 2022.
Thanks for sharing your solution, Benedikt. Can you share the total cost of the solution with these Azure services?
This is hard to tell. The major part of the costs (as far as I can tell today) comes from the ADF Pipeline. The cost of the ADF pipeline is calculated based on runs and runtime. So it depends on how often you sync and how much records are changed within a day.
We will soon implement this solution in test where the volume is more relatable and nearer to how it will be in prod. After that I hope to be able to give you a better answer to that.
I also talked to another member of our community. They have implemented a different solution to replace DES. We plan on doing a price comparison. So stay tuned.
Benedikt….. what was the other solution that you refer to, id be interested to read other approaches to replacing the DES
The other community member uses Azure Synapse Analytics instead of a DataLake (Synapse does use an DL under the hood as well though) and they are using Synapse Pipelines instead of ADF to move the stuff to the SQL.
There is also the idea of just using SQL to move the data. So basically having some trigger on the DL which sends stuff to stored procedures in the SQL and therefore skipping ADF. When I had time to test this I will write about it as well.
Great post!. I had also been through a very similar challenge, but came up with another alternative, one that completely bypass, the Synapse Link/Data Lake combo which may alleviate some of the latency and cost implications with this approach. I recently posted an article about his here link.medium.com/6zFQI5dw7tb. Id be interested to hear your thoughts.
Hej Ravi,
thanks for your reply.
I read through your article. The cost implication isn’t going to be affected by your approach. 99,9% of the cost of the solution I describe is the ADF pipeline. I would assume your approach runs even more pipelines which could increase the cost. I am rather certain that it won’t decrease it.
The latency question is a valid point though. It depends on how important that is. For Reporting, it shouldn’t be a problem to have a latency of around 30 min.
In addition, I would assume that your approach took way more time/cost to implement since it is a custom one.
Hi @Benedikt,
We are using Azure synapse pipeline template i.e Copy Dataverse data into Azure SQL using synapse link. In the trigger by adding “/model.json” to the “Blob path ends with” field in the ADF pipeline Trigger as suggested/written in the MS documentation. After continue, I dont see any matached blobs in the Event Trigger Filters window.
getting below note 0 blobs matched .
And my pipeline executing every one hour and trying to load all the data into Azure SQL instead of incremental data and it is running more than 10 hrs. each pipeline.
We have more than 10 million records in one entity. Can you please suggest where can change to take only incremental data?
Hej Anvesh,
have you set up the Synapse Link as the MS documentation I mention describes? This means with the incremental preview feature?
Hi Benedikt,
I setup synapse link as the MS documentation describes. I have selected AppendOnly and Year Partition.
Have you also activated the preview configuration by adding “?athena.folderSplit=true” to the URL?
Hello Benedikt,
Thanks for your post. Looking forward to hearing about using SQL instead of the ADF for the job. I assume it should be more cost-effective.
Also, could you please share your thoughts regarding using the virtual connectors feature for that matter?
Thanks,
Katrin
I have the incremental feeds working as documented. Each trigger from blob storage is for one folder from the trigger. I’m only getting the incremental changes.
The Data Lake has many other prior folders with incremental changes that I missed.
How do we go back and reseed the tables with all changes so that the tables in SQL are complete. I can manually trigger one by one but that seems wrong.
Hi,
Thanks for the article. I have a question. In my setup the amount of the initial snapshot is so high that I get second trigger fire in 15 mins while the first pipeline is still loading data. But it cannot run in parallel. Can you think of any remediation?
Hej,
Thanks for your comment.
In this setup, the part that usually runs the longest is the schema update part. You could increase the interval to for example 25 minutes which would decrease the times the schema is updated. Another option would be to skip the schema update part and only do that whenever you do a deployment (that is the only time where a schema could change basically).
I am facing issue in trigger. I created the trigger as mentioned in the documentation. When I put “/model.json” Blob path ends with and click next , there is no file matched. When I just put model.json, It shows my model.json plus all other model.json one per entity called Microsoft.Athena.Trickle feed.account.model.json etc.
However, when I go ahead and created the trigger, during run time it errors that Microsoft.Athena.Trickle feed.account.model.json does not exist.
Please advice why /model.json is not working . When you give Blob Ends with /model.json do you see only one model.json file
Hej Micky,
Have you setup the Synapse Link with the mentioned preview incremental feature?
Dear Everyone ,
Need help to resolve this issue , using ADF template to push the data from ADF storage to SQL DB , generated by Dataverse from Dynamics 365 as apendonly option but getting error for “Path: ‘OptionsetMetadata/OptionsetMetadata.csv’. ErrorCode: ‘PathNotFound’. Message: ‘The specified path does not exist.’. ” , please help , thanks
Hej Andy,
I got this error when I had setup a Lifecycle Management rule to delete stuff older than x days from my ADL. For now we have inactivated this.
Hi,
Similar to David, I had the same issue for the initial data transfer. I followed MS documentation strictly and my pipeline works for the incremental updates. However, the initial data that already exits in the Data Lake are never transfered to SQL Databse.
What’s worse, when I manually trigger the pipeline trying to sync initial data, I got errors in SetUpProcessingLog.
Do you have any suggestion? Thanks in advance!
Unfortunately, this behaviour is as expected. It only handles data from when the ADF Pipeline was setup. We already had the SQL setup from our previous DES implementation which meant we hadn’t had the need for the initial sync. What we did in test, though, was to delete the Synapse Link, erase the ADL, Setup the ADF pipeline and recreate the Synapse Link. This would trigger a full initial data sync.
To decrease the amount of data the pipeline has to process you could only activate parts of your tables and add more in chunks.
Great post. Really useful. Has anyone found that createdon dates are not pulling through to the SQL Database? I have recently set this up and notice whilst the data is pulling through it is leaving createdon as NULL.
Hej Natalie,
I have not experienced this behaviour. Unfortunately, I can’t assist you with this. Do you get any errors while syncing?
Hi Benedikt,
Any ideas to what could potentially cause the IfPartitionsExists to skip for folders that do in fact contain one or more CSVs?
I am running into an issue where not all tables are being inserted into. Debugging the data flow shows that, if the folder was to be included, all the steps would succeed accordingly and the SQL table would be inserted into.
This makes me think that, for some reason, the IfPartitionsExists step fails for that particular entity even though the folder does have CSV files.
Hej,
thanks for your comment.
I don’t think I have seen this error before.
Is the schema file created correctly?
Great blog – thanks.
Does the datafactory have to be in the same resource group as the storage account? I have seen some documentation which suggests this.
Hej Alex,
thanks.
As far as I know that should not be a problem and it should be possible to connect a Data Factory to a Sotrage Account in a different Resource Group.
Hi benedickt,
My pipeline is working correctly for building the schema for the tables to the azure sql db but it is not filling it with the data rows. I can see that new incremental change csv files are landing in the data lake container in files. However, the model.json file is not updated in the partitions fields for the entities even if they have updates that landed in the datalake. Do you have any suggestions for how to fix this?
Hej Tee,
I haven’t had that problem. Do you use the pipeline template from MS or have you build your own?
Hi Benedikt
Thanks for the detailed documentation. I have all setup and running smoothly but records export is limited to 10 mil. I have couple of tables have more than 10 min like InventDim, Accounting tabels.
I checked all the DF jobs settings and i dont see any limitation setup. Also, when i query directly on the Web on Syapse DB (SQL query), i can get more than 10 mil count.
Do you have any insight on this? Any help is appreciated.
Thanks
Murali
Hi Benedikt,
Sometimes Json file induces Create table object to do an alter table – ususally is changing from nvarchar 100 to 20 – which takes almost 2 hours to run. On the next run changes back to 100 and it takes 2 mins as expected.
Is OK to disable create table object if I dont have need to add new tables?
Thanks,
Marco
I neither experience this nor tested to disable it.
If you don’t add new tables I would say it is okay do disable