How to call Xrm.WebApi using TypeScript
A lot of projects come to a point where it gets necessary to get information from another entity within JavaScript (JS)/TypeScript (TS) to act on those in some way.
There are different ways of achieving this. Some of those are sync calls, which should not be used.
In this post, I will describe how to get this information in a proper way using the Xrm.WebAPI, TypeScript and async processing.
If you would like to skip the explanation and come directly to the functions, please follow this link.
Why Typescript?
Let’s take a minute and talk about this question first.
I do see two big advantages of using TypeScript over vanilla JavaScript
It’s strongly typed
Since TypeScript is strongly typed the job of writing it gets a lot easier. If you use a proper IDE (Visual Studio Code for example) it will show you type errors while developing.
It’s backward compatible
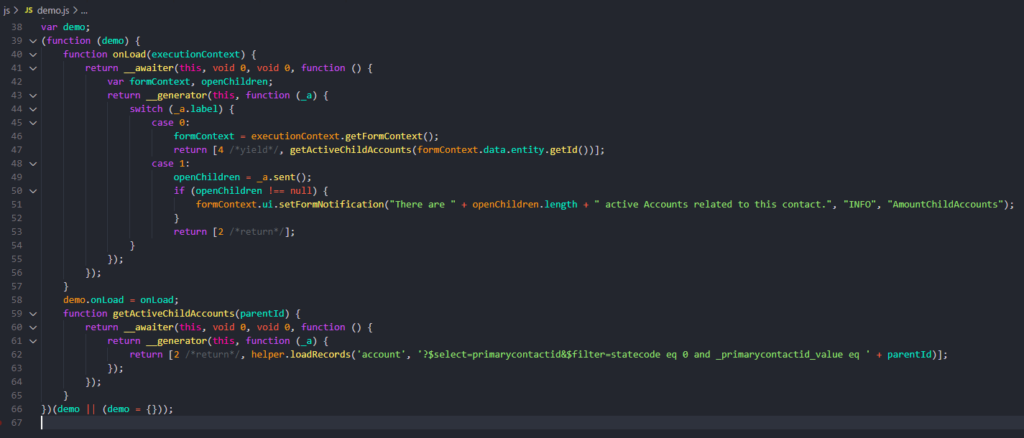
In the end, TypeScript has to be transpiled/compiled to JavaScript. This could, for example, be done via the “tsc” command, which will transpile the TS file to the configured target ECMAScript version (ECMAScript is a standard to define JavaScript. You can read more about that here as well as about the browser support here). With the ability to target different/older versions of the standard the TS will get automatically transpiled into a JS file that is compatible with older browser versions. This means one can write readable code without thinking about compatibility. When transpiled it gets something that is compatible. Of course, it’s not always that easy. In the screenshot below you can see a part of our transpiled demo file.
Basically, every Dynamics 365/CDS project should write the FrontEnd customizations in TypeScript.
Sync/Async
All the requests to the Xrm.WebAPI are async. The reason for that a sync request would block the UI and make the UX a lot less smooth and nice.
I don’t really see a scenario where calls have to be synchronous, besides to prevent the save of a form. But as the documentation of the OnSave Event mentions: If there is the need of getting data from another entity (or basically any information that is not present on the form itself) to decide whether to save or not, this decision/prevention should be in a Plugin or Workflow. The reason is that the OnSave Event is synchronous, which could lead to weird behaviour if try to prevent the save asynchronous.
There are several ways of doing API calls sync. For example, one could make a manual XMLHttpRequest.
var req = new XMLHttpRequest();
req.open("POST", encodeURI(getWebAPIPath() + entitySetName), false);
As mentioned earlier this will block the UI and therefore should not be used. There is a reason why the Xrm.WebAPI is only asynchrony.
Scenario
For this demo we try to implement the following simple scenario:
We would like to show a notification on the contact form if the contact is configured as the “primary contact” on at least one active Account.
As you can see, this might not be a real-world requirement, but we can demonstrate how to get this kind of information from the Xrm.WebAPI.
Solution
The solution will be to wrap the call to the WebAPI into a promise and await that in the calling function.
Since the WebAPI itself will return promises those could be awaited directly. It is a “best practice” to wrap them in a own function though. This is mainly to have one place to change if you have to change something for all the calls to the API. In addition to that one might would like to handle the response of the API in a certain/harmonised way.
One could also use the “then()” function of a promise to execute certain code after the promise was resolved. I find await easier to read and debug, especially if you would like to have several requests in sequence. With the “then” method this will result in nested calls, that aren’t easy to read.
Project
Before we can start we have to create our TypeScript project. Todo so we execute the following steps.
Create folder
We have to create a folder, that will hold our files. For the demo, I will call it “TSDemo”.
Open in VS Code
After creating the folder we will open it in VS Code. You could, for example, open the folder in Windows Explorer, write “cmd” in the “Address bar” and write “code .” in the cmd that opened.
npm init
In VS Code we open the Terminal and write “npm init” in there. This will guide you through some questions and create a “package.json” file.
npm init
Install TypeScript
Next step is to install TypeScript. This could be done globally
npm install -g typescript
or locally in the current folder.
npm install typescript --save-dev
Install Node types
After that we have to install node types
npm install @types/node --save-dev
Install XRM types
We also need the CRM types. Those can be installed with the following command.
npm install @types/xrm --save-dev
Init tsc
The last step in the terminal is to init the tsc command. This will create a tsconfig.json. In that file, one could configure how the transpiler behave. For example, one could define the target ECMAScript version here.
tsc --init
The created tsconfig.json should look something like the following (just with a lot more comments)
{
"compilerOptions": {
/* Visit https://aka.ms/tsconfig.json to read more about this file */
/* Basic Options */
"target": "es5",
"module": "commonjs",
/* Strict Type-Checking Options */
"strict": true,
"esModuleInterop": true,
/* Advanced Options */
"skipLibCheck": true,
"forceConsistentCasingInFileNames": true
}
}
Create folders
For the demo, we will create a “js” and a “ts” folder. the “ts” folder will hold our ts files and the “js” folder will contain the transpiled js files, that should be deployed to Dynamics/CDS.
Change tsconfig
We will add two more things to the config. The first thing is that we would like to have the created JS-files in the js folder, to do that we will add (or comment out) the “outDir” config and set it to “js”. In addition to that, we would like to include all the files we have in the ts folder, so that we just can run “tsc” without specifying which file to transpile. That can be done by adding an additional row at the end of the file. Below is the updated tsconfig.json.
{
"compilerOptions": {
/* Visit https://aka.ms/tsconfig.json to read more about this file */
/* Basic Options */
"target": "es5",
"module": "commonjs",
"outDir": "js",
/* Strict Type-Checking Options */
"strict": true,
"esModuleInterop": true,
/* Advanced Options */
"skipLibCheck": true,
"forceConsistentCasingInFileNames": true
},
"include": ["./ts/**/*"]
}
Obviously this is a very basic project. If you would like to use TypeScript in your project you should also take a look at other stuff like webpack or babel, as well as TypeScript testing with for example jest and some mocking framework for xrm.
Functions
Lets come to the fun part and create our functions. The files we create will have own namespaces (helper and demo). This makes our custom development more “secure”. If you do not have namespaces and two files define the same function (onLoad for example) the file that will get loaded last will override the previous function(s). This usually results in unpredictable behavior. With namespaces this should not happen (if you do not have the same namespace twice).
Helper
As mentioned earlier I tend to have a “helper” function that will execute the request to the Xrm.WebAPI and is used by all the actual functions.
For this demo we will implement a function called “loadRecords”, that will wrap the retrieveMultipleRecords request to the API.
Parameters
The function will take the following parameters.
entityName
Should contain the logical name of the entity one would like to load.
query
Should contain the query one would like to execute against the WebAPI. Read more about the query in the MS docs of the retrieveMultipleRecords request.
maxPageSize
Should contain the maximal page size one would like to receive. It’s an optional prameter.
errorCallback
A function that will be called when an error occurs. The function has to take one parameter itself. This parameter is optional.
Logic
The function will call the WebAPI and respond the list of entities if they are present, if not it will respond with “null”. When an error occurs it will call the errorCallback function if present.
Here is the complete TypeScript of the helper file
namespace helper {
export async function loadRecords(entityName: string, query: string, maxPageSize?: number, errorCallback?: (error: any) => void): Promise<any[] | null> {
return new Promise<any>((resolve, reject) => {
Xrm.WebApi.online.retrieveMultipleRecords(entityName, query, maxPageSize).then(
function success(result){
if(result !== null && result !== undefined && result.entities !== null && result.entities.length >= 1){
resolve(result.entities);
} else {
resolve(null);
}
},
function (error){
if(errorCallback !== null && errorCallback !== undefined){
errorCallback(error);
reject();
}
}
);
});
}
}
If you are not using webpack or something similar to pack all your files together in one the helper.js file needs to be added as a library to all the forms where you use functions from it.
OnLoad
In a separate file (called promisedemo.ts in my case) I will create two functions.
getActiveChildAccounts
This function is basically a one-liner. It takes the parentId (in our case the contact we are on) and returns a call to our helper function with the correct query. One could do it without this function (by calling the helper function directly) but I like to have it separated. It makes it easier to read, debug and reusable.
onLoad
Here we do our “real” work. The following steps will be executed
- Get the FormContext from the EventContext
- await the getActiveChildAccounts
- Create a notification if there are children.
Here is the complete TS of the promisedemo.ts file
namespace demo{
export async function onLoad(executionContext: Xrm.Events.EventContext){
var formContext = executionContext.getFormContext();
var openChildren = await getActiveChildAccounts(formContext.data.entity.getId());
if(openChildren !== null){
formContext.ui.setFormNotification("There are " + openChildren.length + " active Accounts related to this contact.", "INFO", "AmountChildAccounts")
}
}
async function getActiveChildAccounts(parentId: string): Promise<any[] | null> {
return helper.loadRecords('account', '?$select=primarycontactid&$filter=statecode eq 0 and _primarycontactid_value eq ' + parentId);
}
}
Transpile/compile
Now we have to write “tsc” in the terminal of Visual Studio Code. This will generate both a “promisedemo.js” and a “helper.js” in our js folder.
Dynamics
To get this working we have to add it to Dynamics as well.
Deploy
We need to deploy the js files that where just created by the tsc command to dynamics. I created two webresources for that:
- promisedemo.js
- helper.js
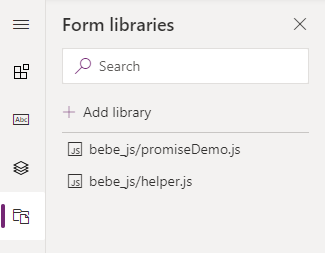
Form
On the form where you would like to add the notification, you have to add both of the files as libraries.
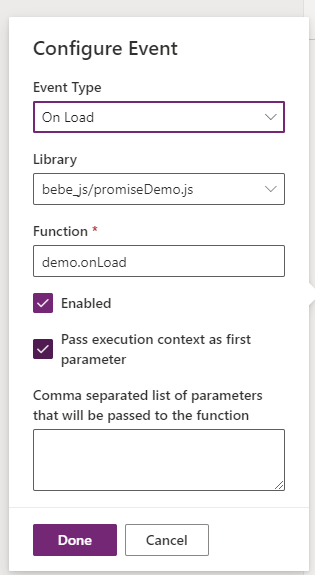
The last step is to add the function to the onLoad event. Bear in mind that we do have namespaces. This means the functions name is “demo.onLoad”.
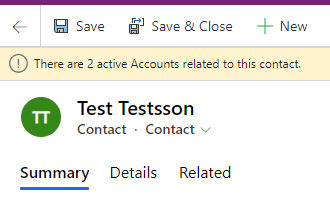
Result
The result of this function is a small notification at the top of an contact form when the person is registered as the primary contact of at least one active account.
Conclusion
TypeScript makes it much easier to develop backward compatible JavaScript.
If one knows how sync and async works it is not very complicated to request the API in a proper way even if you need several request in a certain sequence.
I hope this article helped you. Feel free to contact me if you have any questions. I am always happy to help.
You can also subscribe and get new blog posts emailed to you directly.
About The Author
Benedikt
Power Platform Consultant @ CRM Konsulterna
Consider using the WebResource Manager in the XrmToolBox to upload the js file since it will also upload the TS and map files.
Thanks for the comment Daryl. I have used it a few times.
Usually, I use Fiddler while developing. Only if I am ready with something I push it to the environment. Either through Spkl or directly through a DevOps pipeline.
I don’t like to have the map files in Dataverse since only developers need them. I know that they only get loaded when someone has the Developer Tools open but still.
One question regarding this: What’s the reason to have the TS in Dataverse?
This post is great! Is there any way you could possibly do a similar post for adding webpack? I have typically written JS for the CRM/CDS solutions. After getting into the PCF components about a year ago, I love TypeScript and would really like to start using it in the CRM/CDS projects; however, I can’t seem to find a good model or guide for implementing Webpack for something like CRM/CDS solutions. (Where each client-form is really it’s own “single page app”… so we would potentially need to make multiple bundles instead of just one.).
Hej Ryan,
glad you liked the post.
Have you seen my post on how to set up a TypeScript project as well as adding React to the project?
Those might be helpful for you. Please let me know if you have any further questions. If they don’t help I can absolutely create another post.
//Benedikt
Perfect! Thank you. I hadn’t seen that post. I will check it out!
Thanks for the posts and helping me to understand using Typescript for model driven apps. However, I have been trying to debug my Typescript files in the Edge devtools as opposed to the transpiled JavaScript files. I have been unable to do this since neither the source map files nor the Typescript files themselves can be added to the Web resources folder.
If you were able to help out on how to achieve this, you would really be helping me out!
Thanks
Hej Marc,
sorry for my late response.
Theoretically, source map files could be deployed to the web resources. They would only get loaded when someone is debugging. Which means it doesn’t harm doing so. Still, I don’t do it and I recommend doing it. The reason is that I personally don’t like having files in my solution which are only there for debugging purposes.
I usually use Fiddler to inject my JS files while developing. When set up correctly it will also inject .map files. I wrote another blog post about this
https://benediktbergmann.eu/2021/01/21/use-fiddler-to-serve-a-local-version-of-webresources/