Fill Excel using Power Automate and Office Script
Över two years ago I wrote about how to “create and fill an Excel file dynamically using Power Automate“. I recently had a similar use case again. I discovered Office Script (Thanks to Tomasz Poszytek (LinkedIn, Twitter, Blog) for mentioning it to me), which I found to be a much easier way of manipulating Excel fills than doing everything in Power Automate. Therefore I decided to recreate the use case of my previous post using Office Script.
What is Office Script?
Office Script is basically a TypeScript snipped which can be run against any Excel file. There are some specific functions one can use, which makes Office Script technically a superset of TypeScript.
It is only available in Excel online, which means your file has to be stored in SharePoint Online or OneDrive.
Scenario
Let me remind you of the given scenario.
Let’s assume AB Company is using Dynamics 365 for Marketing and manages events within this module. The handling of Dynamics is centralized and not every event Organizer has access to the system.
Since it is crucial for the event Organizers to have a correct list of persons that have registered (and therefore will participate) one must send this information to the Organizer.
For this article, I have created custom tables (organization, Demo Event and Demo Attendee). You could also use the tables of the Marketing Event management module. Which I did in the first article.
Solution
The idea is to create a template excel file that will be stored on SharePoint. Within the template, we will create a table that will be used by the script. We then copy that file in SharePoint and fill it with the needed data by running the created script.
Our flow will execute the following steps whenever it is executed.
- Load the content of our template file
- Load Event Name
- Create a file in SharePoint with the content of the template file
- Load all Event Registrations
- Generate an array with all the event registrations
- Run the script and pass in the array
- Get the content of the file
- Send an email with the file as an attachment
We will store the file in SharePoint and use the “Excel Online (Business)” connector to execute the script.
Implementation
Let’s see how we implement this solution.
Template
We will use the exact same template as we used in the first post.
To create it we open excel and add the names of the desired columns. For this demo we choose:
- Name
- Role
The second step is to add a table to the file. We go to Insert –> Table, in the popup we check the box beside “My table has headers” and press “OK”.
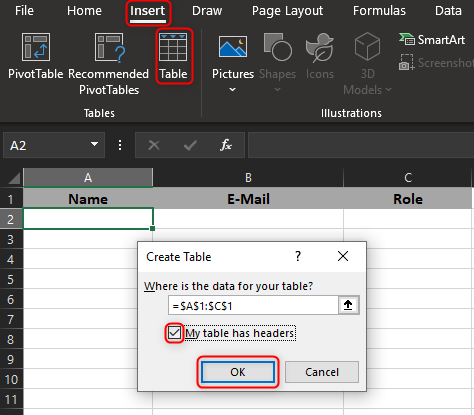
The last step within Excel is to configure a proper name for our table. Unter the tab “Table Design” you will find “Table Name” on the far-left side. We will name it “EventRegistrations”.

We will now upload the file to the SharePoint site.
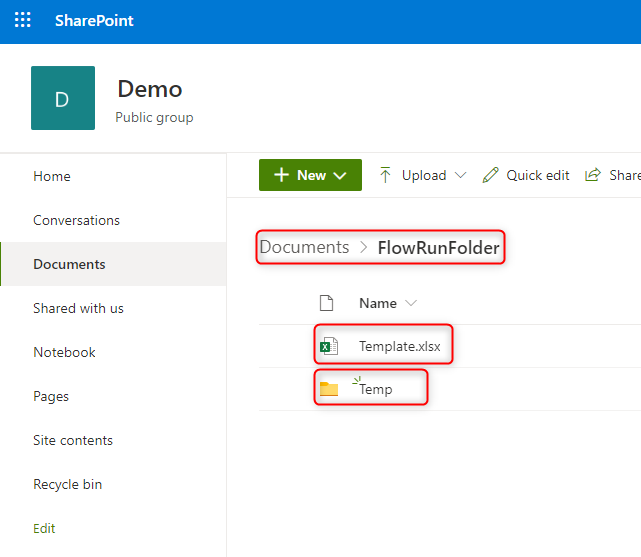
As you can see, we have created a folder “FlowRunFolder” within the root folder. Here we can find a “Temp” folder that will hold the files that the flow is creating.
Office Script
Next, we have to create our office script. It will take an array as the input and add every row to the table, which we expect to be there.
With Office Script you could also create the table on the fly. This would make the script a bit more complex though.
Unfortunately, there is no possibility (as of my knowledge) to debug an Office Script other than writing stuff to the console.log.
We open the Template in excel online by clicking it in SharePoint.
In Excel online we navigate to “Automate” –> “All Scripts”. A pane on the right-hand side will open. As you can see on the next screenshot it will either show a list of already present scripts or you have to select “New script”.
If you create a new script it will be a blank function which only expects the workbook to be presented.
We will add some parameters to the function. When the script is run via Power Automate those have to be presented (we will see this in the next chapter). While running in excel online they always will be “undefined”. Therefore we will add some dummy or default values to make development easier.
The following is the script we will use. I will explain it more or less line by line in this chapter.
function main(workbook: ExcelScript.Workbook, sheetName: string, tableName: string, jsonData: attendee[]) {
if (jsonData == undefined || jsonData == null) {
console.log("jsonData empty. Using dummy data.");
jsonData = dummyData;
}
if (sheetName == undefined || sheetName == null) {
console.log("sheet empty. Using default sheetname.");
sheetName = "Sheet1";
}
if (tableName == undefined || tableName == null) {
console.log("tableName empty. Using default tableName.");
tableName = "EventRegistrations";
}
const worksheet = workbook.getWorksheet(sheetName);
if (worksheet) {
// Switch to the "Data" worksheet.
worksheet.activate();
const table = worksheet.getTable(tableName);
const tblRange = table.getRangeBetweenHeaderAndTotal();
let firstEmptyRow = 1;
const rowsToAdd = jsonData.map(at => convertDataToRow(at));
table.addRows(firstEmptyRow, rowsToAdd);
} else {
console.log(`No worksheet named "${sheetName}" in this workbook.`);
}
}
/*----------------------- Helper Function ---------------------------*/
function convertDataToRow(at: attendee): (string | number)[] {
const array: (string | number)[] = [];
array.push(at.Name);
array.push(at.Email);
array.push(at.Role);
return array;
}
/*----------------------- Object Interface ---------------------------*/
interface attendee {
Name: string,
Email: string,
Role: string
}
/*----------------------- Dummy Data ---------------------------*/
const dummyData: attendee[] = [
{
Name: "Benedikt Bergmann",
Email: "benedikt@benediktbergmann.eu",
Role: "Speaker"
},
{
Name: "Max Mustermann",
Email: "test@test.de",
Role: "Attendee"
},
{
Name: "Inga Musterfrau",
Email: "test2@test.de",
Role: "Attendee"
}
];
Helper & interface
At the end of the script (Lines 30 to 62), we do have one helper function, an interface and a dummy data declaration.
The interface defines how the object we expect and use is structured. In our case we expect it to contain Name, Email and Role.
The helper function, convertDataToRow, takes a single object instance of our interface and transforms it into a row array so that the excel specific TypeScript can understand it and add the row to the excel.
The dummy Data is only used when the script is run in excel online.
Function
Let’s look at the actual function.
Function declaration
We begin with its declaration at the beginning of the script. In addition to the workbook, which always has to be there, we also expect a string “sheetName”, a string “tableName” and an attendee array jsonData.
The first two will later be used to open the correct table in case there are several sheets and tables within the excel file. The last one is the actual array of data we would like to add to the excel.
Null check
The next couple of lines (2-13 to be precise) do check whether the parameters are presented. They will, as mentioned, be undefined when the script is run within Excel online. That is the reason why I set defaults and dummy data. It makes development much easier since you are able to run the script directly in excel online without running any flow.
Select Worksheet and Table
Lines 15 – 19 do select the worksheet and the table. Both are identified by the presented names.
Next up (Line 20) is to select the range of the table and set the id of the first row (Line 21).
Be aware that TypeScript handles arrays as zero-based whereas excel uses one-based syntax. That is why we select the first empty row as 1 whereas in excel it is the second row.
The same applies to calculations you might add to your script.
Add Rows
The last step is to add the rows we got in our jsonData parameter. To do that we do a map on the input data and send every row to our helper function “convertDataToRow”. The newly created “rows array” will then be added to the table.
That’s basically it for the script. As you can imagine this example is very basic. You can do a whole lot more with Office Script. You can change formation, create calculations, add rows between existing rows and much more.
Naming & Save
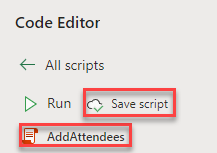
You can change the name of the script by clicking beside the little red icon underneath “Run”.
You have to save the script, by pressing “Save script” before you can use it.
Flow
Next up we have to build the flow which generates our file. It is very similar to the flow in the first article. Only the actual data-adding part is different. We also don’t need to have a delay for the excel row addition to complete as well as we don’t need to query the Graph API. Which makes the flow already a lot easier.
Trigger
For the ease of this article, we will use the “When a record is selected” trigger of the Microsoft Dataverse (legacy) connector.
Please notice that this trigger is only available in the Common Data Service connector and not within the Common Data Service (current environment) connector.
Please also notice that you should never rename this step. If you do it will/might not appear in the model-driven app.
Environment
As the Environment we will choose “Default”.
Note: The UI is misleading here. Even if you choose “Default” as the environment the Connector will go against the current environment.
Entity Name
Here we choose “Demo Events”
Steps
Let’s dive into the steps of our flow.
Load content of Template
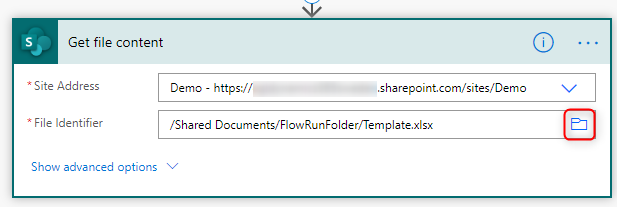
We will use the “Get file content” action of the SharePoint connector.
Here we first have to choose the Site we would like to use and then we can pick the file by using the little folder icon on the right.
Load Event Name
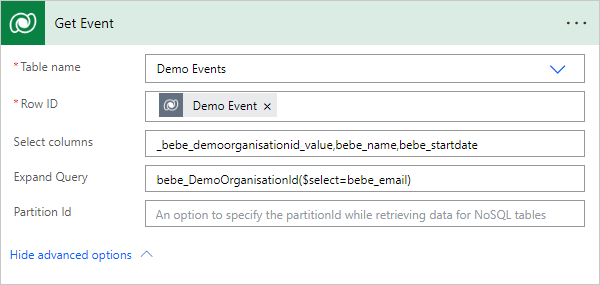
To load the event name we use the “Get a record” action of the Microsoft Dataverse connector.
Table name
As the Table we choose “Demo Events”
Item ID
The Item ID is the Demo Event Unique identifier from the trigger
Select Query
We select the Event name (“bebe_name”), the start date (“bebe_startdate”), the related Organisation (“bebe_demoorganisationid”), as well as the email field (“bebe_email”) on the organisation where we should send the mail.
Create file
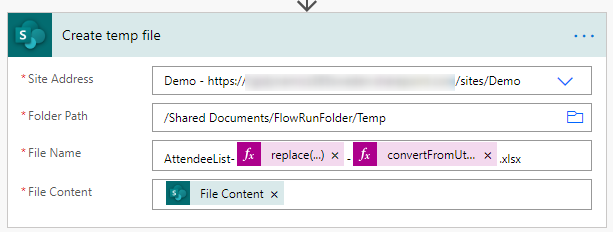
To create the temporary file, we will use the “Create file” action of the SharePoint connector.
Site Address
You choose the SharePoint site you would like to use for the temporary file.
Folder Path
Here you choose the folder you would like to store the temporary files in, by using the folder icon on the right.
File Name
In this field, you can decide on the file name (including the ending, in our case “xlsx”). We will use a combination of “AttendeeList”, Event Name, and current Date and Time. All the spaces in the event name we replace with “_”. The Date will be in the format “yyyy-MM-dd_HH-mm-ss”. See the forms below
replace(outputs('Get_Event')?['body/msevtmgt_name'], ' ', '_')
convertFromUtc(utcNow(), 'W. Europe Standard Time', 'yyyy-MM-dd_HH-mm-ss')
File Content
The file content is the output of the previous step.
Load Event Registrations
To load all Event Registrations, we will use the “List Records” action of the Dataverse connector.
Table name
We do select “Demo Attendees” as the table.
Select Query
We would like to include the Role and contact in our list. Therefore we select the role and the contact field
bebe_role,_bebe_contactid_value
Filter Query
To get only those Demo attendees that are related to the Event we handle we will filter on the event ID (which comes from the trigger). Since we have an expand query on the contact we would like to make sure that this field is present as well.
(_bebe_demoeventid_value eq @{triggerBody()?['entity']?['bebe_demoeventid']}) and (bebe_ContactId/contactid ne null)
Expand Query
In the Excel we would like to include the fullname and email of the contact. Therefore we add an expand query to fetch those information.
bebe_ContactId($select=emailaddress1,fullname)
Creating all the queries can easily be done with the FetchXML Builder from Jonas Rapp.
Variable
To store the data we will send to our script we will initialize a variable, AttendeeList, of type array.
Variables need to be initialized before they can be used. The initialization of variables can only be done on the root level of a flow.
Loop
We have to execute the next two steps for every Demo attendee we fetched. Therefore we will add an “Apply to each” action.
Input
As the input we select the output of the list Event Registrations step
Compose row
Our script expects an array of “Attendees” in JSON format. We will use the build in “Compose” action. to create an object which will be added to the variable in the next step.
This step should be within the loop.
Input
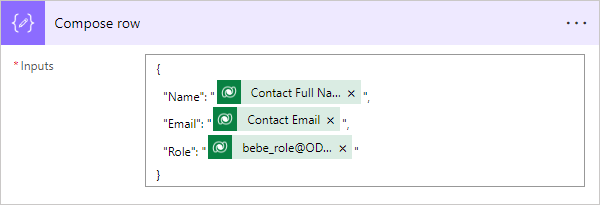
The Input of this action is a JSON object that represents an attendee. Every Column should be present and referenced by the name we used in our interface in the script. For the demo, those are “Name”, “EMail” and “Role”. The schema is
"<Column Name>":"<value>"
Name and Email are from the contact and can be selected from our List Event Registration straight away. The Role is an OptionSet. Here we would like to select the label and not the value (that means Attendee and not a number that no one understands). Use the following expression to achieve this
items('For_all_Event_Registrations')?['bebe_role@OData.Community.Display.V1.FormattedValue']
{
"Name": "@{items('For_all_Event_Registrations')?['bebe_contactid/fullname']}",
"Email": "@{items('For_all_Event_Registrations')?['bebe_contactid/emailaddress1']}",
"Role": "@{items('For_all_Event_Registrations')?['bebe_role@OData.Community.Display.V1.FormattedValue']}"
}
Append row to variable
We have to append the row we just created to our variable. We use the “Append to Array” step within Power Automate.
This step should be within the loop.
Name
Here we select our “AttendeeList” variable
Value
The value is the output of the previous compose step.
Add row to Excel
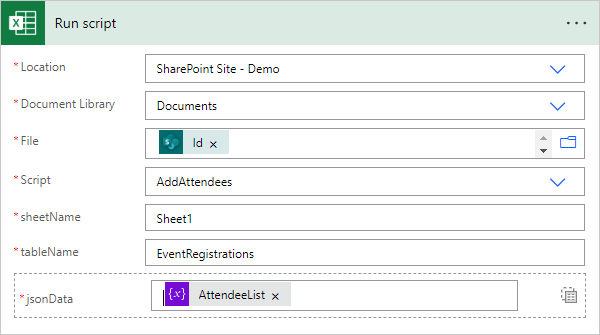
We will use the “Run Script” action of the Excel online connector.
Location
As the location we select the SharePoint Site we used earlier.
Document Library
The document library is in our case “Documents”, which is often the case.
File
Here we will use the Id we get as an output from the step which created our temp file.
Script
We select our script from the dropdown. All the following parameters are based on what the script expects us to input.
sheetName
The name of the sheet the script should use. In this demo “Sheet1”
tableName
The name of the table within excel the script should use. In this demo “EventRegistration”.
jsonData
This is the actual data which will be added. Therefore we will just send in the array variable.
Power Automate lets you either add one array (as in the screenshot) or manually multiple lines. It might be the case that you have to switch between those views by using the little icon on the right side beside the jsonData input.
Load file content
To be able to send out the file as an attachment we have to load the content of the file we created and filled. We use the same action as we used earlier, “Get file content”.
Site Address
This should be the same SharePoint Site we used everywhere earlier.
File Identifier
Here we will use the Id we get as an output from the step which created our temp file.
outputs('Create_temp_file')?['body/Id']
Send email
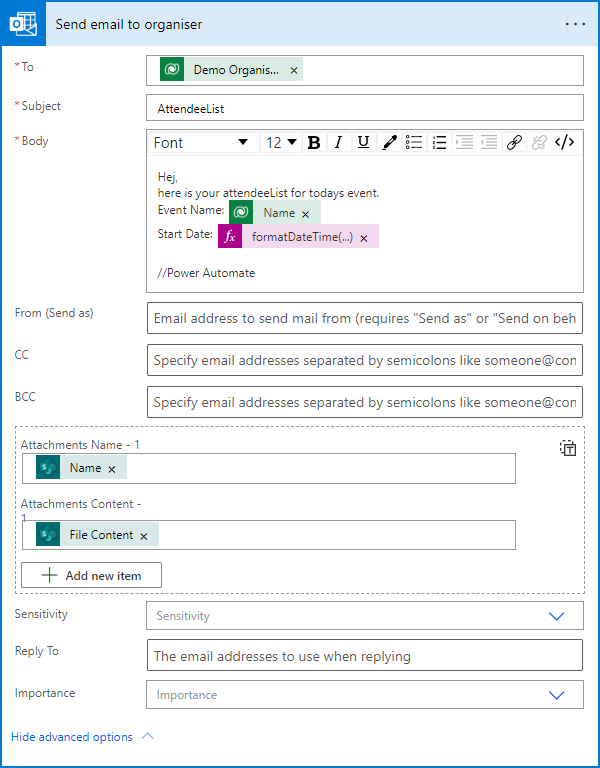
The last step is to send an email with the file attached. Here you could use whatever email connector you would like to (for example google). For this demo, we will use the “Send an email (V2)” action of the Office 365 Outlook connector.
To
As the recipient we choose the value of the custom field we created on the Event Entity and fetched with our event data.
outputs('Get_Event')?['body/???_email']
Subject
Choose whatever subject you would like. I have included the Event name.
Body
Write a text that should be included in the mail. I have as well included the Event Name.
Attachments Name – 1
Here we choose the Name of the file we created. This is the output of the “create” step.
outputs('Create_temp_file')?['body/Name']
Attachments Content – 1
Here we choose the output of the previous step that has fetched the file content.
outputs('Get_content_of_temp_file')?['body']
Complete flow
Here is a screenshot of the complete flow
There are obviously several things that could be improved in this demo flow.
- Delete temp file
- Check if there are Event Registrations and terminate if not
- Recurrent trigger
- Error handling
I might take a look at those in future blog posts.
Governance & ALM
Unfortunately, Office Script does not provide any governance or ALM. What I did for the customer in question is create 3 Office Scripts (With suffixes “DEV”, “TEST” and “PROD”). Those 3 are shared with at least 2 other colleagues so that they don’t disappear when my account get’s inactivated in the future.
In the step where I run the Office Script against my given Excel file, I use an environment Variable for the Script name instead of selecting it manually/hard coded. This allows me to switch between the 3 mentioned Office Scripts according to the environment the flow is running in.
With that setup, I could do changes to my “DEV” script without risking any harm to the production implementation. When it is time to deploy I only have (and this is unfortunately a manual task) copy from the “DEV” script to “TEST” or “PROD”.
You should also save the script in your repository to be sure to have the latest version.
Conclusion
In this article, I only showed a fraction of what is possible with Office Script. You could for example also extract data (for future use), format your file and many more.
Office Script is a nice alternative to processing Excel directly in Power Automate. I think it is much easier to create complex scenarios.
I hope this post helped. Please let me know if you have any questions.
You can also subscribe and get new blog posts emailed to you directly.







I also recently built a template for both filling & updating tables.
And all the settings are controlled from the flow, no need to continually edit things like column names in the Office Script. It will update & create anywhere from 500-10,000 rows per minute depending on your data & table size.
https://powerusers.microsoft.com/t5/Power-Automate-Cookbook/Excel-Batch-Create-Update-and-Upsert/td-p/1624706
I am unable to save or saveas excel after refreshAllDataConnections() can you help me
Could you elaborate on your error? Do you get it in the flow or when doing the steps manually?
Where do you call “regreshAllDataConnections()”?
Great post! But I’m unable to run the script, I get error:
Office JS error: Line 22: Table addRows: The argument is invalid or missing or has an incorrect format.
My input is Sheet2, Table2 (since this is where I have my data). And the JSON array is like this (I wanted to modify your script to use for other purpose, so that’s why the data is a bid odd (-: :
[
{
“Name”: “02016789301”,
“Email”: “DEU”,
“Role”: “Toilettenschüssel, Weiss”
},
{
“Name”: “020446761301”,
“Email”: “ENU”,
“Role”: “Toilet bowl, Glossy White”
},
{
“Name”: “000020441312”,
“Email”: “DEU”,
“Role”: “Toilettenschüssel, Matt-Weiss”
}
]
What am I missing?
Thank!
Hej,
are you using my script exactly as it is or have you changed anything in it?