Create custom connector for own API
Recently I have been in a project where we had to create a custom connector for our own API of the customer. The setup was not as straightforward as I would have expected and took me way longer than I would have liked it to be. Since I don’t think I am the only one with that problem I thought why not create a blog post about it.
If you only are searching for the setup of the App Registrations and the Security part of the custom connector and you do not need everything else you can directly go there.
Table of contents
Scenario
Let’s look a bit deeper into the given scenario. The customer does have a custom API that makes data from an internal (onPrem) system available and makes it possible to create new records within the system using a REST API. It is built on .net Core 5.0 and uses Azure Active Directory (AAD) for authentication.
We build a Mode-Driven App for the customer which should fetch and send data to the mentioned onPrem System through the API.
We figured the easiest way would be to have a Power Automate Flow which triggers on certain conditions and creates rows in the System in question accordingly.
Since citizen devs should be able to implement other flows against the same system in the future as well we thought a custom connector would be the best approach.
The base of the custom connector was built rather easy and fast. Problems arose when authentication through AAD was introduced.
Solution
At first, I followed a tutorial from Microsoft called “Use Azure Active Directory with a custom connector in Power Automate“, which I found very confusing. It does cover parts of the solution but not quite those needed for a custom API hosted in Azure.
In the end, I came to a solution using another tutorial called “Create a custom connector for a web API” as well as a lot of trial and error.
What we need are two App Registrations configured in a certain way. One is used by the WebAPI to authenticate against Azure AD and the second is used by the custom connector to authenticate against the WebAPI.
Setup
Let’s come to the fun part and set up/implement our solution.
App Registrations
As mentioned we do need two different App Registrations. Both are created the same way.
- Open the Azure portal
- Got to Azure Active Directory
- Navigate to App Registrations
- Click the “New registration” button

In the following screen, you have to present a name. I named them “Custom Connector Test – Web API” and “Custom Connector Test – Custom Connector”. The other configurations should be left as the defaults.
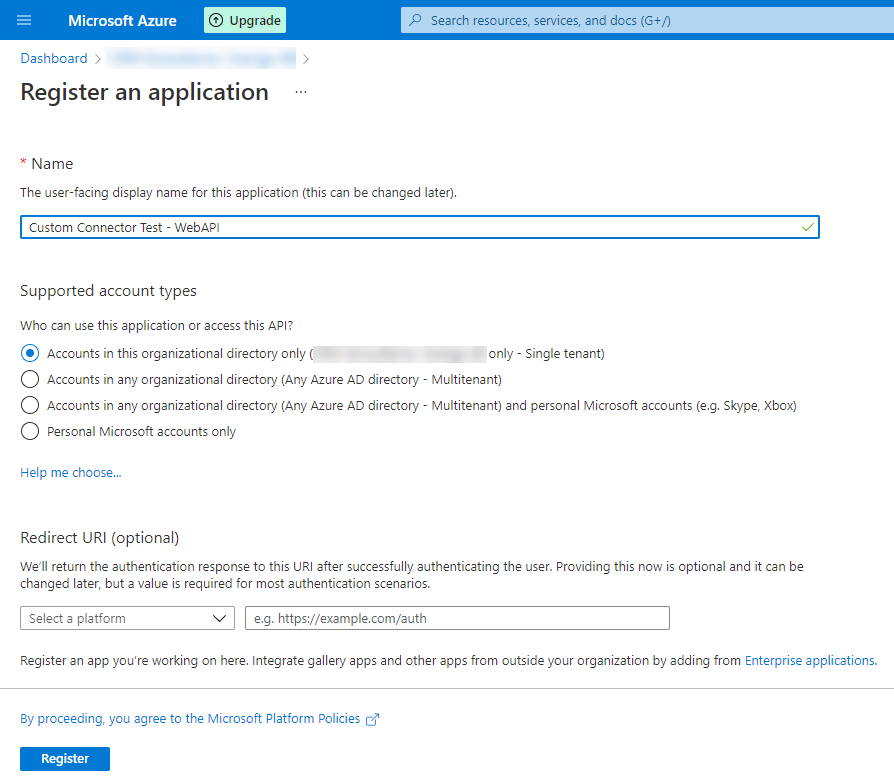
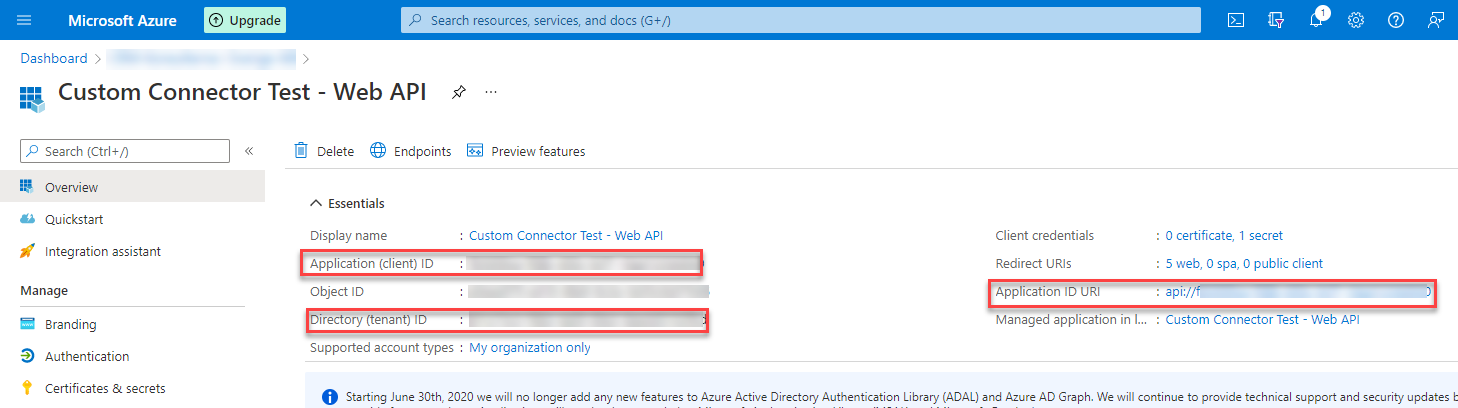
After you have created an App Registration you will come to the overview page. Here you can see information like Tenant ID, App Id or Application ID URI. We will need all of them for both app registrations later, so save them somewhere or remember how to come back to the overview.
The following two chapters will describe the specific configuration needed for the two App Registrations.
Custom Connector Test – Web API
Let’s take a look at the specific configuration for the Web API App Registration. For this App Registration, we have several things to do.
Authentication
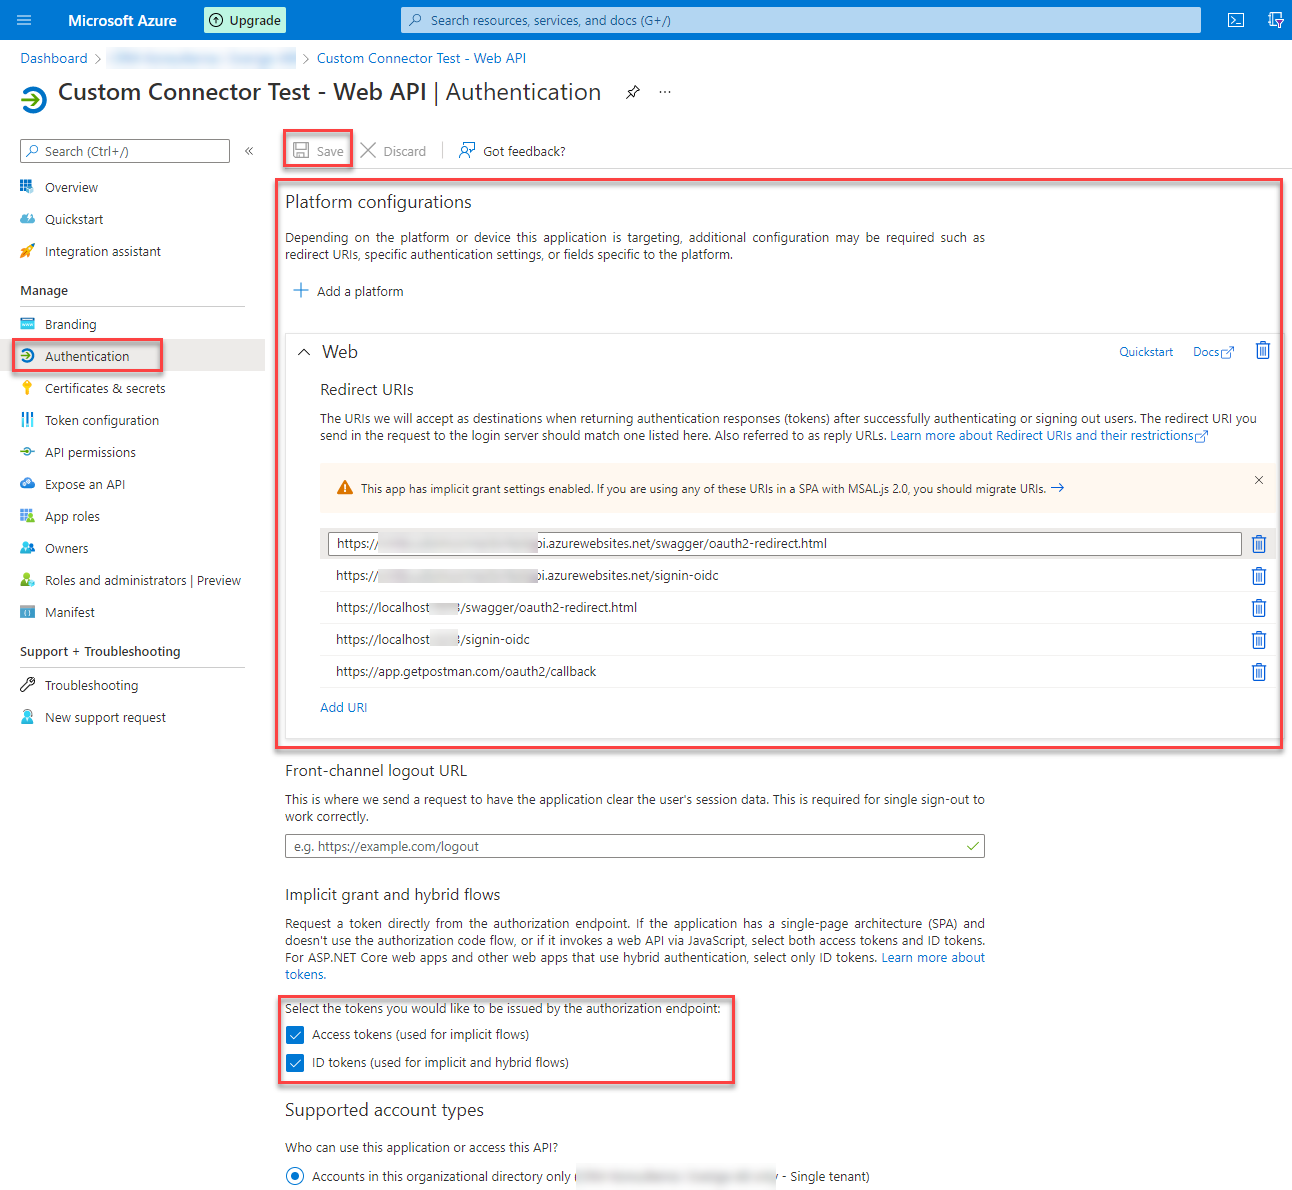
Under authentication, we have to add a platform (using the Add a platform button) of type “Web”. As redirect URL’s we don’t really need any but to be able to test our API locally, from Azure and via Postman we have to add the following entries.
- https://app.getpostman.com/oauth2/callback
- https://localhost:<your port>/signin-oidc
- https://localhost:<your port>/swagger/oauth2-redirect.html
- https://<url to your azure API>.azurewebsites.net/signin-oidc
- https://<url to your azure API>.azurewebsites.net/swagger/oauth2-redirect.html
In those URL’s you have to replace “<your port>” with the port your API is using locally and “<url to your azure API>” with the URL you create when you create your API in azure.
Some of that information you only get when you created the API, which we will do later in this blog post. Make sure to come back and add the entries then.
It is also important to check the boxes beside “Access tokens (used for implicit flows)” and “ID token (used for implicit and hybrid flows)”.
Don’t forget to hit “Save” at the top after you have configured everything.
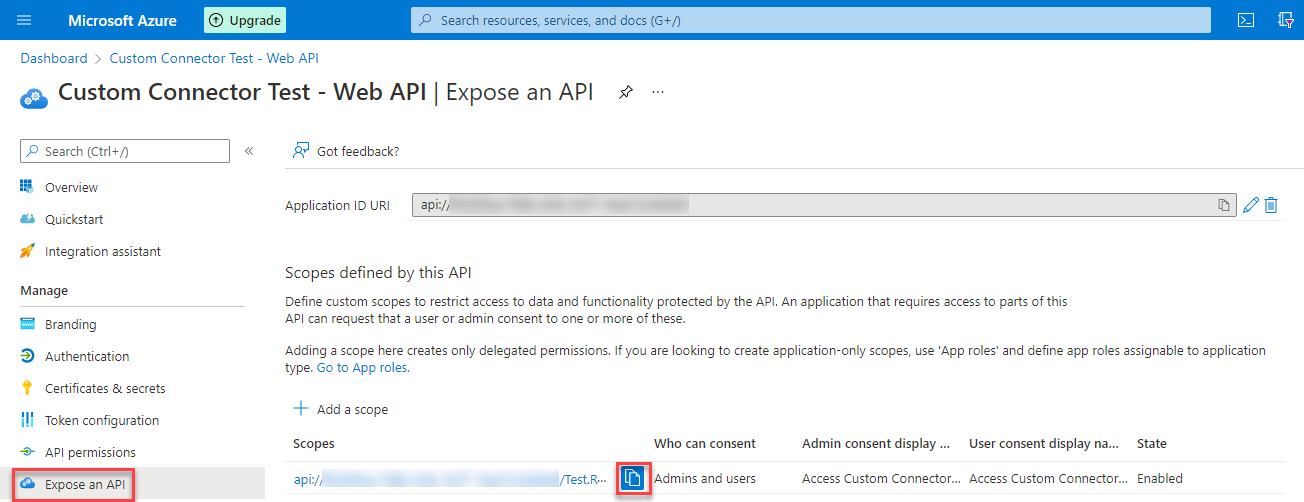
Expose an API
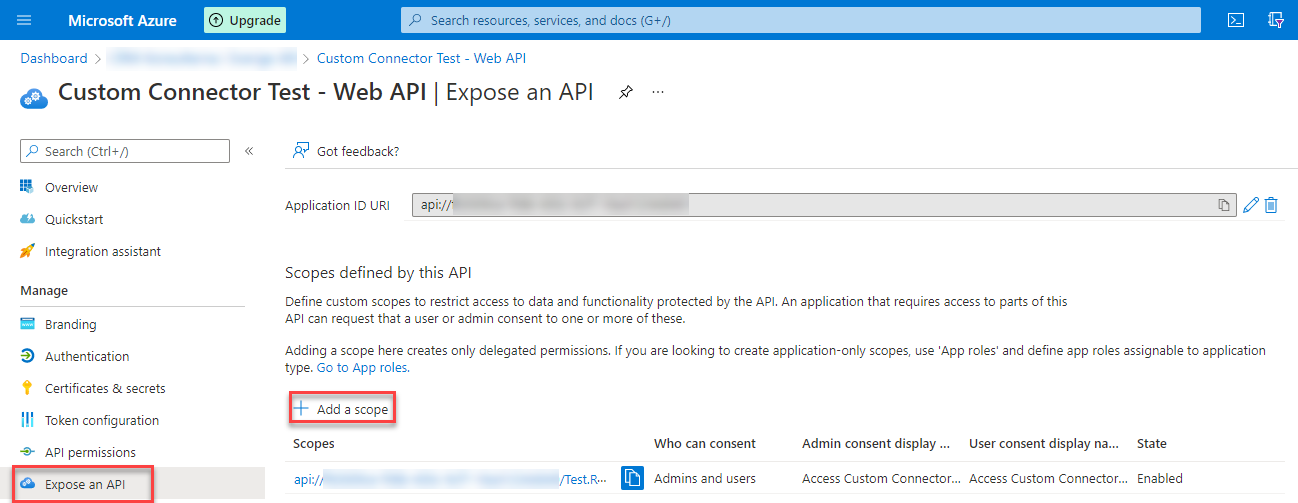
The last configuration for this App Registration is the Expose an API part. Here we have to create a new scope by using the “Add a scope” button. In the side pane, you can
- specify a name for the scope – Test.Read for my demo
- Who can consent – Admin and users in our case
- Descriptions and Display names for both Admin and User consent

Custom Connector Test – Custom Connector
Next up is the App Registration to be used for the custom connector. We have to configure the following parts.
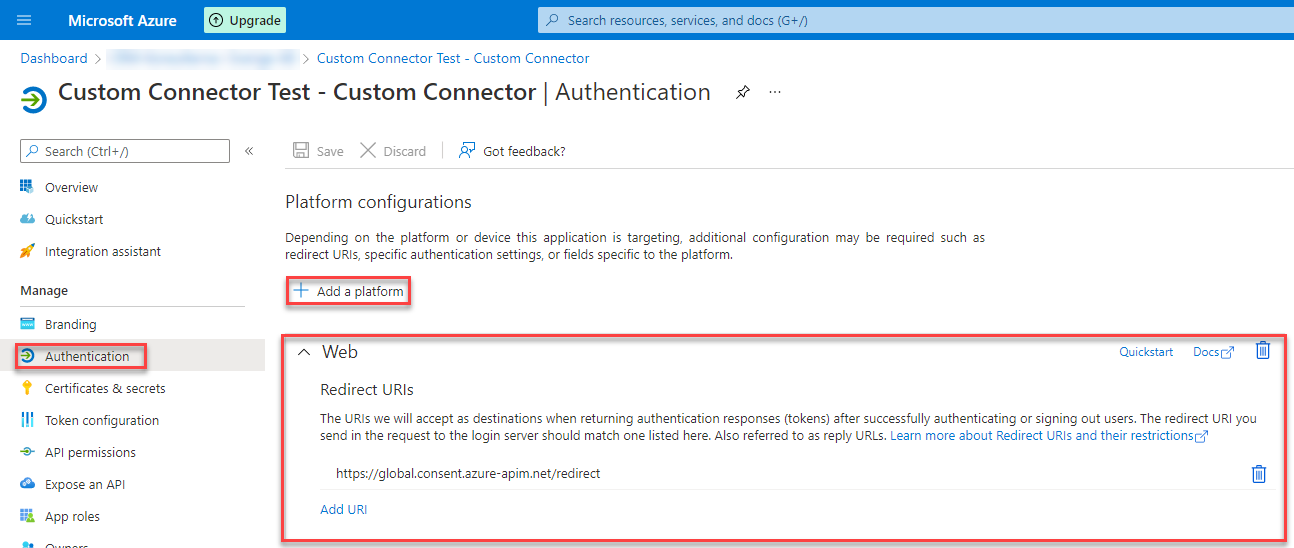
Authentication
Here we have to add again a platform. To do so we use the “Add a platform” button and select “Web” as the platform. The redirect URI you will get later when we create the custom connector. Until now I always got the same URL though. For me it was https://global.consent.azure-apim.net/redirect.
Make sure to come back to this configuration when you have the url.
Certificates & secrets
For this App Registration we also need a secret. Navigate to “Certificates & secrets”, click “New client secret”, choose a speaking name and a expiration period, add the secret and then copy the generated secret.
The secret will only be shown once. So make sure you copy it.
If you need a secret that does not expire after 24 months please take a look at my blog post about this.

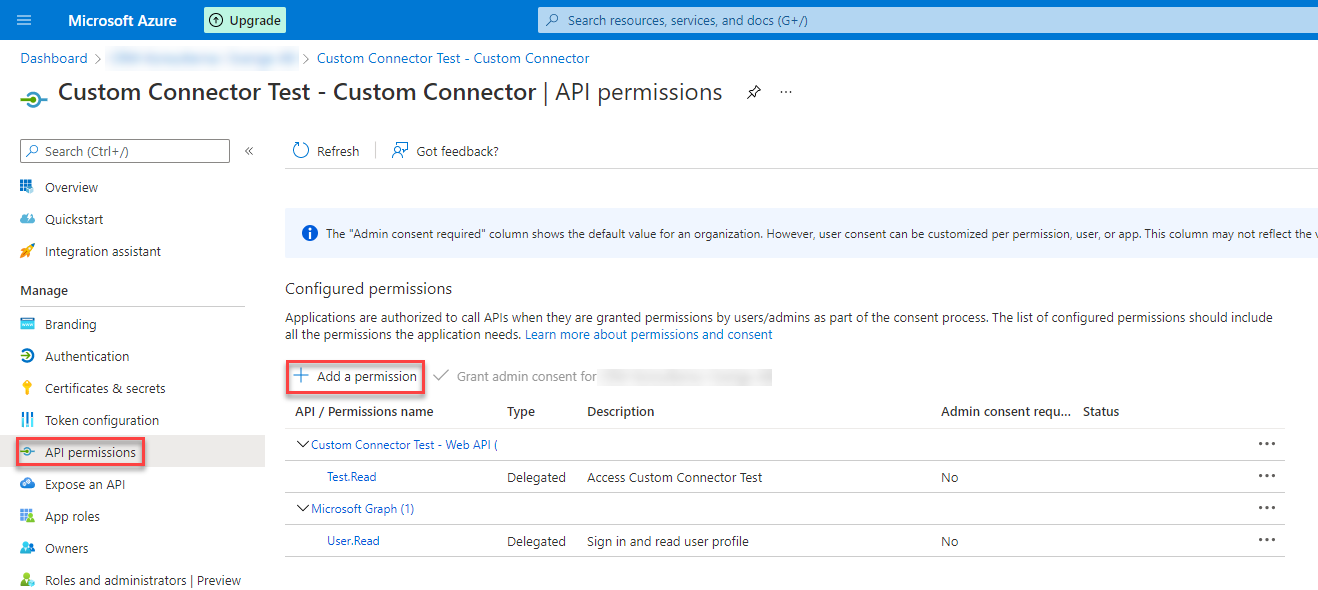
API Permissions
Last part fo this App registration is to add an API Permission to the API we exposed in the first App Registration. We navigate to API Permissions and use the “Add a permission” button.
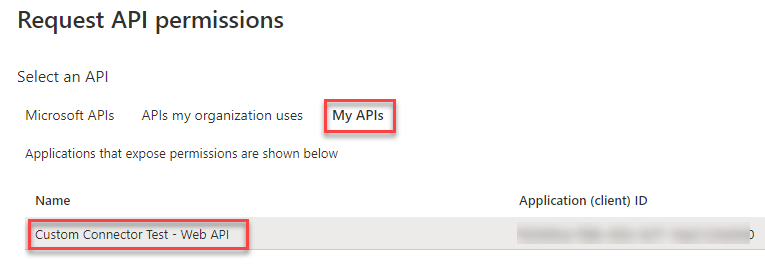
In the opening side pane you select the tab “My APIs” and then the App Registration we created for the Web API.
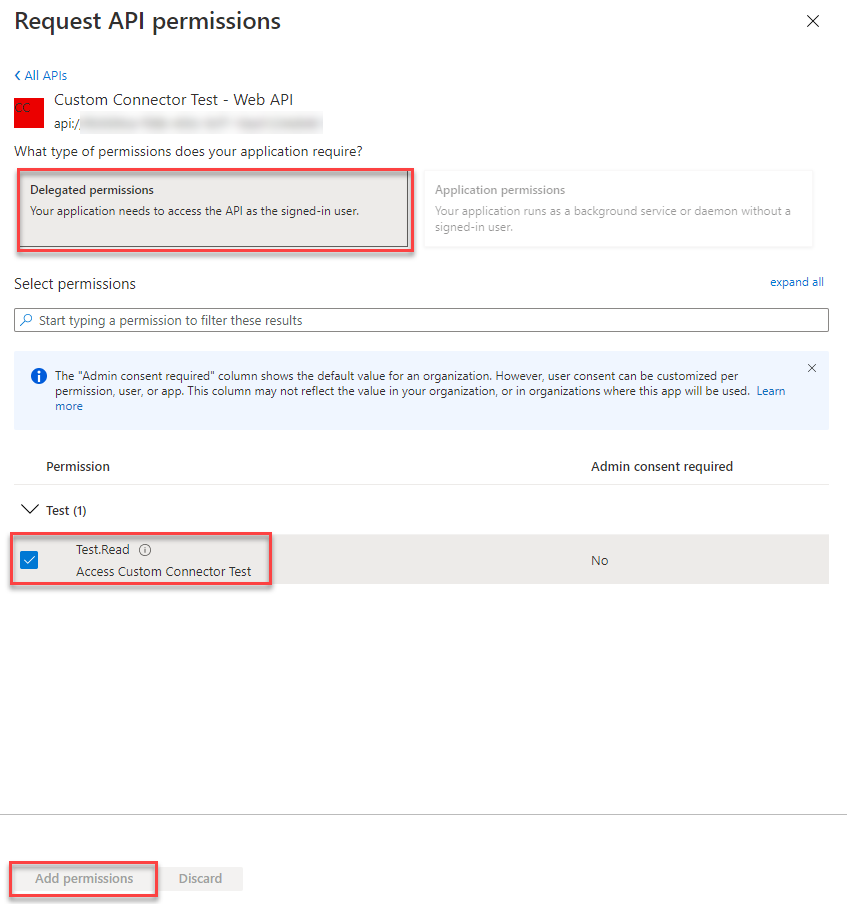
When the App Registration is selected the side pane is going to the next page. Here you select “Delegated permissions”, check the box beside the permission we exposed in the Web API App Registration (in my case “Test.Read”) and click on “Add permissions”.
API
After the App Registrations are created we have to create a demo API. We will use the standard example which will be created when you create a new ASP.NET Core Web App. This API will have one endpoint for the weather forecast, WeatherForecast.
Create API
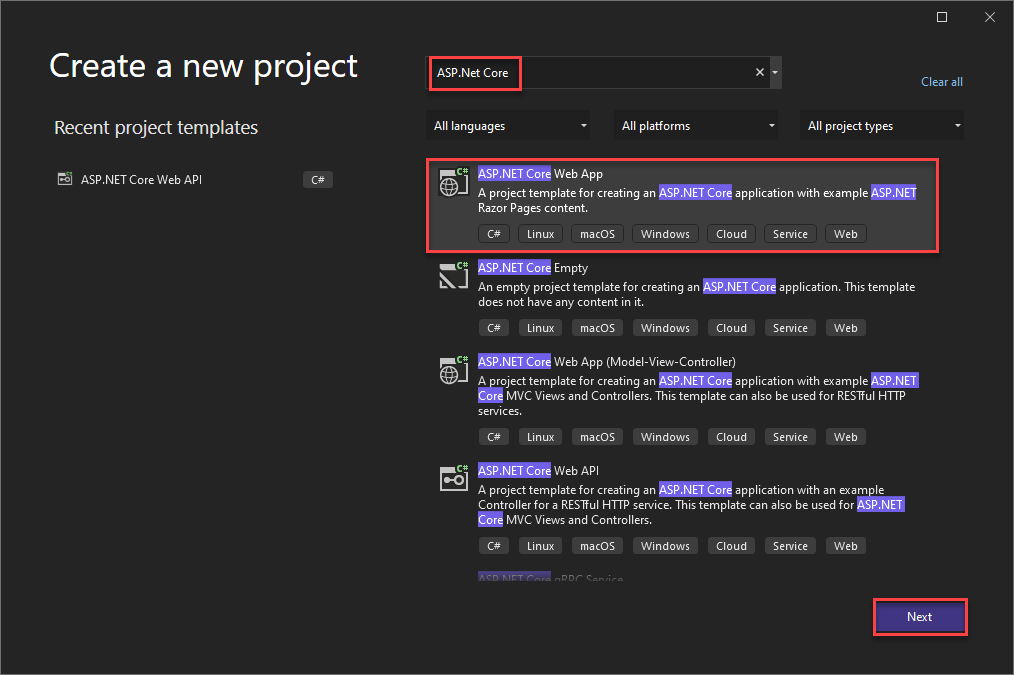
In Visual Studio (I am using VS 2022) you go to File->New->Project. In the popup, you search for “ASP.NET Core”, select ” ASP.NET Core Web App” and click on next.
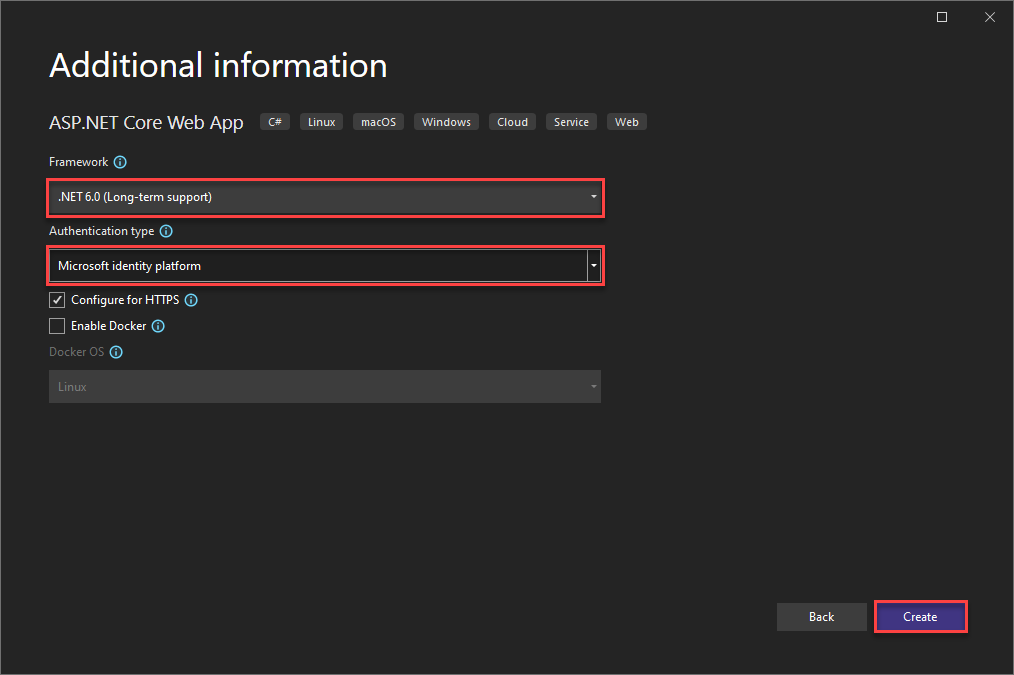
On the next page, you choose the Framework (selected “.NET 6.0 (Long-term support)”) as well as “Microsoft identity platform” as the Authentication type.
Congratulations, you have successfully created your API.
Configure Authentication
All we have to do is to add some information to the appsettings.json.
This currently should look like this:
{
/*
The following identity settings need to be configured
before the project can be successfully executed.
For more info see https://aka.ms/dotnet-template-ms-identity-platform
*/
  "AzureAd": {
    "Instance": "https://login.microsoftonline.com/",
    "Domain": "qualified.domain.name",
    "TenantId": "22222222-2222-2222-2222-222222222222",
    "ClientId": "11111111-1111-1111-11111111111111111",

    "Scopes": "access_as_user",
    "CallbackPath": "/signin-oidc"
  },
  "Logging": {
    "LogLevel": {
      "Default": "Information",
      "Microsoft.AspNetCore": "Warning"
    }
  },
  "AllowedHosts": "*"
}
You have to insert the TenatId (where 222222…. is) and ClientId (where 11111… is) of the Web API App Registration (the first one we created). You can find both on the Overview page.
Second thing to do is to insert the right scope. It should be the same as what you created while configuring the first App Registration. In my case it is “Test.Read”.
Adding Swagger
To make swagger work we have to configure it in a way that it is using OAuth 2. To do so we have to add some lines of code to the Program.cs file.
Replace line 15 (builder.Services.AddSwaggerGen();) with the following block of code.
builder.Services.AddSwaggerGen(c =>
{
    c.SwaggerDoc("v1", new OpenApiInfo { Title = "CustomConnectorTest_API", Version = "v1" });
    c.AddSecurityDefinition("oauth2", new OpenApiSecurityScheme
    {
        Type = SecuritySchemeType.OAuth2,
        Flows = new OpenApiOAuthFlows()
        {
            Implicit = new OpenApiOAuthFlow()
            {
                AuthorizationUrl = new Uri("https://login.microsoftonline.com/<Your Tenant ID>/oauth2/v2.0/authorize"),
                TokenUrl = new Uri("https://login.microsoftonline.com/<Your Tenant ID>/oauth2/v2.0/token"),
                Scopes = new Dictionary<string, string> {
                        {
                            "<URL you can find under the exposed scope>",
                            "Reads the Weather forecast"
                        }
                    }
            }
        }
    });

    c.AddSecurityRequirement(new OpenApiSecurityRequirement()
    {
        {
            new OpenApiSecurityScheme {
                Reference = new OpenApiReference {
                        Type = ReferenceType.SecurityScheme,
                            Id = "oauth2"
                    },
                    Scheme = "oauth2",
                    Name = "oauth2",
                    In = ParameterLocation.Header
            },
            new List < string > ()
        }
    });
});
You have to add your Tenant ID to the AuthorizationUrl and TokenUrl as well as the Scope URl. You can find this under “Expose an API” in the first App Registration.
The current set-up would output the swagger definition in OpenAPI version 3.0. Since Power Apps only support OpenAPI 2.0 definitions we have to configure the app to output this instead. This will make the creation of the custom connector much easier. To do so replace line 21 (app.UseSwagger();) with the following code.
app.UseSwagger(c =>
{
    c.SerializeAsV2 = true;
});
You also have to replace line 22 (app.UseSwaggerUI();) with the following code snippet. This will configure the UI to use OAuth 2.0 so that you are able to authenticate yourself in the swagger ui.
app.UseSwaggerUI(c =>
{
    c.SwaggerEndpoint("/swagger/v1/swagger.json", "CustomConnectorTest_API v1");
    c.OAuthClientId("<App Id of Web API>");
    c.OAuthUseBasicAuthenticationWithAccessCodeGrant();
});
You have to insert the AppId of the Web API App Registration.
Make sure you add the URL to the swagger redirect to your first App Registrations redirect URL’s under authentication. The URL is your localhost or Azure App Service URL followed by “/swagger/oauth2-redirect.html“
The last thing is to delete the if around app.UseSwagger(); and app.UseSwaggerUI(…..);.
Publish API
The last thing we have to do with the API is to publish it to Azure.
Create App Service
The first task is to create an App Service in Azure where the API can be deployed to.
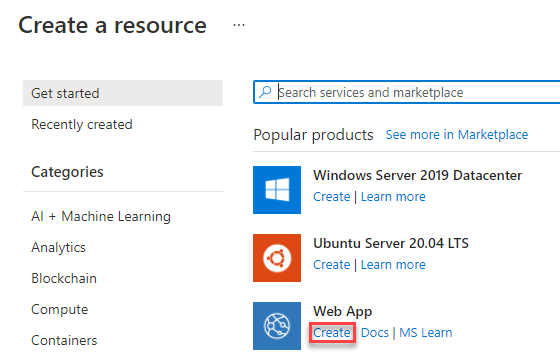
You log in to the Azure portal, navigate to “All resources” and click the “Create” button.

In the next screen, you select “Web App” as the resource you would like to create. If it is not shown in your list you can search for it.
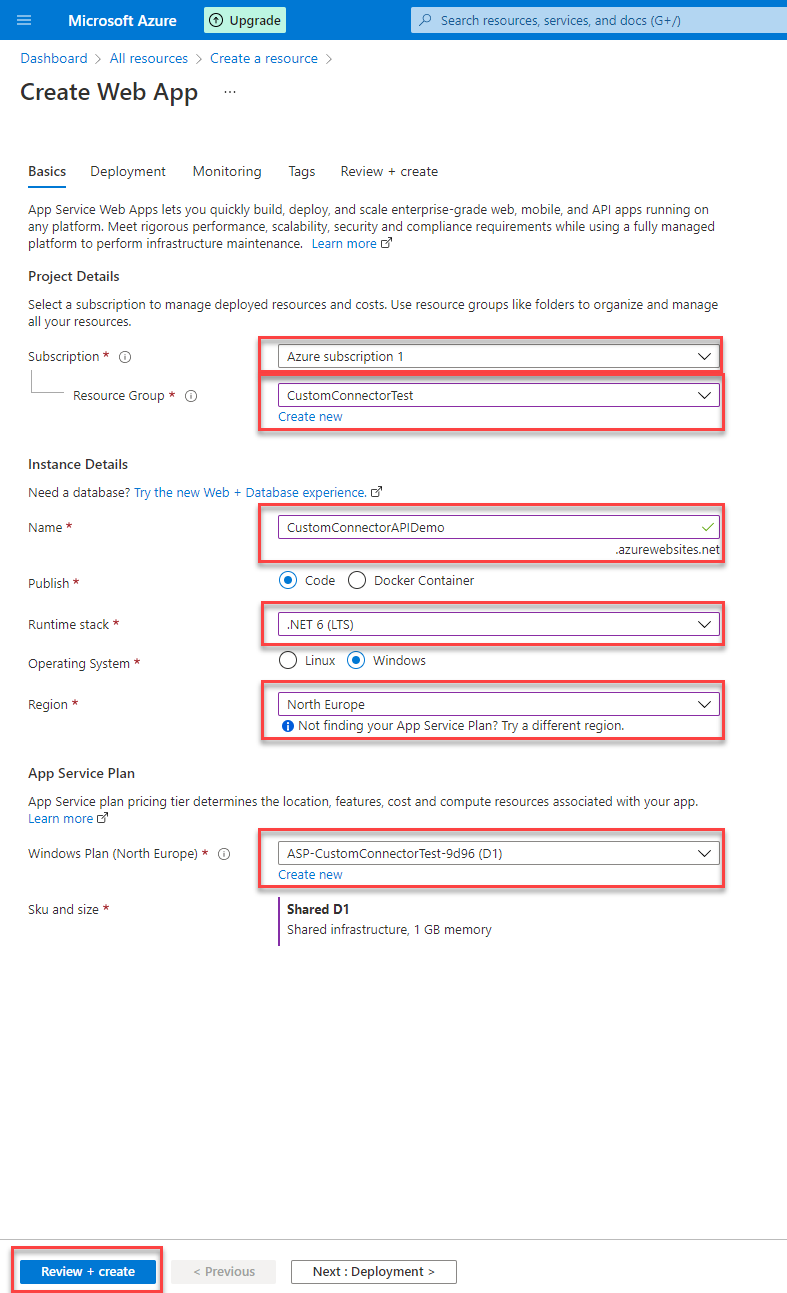
The last step is to configure everything needed for your Web App. It includes
- The subscription
- A Resource Group (you can also create a new one from here)
- Unique name for you Web app. This will be the URL you need to configure under “Authentication” in the first App Registration
- Runtime stack – Here we need .NET 6 (LTS)
- Region
- Windows Plan (you can also create a new one from here)
After you have added all this information you have to click “Review + create” button at the bottom of the page. The next page will validate everything, which could take some time. When it is ready you have to press “create” to really create your Web App. The creation can take some minutes, but the portal will show when it’s done.
Prepare API
To make the deployment work you have to install two additional NuGet packages
- Microsoft.AspNetCore.AzureAppServicesIntegration
- Microsoft.AspNetCore.AzureAppServices.HostingStartup
Publish
It is important that you are logged in to Visual Studio with the same account as you used for the Azure portal.
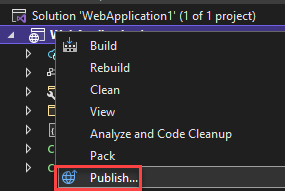
Right-click on your API project and select “Publish” from the context menu.
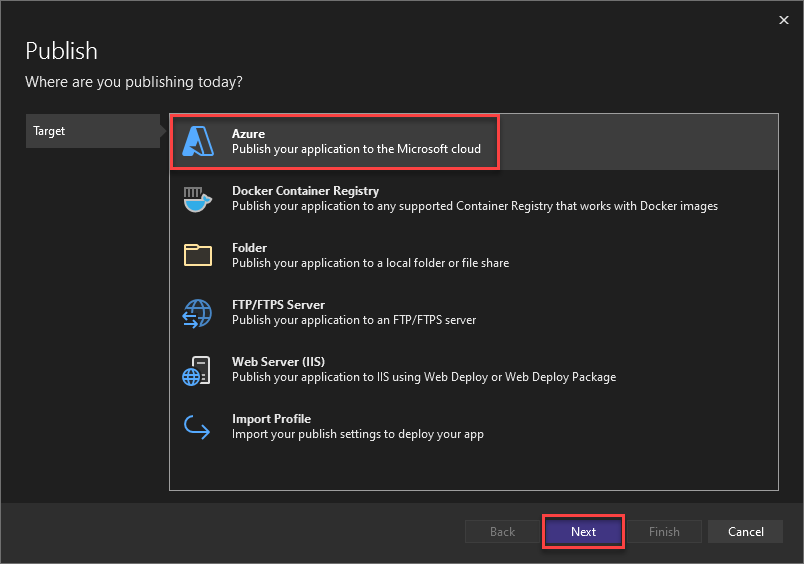
Make sure “Azure” is selected as the Target and click “Next”.
Select “Azure App Service (Windows)” as the “Specific target” and click “Next”.

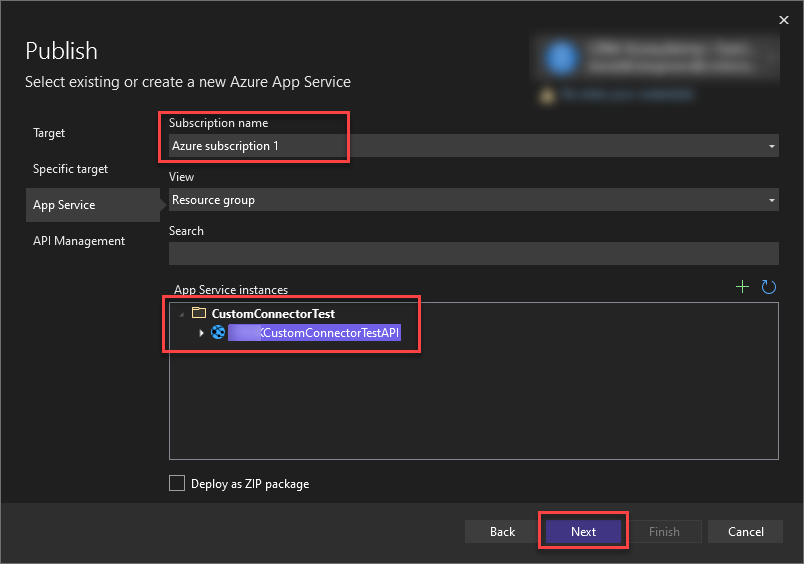
Select the Subscription you used in the Azure Portal and the App Service you created within it and click “Next”.
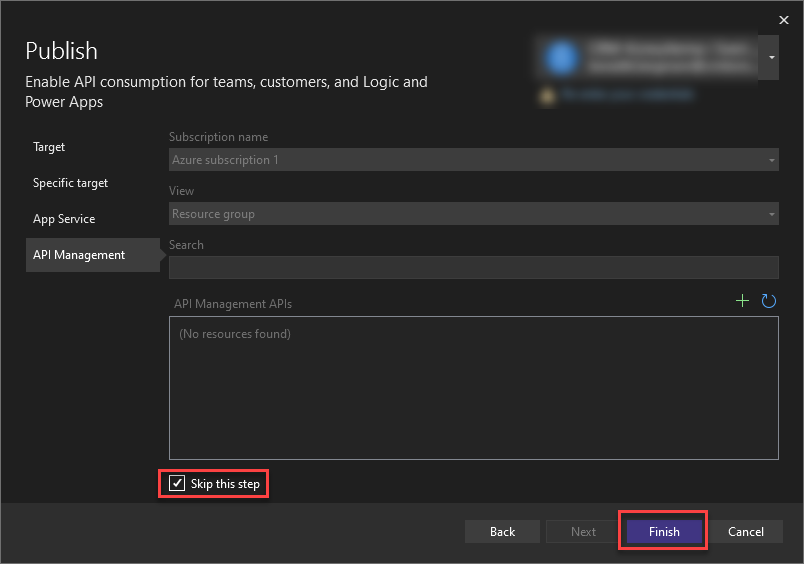
For the API Management page make sure to check the box beside “Skip this step” at the end of the page and click “Next”.
Now your publish profile is ready and you can deploy your API by clicking the “Publish” button.
It might be needed to change the “Target Runtime” from “Portable” to “win-x86”.

Custom Connector
Now that everything else is set up let’s finally create a custom connector for our own API.
Swagger definition JSON
To create the Custom Connector you will need the swagger definition json. Open the swagger of your API which is deployed to Azure, to do so you navigate to the URL you selected while creating the Web App and add “/swagger” to it. On the page which appears you should have a small link underneath the name, it says “/swagger/V1/swagger.json”. If you click this link a new window will open and show the swagger definition json.

Create Custom Connector
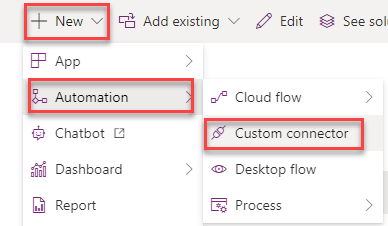
From within a solution click “New” and select “Custom connector” under “Automation”. This will open a new pop up with the custom connector editor.
Give your Connector a good name and switch to the “Swagger Editor”.
Once saved the name of your connector can not be changed.

Swagger Editor
In the swagger editor mark everything in the left (black) part and paste your swagger definition json. A pop up will appear asking you whether you would like to convert your JSON to YAML, press “OK”.
You could skip this part and create your definition manually. Which normally is a lot more time consuming than copying the swagger json.

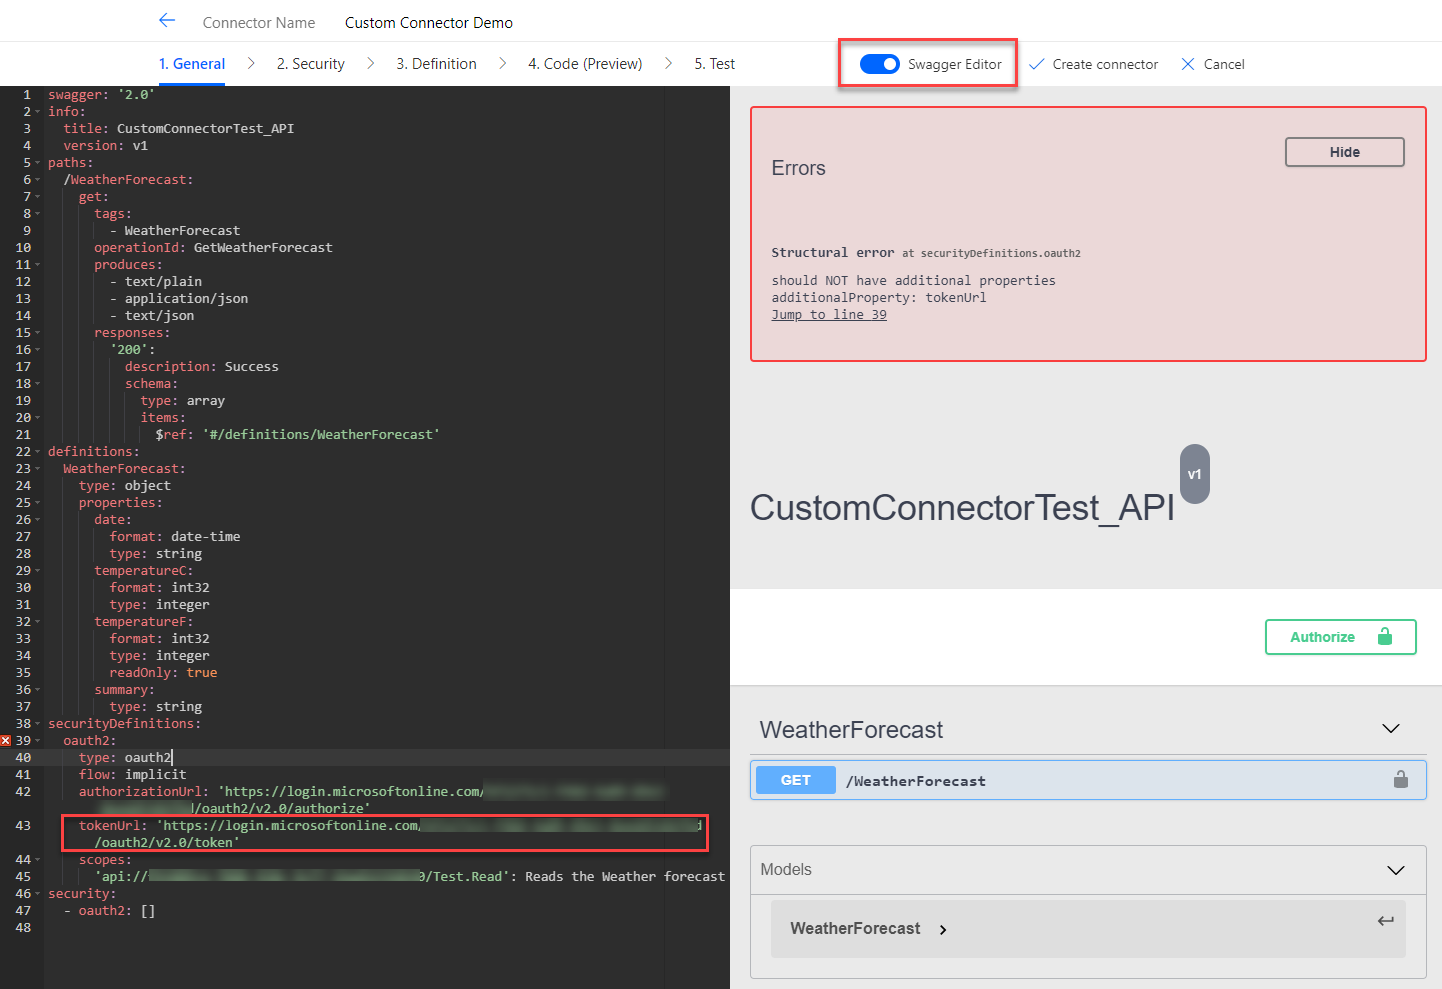
You might get an error (as you can see on the following screenshot) in that case delete line 43/the tokenURL. When no error is left switch back to the normal UI.
General
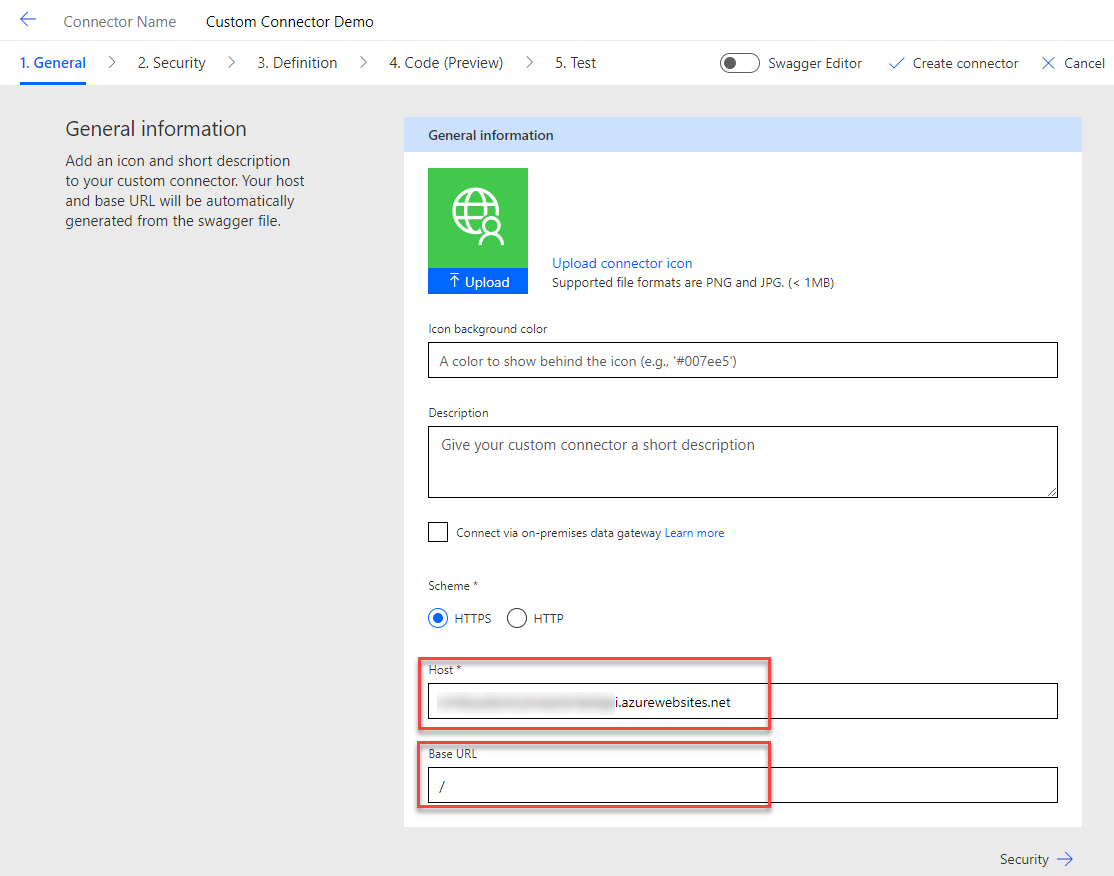
Go to General and past the URL to your Azure-hosted API (without https://) into the “Host” field. “Base URL” should be a simple “/”.
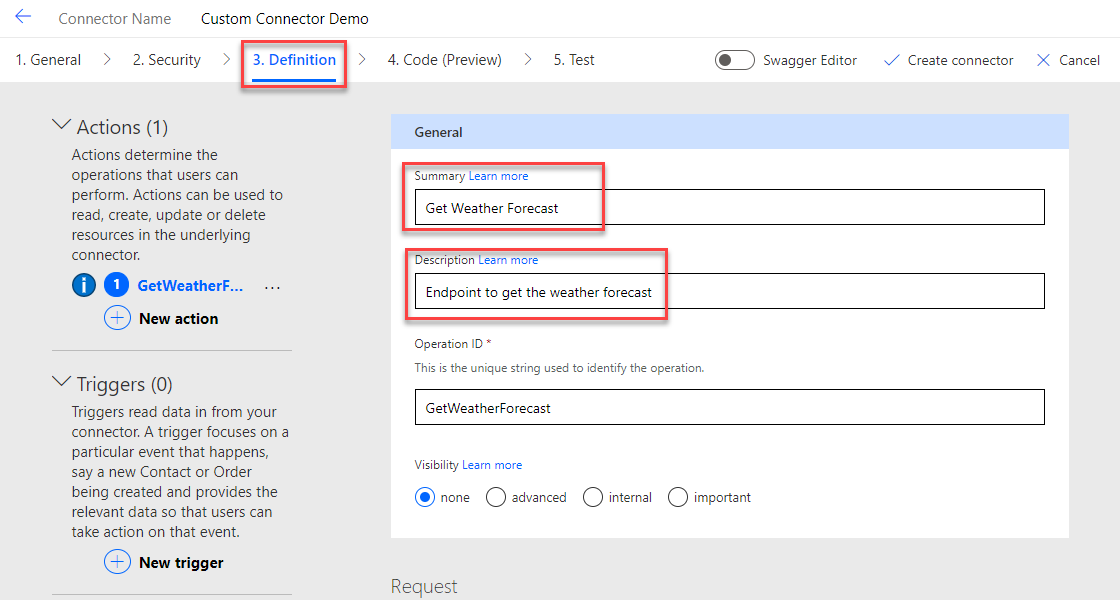
Definition
Next, we go to Definition and define a Summary and Description for our Action.
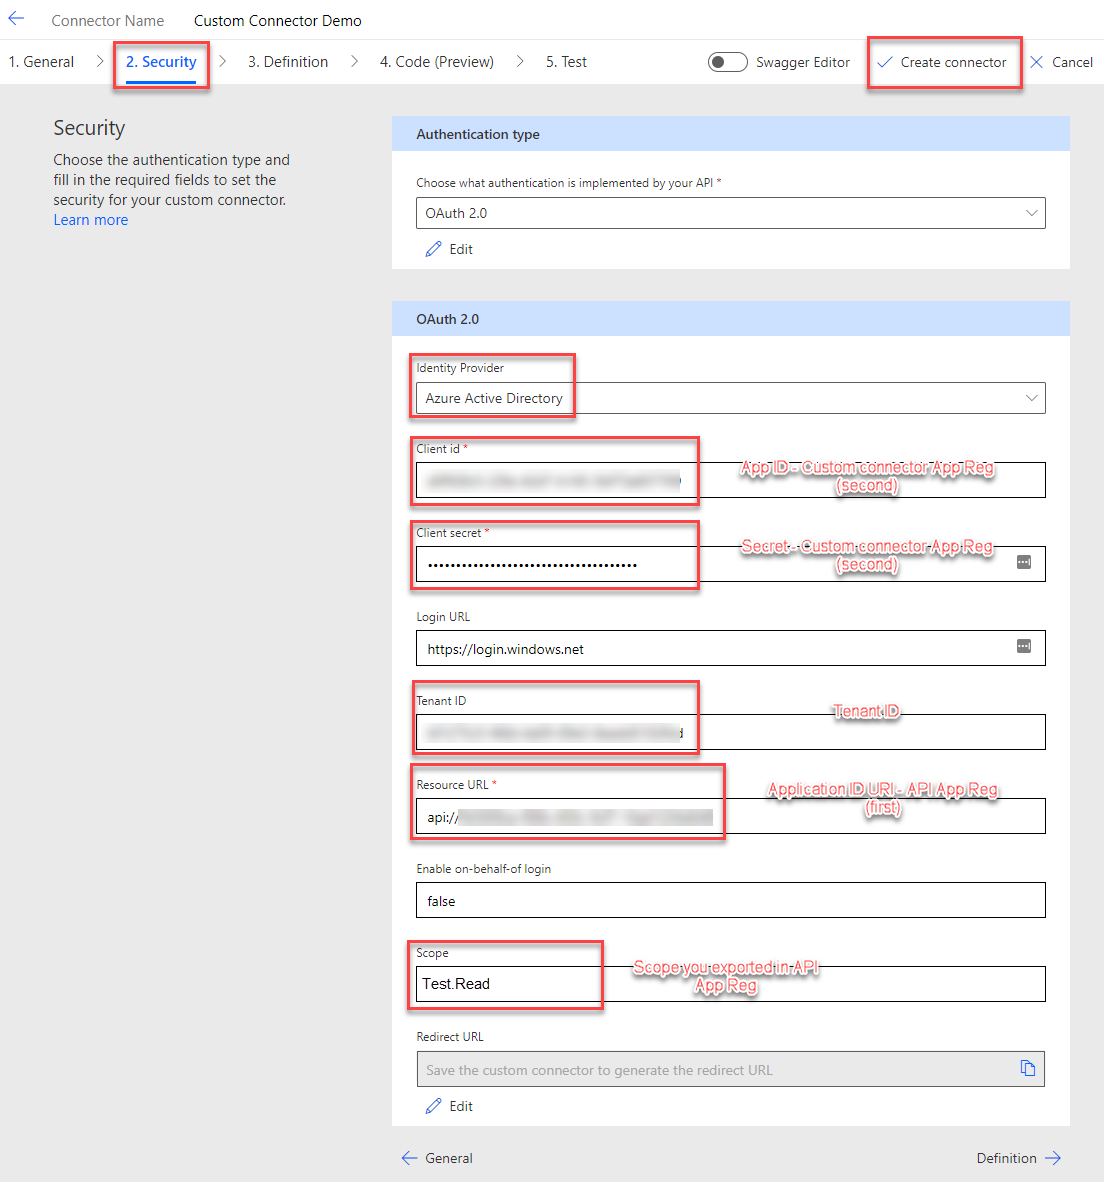
Security
Here comes the interesting part. We configure the Security of our custom connector.
Make sure you switch the Identity Provider to “Azure Active Directory”. You will need the following values:
- Client id: Should be the App ID of the Custom connector App Registration (second one we created)
- Client secret: Should be the secret we created to the custom connector App Registration (second one we created)
- Tenant ID: Should be the ID of your tenant
- Resource URL: Should be the Application ID URI of the API App Registration (first one we created).
- Scope: Should be the Scope you exported in the API App Registration (first one we created). You only take the Scope and not the complete URL.
Switch back to the swagger Editor and make sure that the TokenURL in the securityDefinition is “https://login.windows.net/common/oauth2/authorize” before you save.
Press “Create connector” to save all your configuration.
Test
Everything left to do is to test your set up. Go to “Test” and click “New connection”. A standard MS Login popup should appear. Login with your account and give consent to the access the process asks for.
Depending on the setup of your organization it might be needed that a global admin gives consent as well.
Now the “Test operation” button should get activated. If you press it the API will be requested and it should show the correct result.
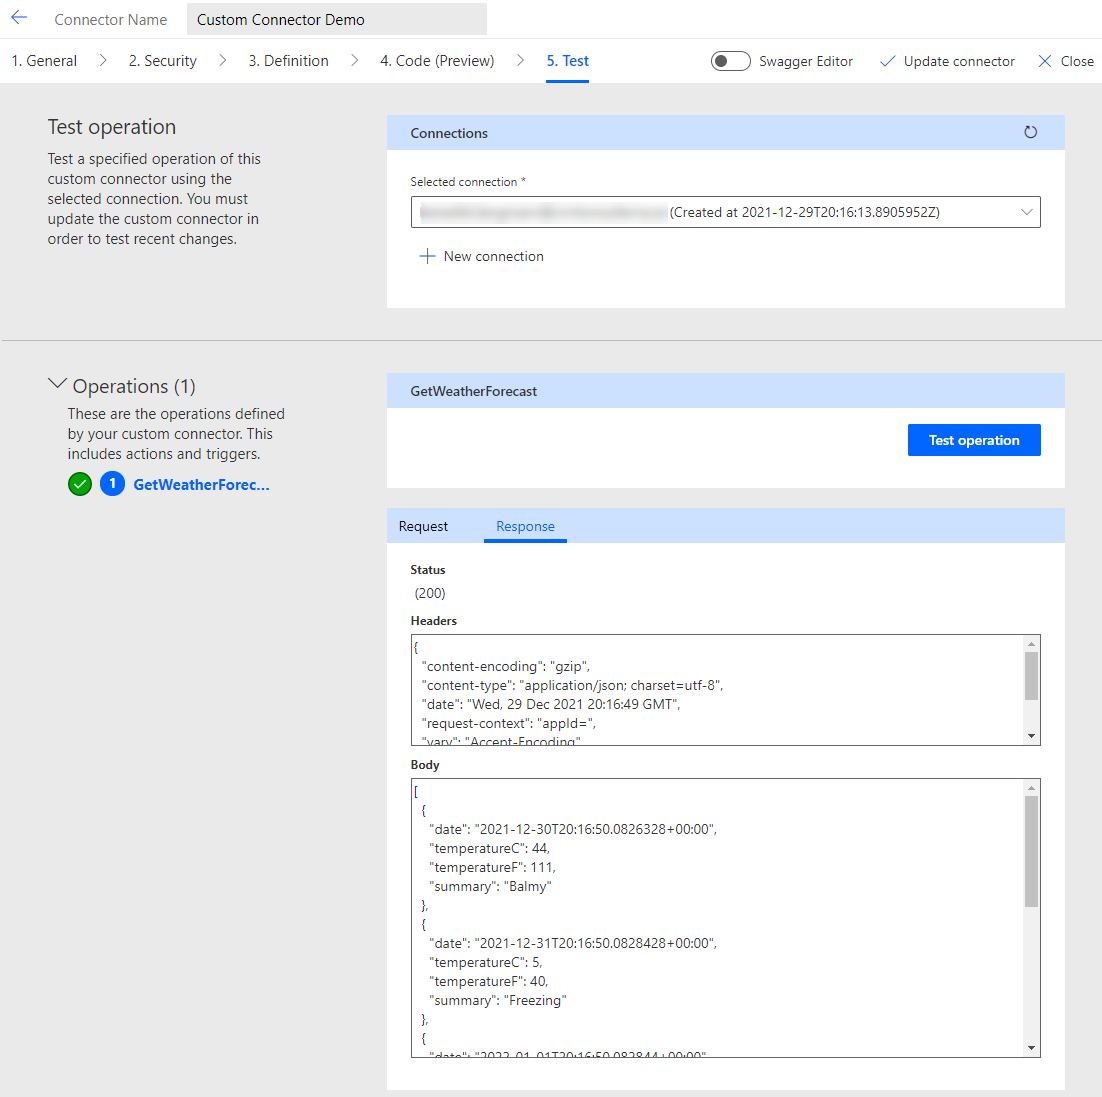
Congratulations! You have successfully created a custom connector for your own API.
Conclusion
There are a few things to do to create a custom connector for your own API. But it isn’t that hard once you know what it needs.
I hope this post was able to help you. Please let me know if you have any further questions.
You can also subscribe and get new blog posts emailed to you directly.
About The Author
Benedikt
Power Platform Consultant @ CRM Konsulterna
Great post! Is there a way to customize the authentication of the custom connector by including the API key as well (alongside the OAuth 2.0)?
Hej Ryan,
thanks for your comment.
It should be possible but needs some custom implementation. You could have another field, “API Key”, in every step and a policy to add the value to a header.
Thank you ever so much!
You made a lot of work relatively simple
Hi Benedikt,
Thank you for the post! We have setup a custom connector as well for our internally built API, we are using roles in Azure AD App Registration to define what calls users can make. When we perform our authentication, the JWT does not seem to have the App Roles in the decoded token, but we see them in our Postman JWT token. Have you run into the issue before? Not sure if I’m missing a certain permission in our app registration.
Hej Dana,
that is a good question. To be honest I never used App Roles for App Registrations I use in an custom connector.
Do you mean that the custom connector does bypass the roles?