Create a Teams status indicator light
For a long time, I thought about a great use case for a raspberry pi. Beginning of 2021 I found a great article of Elio Struyf on how he created such a light. I thought: “I want one of those! This is a great use case to get my first raspberry pi.”. So that’s when I decided to create a Teams status indicator light of my own.
Unfortunately, his setup and approach weren’t usable for me. In the following blog post, I will explain my setup and show step by step how one could create its own status indicator light.
Goal
My goal was to create some kind of indicator I could have outside of my room so that my wife and son know when I am in a meeting and therefore unavailable. It should show when my teams status is changed to “Busy”.
Not that I in that case close the door anyway. So it might be that it is more for me to test new things out.
Hardware
First things first. I had to order the hardware. I bought the following stuff:
Pimoroni is sending from the UK. My delivery to Sweden took nearly 2 months. I do assume the issue is that the UK isn’t in the EU any longer. Therefore the package went through Swedish customs which isn’t very fast.
Please calculate some delivery time.
Solution
Since I don’t have any other Raspberry Pi (at the moment) I wanted to have my solution completely on the one Raspberry Pi I ordered to implement this.
Since I am way more familiar with NodeJs than Python I tried to implement as much as possible in NodeJs. Actually, I was able to do everything in it and not use Python at all.
Basically, I created a NodeJs application using TypeScript which runs on a cron schedule. It then polls the Graph API for the user’s Teams presence and changes the LED colour accordingly.
Since there is no possibility of the user logging in on the Raspberry Pi I use the Device Code flow of Microsoft Authentication Library (MSAL). The Application is able to send an email with the code to a given email adress, the user can then login there.
You can find the code to the Application on my GitHub.
I will create a separate blog post dedicated to the described application soon. For now, we just have to use it as is.
With this setup the Raspberry Pi can be used self-sufficient and just needs the power supply.
Implementation
So enough with the chit chat. Let’s get into the real fun and create a Teams status indicator light.
Basic Raspberry Pi setup
First of all we have to do the basic setup of our Raspberry Pi. Since it will be self-sufficient and to save resources I would like to have a “headless” installation. This means that there is no graphical UI and we have to connect to the Raspberry Pi via SSH.
I followed, more or less, this tutorial. I will describe the process here as well.
IMPORTANT! Earlier this year, in 2022, Raspberry Pi did some changes (read more). The standard image now does not contain the pi user any longer. In the Imager (next chapter) there is now a little cogwheel in the lower right corner. Before hitting write you can do all the configurations (enable ssh, change username & password, change host, Wifi config, localization config) directly in there. This means with the new process you can skip a few chapters and directly go to the Bonjour setup. You can also skip the whole chapter “Change raspberry config”.
Burn Image
To “burn” the image to the SD Card I used “Raspberry Pi Imager“.
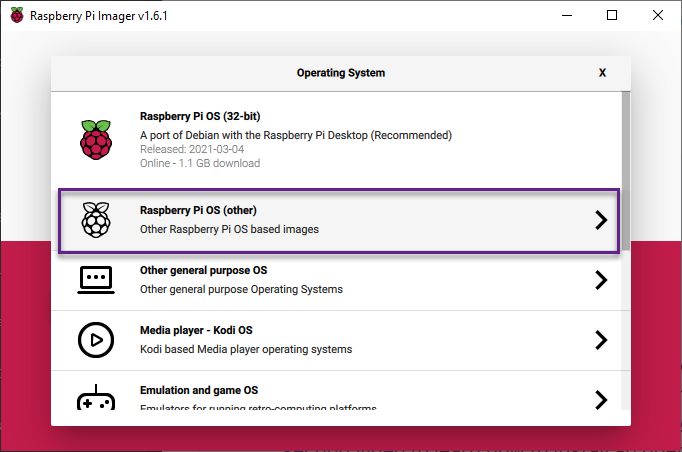
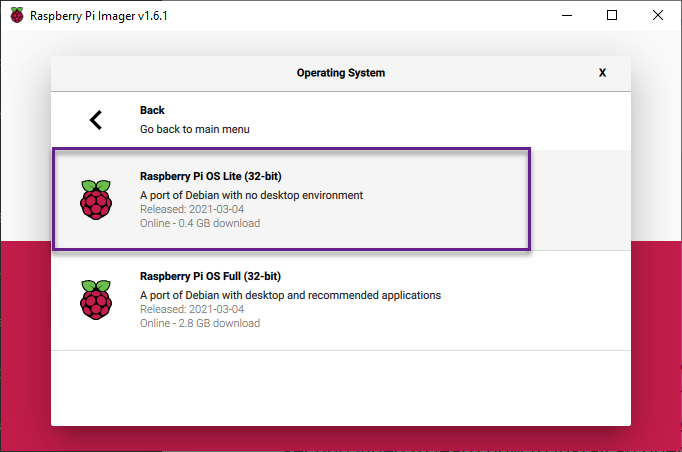
The first thing is to choose the right Operating System. To do so we click on “CHOOSE OS”, select “Raspberry Pi OS (other)” and then “Raspberry Pi OS Lite (32-bit)”.

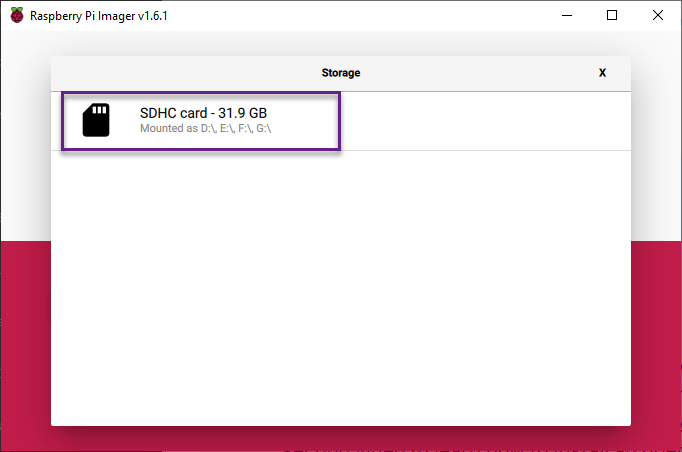
Next step would be to choose the correct SD card (which should be inserted) by clicking “CHOOSE STORAGE” and then selecting the correct SD card.
The last step is to write the image to the SD card by clicking “WRITE”.
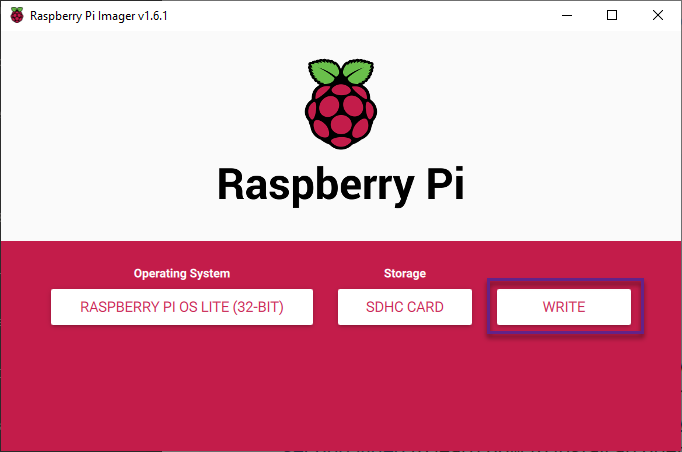
After a few minutes this will be ready.
SSH
Since the Raspberry Pi will be headless we have to connection to it via SSH. For security reasons SSH is disabled as the default. We have to enable it.
This is as easy as creating a file called “ssh” in the root of the SD card.The file should only contain one space. Make sure you don’t have any file extension.
Some card readers aren’t able to see the SD card at all after the image was written. I had to change to a different laptop. If that happens to you it might be as easy as updating your SD card reader software.
Network
The Raspberry Pi has to connect to the wifi on startup automatically. To achieve this you have to create a second file called “wpa_supplicant.conf” in the root of the SD card. It should contain the following conent.
  country=US
ctrl_interface=DIR=/var/run/wpa_supplicant GROUP=netdev
update_config=1
network={
ssid="NETWORK-NAME"
psk="NETWORK-PASSWORD"
}
You have to adjust country, ssid (Network name) and psk (Network Password).
Bonjour
If you are on a windows machine you have to install “Bonjour” to be able to see the Raspberry Pi.
Putty
Next Step would be to install Putty and connecto to your Raspberry Pi.
Before you can proceed you have to put the SD Card into the Raspberry Pi and power it up. Give it some minutes to start.
If you start putty you have to set
- the Host Name to “raspberrypi.local”
- the Port to 22
- the connection type to SSH
and click “Open”.
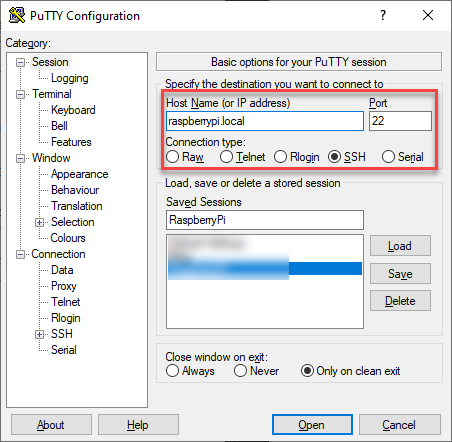
PuTTY should open a new terminal window and attempt to connect to your Raspberry Pi.
Please be aware that it could be that you will get prompted with a Security Alert. Those should be closed with “Yes”
The Terminal will then request the username (which is “pi”) and password (which is “raspberry”) of you.
If you would write “pi@” before the hostname PuTTY would try to connect as the “pi” user.
You can save your session via the “Save” button. So whenever you would like to connect you can just double click that session.
Following this tutorial, you could configure your SSH-Key in the authorized_keys on the Pi. With the Pagent you could then connect without the need of typing the password.
Change raspberry config
We have to change some things in the rasp-config.
To do so you write the following command.
sudo raspi-config
Hostname and Password
Since the Raspberry Pi is connected with the network you should change both the Hostname and Password.
This will open the configuration screen. Here you could (and should) change your hostname and password.
If you change your hostname you also have to change your saved PuTTY session.
Time zone
To ensure that our application runs on the correct times we have to configure the local time zone. For me it is Europe/Stockholm, but you have to adjust it to your needs.
Still in the rasp-config you choose
- 5 Localisation Options
- L2 Timezone – It can take some seconds until the config page comes up.
- Your Region (in my case Europe)
- Your Time zone (in my case Stockholm)
You could also expand the file system to use all the space there is on your SD card.
Now you have to save your changes by selecting (2 times the right arrow) and clicking “Finish”. The PuTTY terminal should show your new timezone and correct time. For me it was
Current default time zone: 'Europe/Stockholm'
Local time is now:      Thu Apr  1 11:39:08 CEST 2021.
Universal Time is now:  Thu Apr  1 09:39:08 UTC 2021.
If you now write “date” in the PuTTY Terminal it should show the correct time as well.
Thu 1 Apr 11:39:23 CEST 2021
After you saved your changes you should restart the Raspberry Pi. After a few minutes, you should be able to reconnect to it using PuTTY. Don’t forget to use the new hostname.
Install WiringPi
For one of our npm packages we need WiringPi. To install it we execute the following command on the Pi.
sudo apt-get install wiringpi
NodeJS setup
Next we have to setup NodeJs on our Raspberry Pi.
Get ARM version
We have to get the ARM version of the Raspberry Pi to locate the correct NodeJs version to install. To do so type the following command in your PuTTY terminal
uname -a
This should result in a row of information. For me it was
Linux bbstatusraspberrypi 5.10.17+ #1403 Mon Feb 22 11:26:13 GMT 2021 armv6l GNU/Linux
Nearly at the end you can find the ARM version: armv61 for a for a Pi Zero WH.
Locate correct NodeJs
Next step is to get the link to the correct NodeJs version.
If you go to the dist folder of NodeJs, you can search for the latest version that supports your ARM version (the name of the tar.gz file should include your arm version). For armv61 (which is the version of the Pi Zero WH) we need v11 of NodeJs. In the list of available files we get the link to the correct tar.gz file (in our case: node-v11.15.0-linux-armv61.tar.gz)
Install NodeJs and Git
On the Pi we execute the following command to download the correct NodeJs version
wget https://nodejs.org/dist/latest-v11.x/node-v11.15.0-linux-armv6l.tar.gz
You have to use the url you copied from the previous step.
We then extract the file with the following command
tar -xzf node-v11.15.0-linux-armv6l.tar.gz
Again, please alter the name of the tar.gz file to match your version
Now we have to move the extracted file to the user/local folder to make the system aware of it and make it available to everyone.
sudo cp -R node-v11.15.0-linux-armv6l/* /usr/local/
If you would like to check whether this worked you can execute the following command. It should show you the installed version of node.
node -v
The last step of the NodeJs setup is to remove the unneeded files in your home directory (this is optional.
rm -rf node-v*
Since we will clone my GitHub repo we have to install Git as well.
sudo apt install git
Azure AD App Registration
Our Application has to connect to Azure and the Graph API to be able to get your current presence status. To achieve this we will create a App Registration in Azure AD.
This should be done in the Tenant you also have your Teams in.
Create App Registration
To do so you
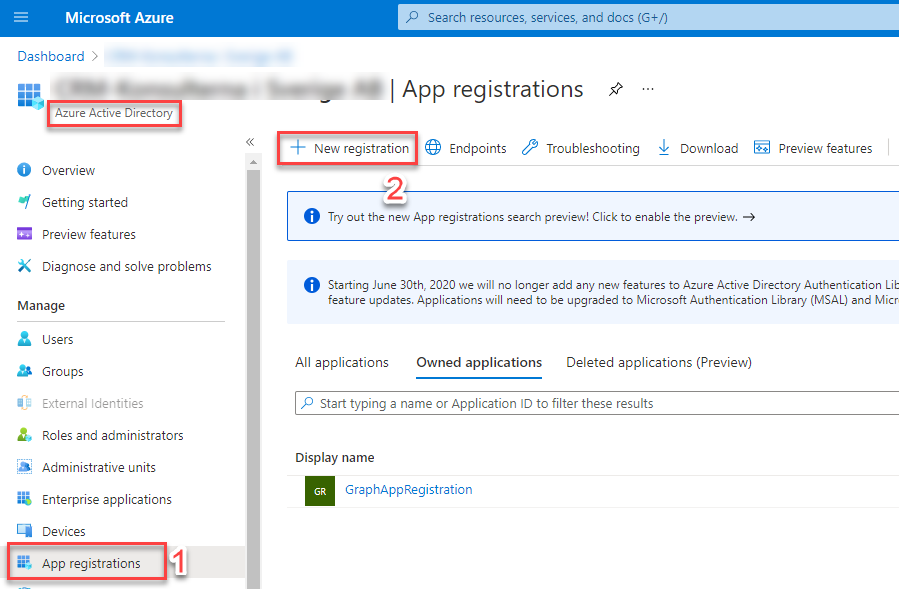
- go to the Azure portal
- Open Azure Active Directory
- Select “App registrations” (1)
- Press “+ New registration” (2)
In the create form, which appears, you choose a name for the App Registration and the second option under Supported Account types (Accounts in any organizational directory).

After clicking “Register” you will come to the Overview page. There you should copy the Application ID and the Directory ID. We need both later when setting up the light.
Add Permissions
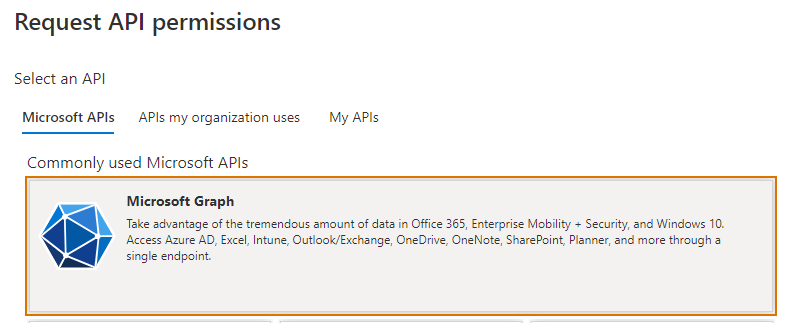
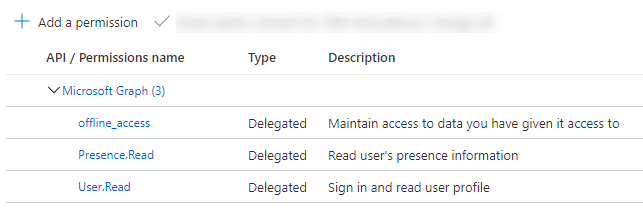
Now that we have created the App Registration we have to add the needed permissions to it. We open “API permissions” (1) in the new App Registration in the azure portal. In this screen we:
- Select “Add a permission” (2)
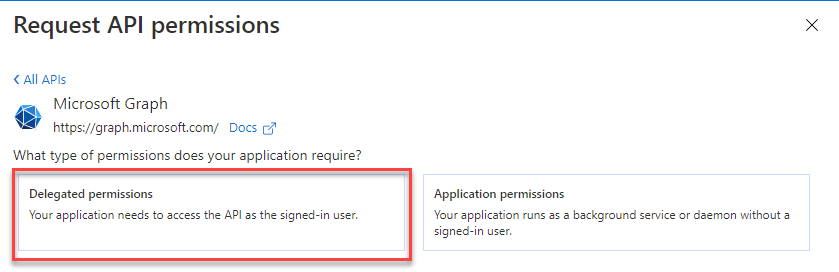
- Select “Microsoft Graph”
- Select “Delegate permissions”
- And make sure that “offline_access”, “Presence.Read” and “User.Read” is selected
- Click “Add permissions”

After that the list of API permissions should look like this.
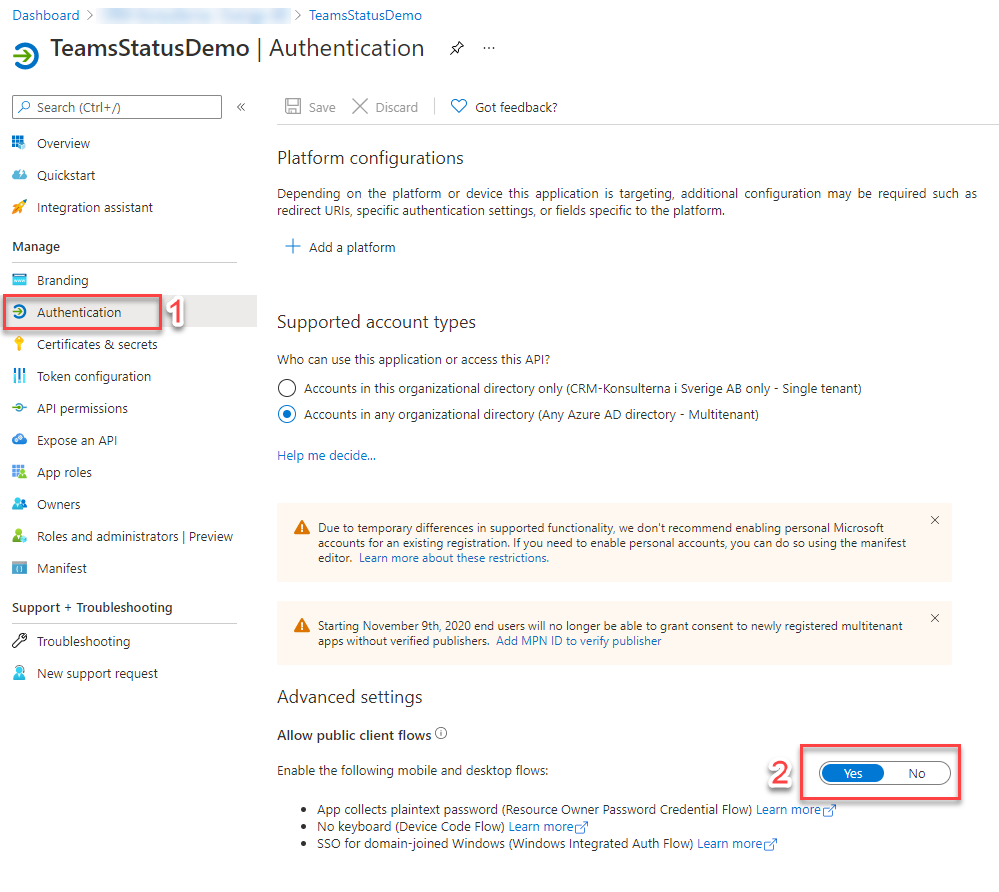
Configure Authentication
The last thing to do with the App Registration is to set the “Allow public client flows” flag to “Yes”. This can be found at the end of the “Authentication” page.
Setup Status Indicator
Now we come to the real part of this blog post. We will finally setting up our status indicator light application.
As mentioned earlier you can find the source code of it on GitHub.
Everything we do in this section is on the Raspberry Pi via the PuTTY terminal.
“Install”
Actually it isn’t really an installation. It is more downloading the source, building it and then running it.
To structure our applications in a good way we create a new folder called “projects” in our home folder and opening it.
cd
mkdir projects
cd projects
Then we have to clone the application from GitHub and open the folder of it.
git clone https://github.com/BenediktBergmann/StatusIndicator
cd StatusIndicator
After that we need to install all the npm packages.
npm install
The applications uses a npm packege, node-blinkt, to change the LEDs. This npm packages does need “Wiring Pi” (which we installed earlier) and therefore can only be added on the Pi. To do this we execute the following command.
npm install node-blinkt
The install process can take some minutes. It will also generate quite a lot of output in your terminal. That is normal.
When the installation is done we have to change the ledService file. Since the npm packaged to change the LEDs wasn’t installed I commented out the needed lines.
Open the ledService.ts file, which is located in src/services, with vi.
vi src/services/ledService.ts
By pressing “i” for insert you will be able to change the file in vi. Uncomment (delete the leading //) in the rows 3,4,14-17 and 32-34. The file should then look like this.
//sudo apt-get install wiringpi
//npm install node-blinkt
const Blinkt = require('node-blinkt');
const leds = new Blinkt;
const { DEBUG, BRIGHTNESS } = require('./../helper/config');
let lastStatus = "";
function setColor(red: number, green: number, blue: number, brightness: number){
if(DEBUG === "true"){
console.log(`Setting leds with: Red: ${red}, Green: ${green}, Blue: ${blue} and Brightness: ${brightness}`);
}
leds.setup();
leds.clearAll();
leds.setAllPixels(red, green, blue, brightness);
leds.sendUpdate();
}
export class ledService{
clearLEDs(): void{
if(lastStatus === "cleared"){
return;
}
if(DEBUG === "true"){
console.log("Clear all LEDs");
}
lastStatus = "cleared";
leds.setup();
leds.clearAll();
leds.sendUpdate();
};
async setAvailable(): Promise<void> {
if(lastStatus === "Available"){
return;
}
if(DEBUG === "true"){
console.log("Set LEDs to green");
}
setColor(0, 255, 0, BRIGHTNESS);
lastStatus = "Available";
};
async setAway(): Promise<void>{
if(lastStatus === "Away"){
return;
}
if(DEBUG === "true"){
console.log("Set LEDs to yellow");
}
setColor(255, 100, 0, BRIGHTNESS);
lastStatus = "Away";
}
async setBusy(): Promise<void> {
if(lastStatus === "Busy"){
return;
}
if(DEBUG === "true"){
console.log("Set LEDs to red");
}
setColor(255, 0, 0, BRIGHTNESS);
lastStatus = "Busy";
};
async errorBlink(): Promise<void> {
await this.setBusy();
await sleep(1000);
await this.clearLEDs();
await sleep(500);
await this.setBusy();
await sleep(1000);
await this.clearLEDs();
await sleep(500);
await this.setBusy();
await sleep(1000);
await this.clearLEDs();
}
}
function sleep(ms: number) {
return new Promise((resolve) => {
setTimeout(resolve, ms);
});
}
If you are ready with that you can exit vi by first pressing “Esc” and then typing “:wq” which will write the changes and quit vi.
Configure
The last step to create a Teams status indicator light is to create our configuration. To achieve that we create a new file called “.env” by executing the following command.
vi .env
This will again open vi. Here you can copy and paste the following code (paste in vi with shift + insert).
# Credentials
TENANT_ID=<Tenant ID we copied earlier>
APP_ID=<App Registration ID we copied earlier>
# Endpoints
AAD_ENDPOINT=https://login.microsoftonline.com/
GRAPH_ENDPOINT=https://graph.microsoft.com/
# General Config
POLL_INTERVAL=1
POLL_WEEKENDS=false
START_TIME="7:00"
END_TIME="17:00"
DEBUG=false
BRIGHTNESS=0.05
DEVICE_CODE_REQUEST_TIMEOUT=20
# Email settings
EMAIL_ON=false
EMAIL_HOST="<Your SMTP Host>"
EMAIL_PORT=<Your SMTP Port>
EMAIL_USER="<Your SMTP Username>"
EMAIL_PASSWORD="<Your SMTP Password>"
EMAIL_TO="<your email>"
Here you have some possibilities to configure your Teams status indicator light.
TENANT_ID
Should contain the ID of your tenant. You have copied that in one of the previous steps.
APP_ID
Should contain the ID of the created App Registration. You have copied that in one of the previous steps.
POLL_INTERVAL
Defines how often the light should poll for the Teams status/presence. You can configure something between 1 and 60. Default is every minute.
POLL_WEEKENDS
Whether or not to poll the status on the weekends.
START_TIME
The time of the day when the polling should start. I usually do that at 07:00. You can configure something between 00:00 and 23:59.
END_TIME
The time of the day when the polling should end. I usually do that at 17:00. You can configure something between 00:00 and 23:59.
DEBUG
Defines whether or not to output debug logs.
BRIGHTNESS
Configures how bright the LEDs should be.
DEVICE_CODE_REQUEST_TIMEOUT
Says how long (in minutes) the device code should be valid.
EMAIL_ON
Whether or not the application should send emails when you have to login. If disabled your only possibility to see the device code is in the logs.
EMAIL_HOST
The hostname of your SMTP server.
EMAIL_PORT
The port of your SMTP server.
EMAIL_USER
Username you use to login to your SMTP server.
EMAIL_PASSWORD
The Password of the user you use to login to your SMTP server.
EMAIL_TO
The email address the status indicator should send the mails to.
Build/Transpile
Since node only understands JavaScript we have to transpile our TypeScript code to JavaScript before we can run the application. This can be done with the following command.
npm run build
This command will take some minutes to exeute.
Start the status indicator light
Now that we have finished all the steps to configure and create a Teams status indicator light we have to start the application. This can be done by running the following command.
node ./dist/StatusIndicator.js
This will fire up the application. After a while you will see a message to login. It will contain a link and a code. You have to open the link on your normal device, enter the code and login to your Microsoft Work or School account.
The lights will become the correct color after a short time, depending on your poll interval.
If you are outside of the configured time interval or offline the lights will not be on.
Add to Autostart
Since we don’t want to connect to the Pi to start the application every time we start it, we can add the Status light indicator light to the auto start.
We create a new file called statusIndicator.service by executing the following command.
vi statusIndicator.service
We add the following code to the file
[Unit]
Description=Teams Status Indicator
After=network.target
[Service]
WorkingDirectory=/home/pi/projects/StatusIndicator
ExecStart=node dist/StatusIndicator.js
Restart=on-failure
User=pi
[Install]
WantedBy=multi-user.target
Here again you can save by pressing “Esc” and then writing “:wq”.
This script does basically do the same as we do when we start the application manually. In addition, we have to configure which user to use and in which directory to work in.
Next we have to copy the file to the correct folder and set the right chmod.
sudo cp statusIndicator.service  /etc/systemd/system/
sudo chmod u+rwx /etc/systemd/system/statusIndicator.service
Last step for this setup is to enable the service which will then start it on every start of the Pi.
sudo systemctl enable statusIndicator
You can manually start or stop the service with the following commands.
sudo systemctl start statusIndicator
sudo systemctl stop statusIndicator
Access Logs
To access the logs of our Teams status indicator light you can execute the following command.
sudo journalctl -u statusIndicator
There is a lot more you can do with journalctl. For example you can filter on certain timeframes.
Conclusion
Now you have learned how to create a Teams status indicator light using a Raspberry Pi. There are quite a few steps needed to set everything up (way more effort went into creating the used application though). At the end this can help to show everyone when you are available and when not.
I hope this post was useful. Feel free to contact me if there are any additional questions.
You can also subscribe and get new blog posts emailed to you directly.
About The Author
Benedikt
Power Platform Consultant @ CRM Konsulterna
Hi Benedikt,
I tried to get this project up and running, but I have trouble to connect to the Azure App. In the response on the RPi I got these endpoint_resolution_errors. Any suggestions on how to solve this?
pi@raspberrypi:~/projects/StatusIndicator $ node ./dist/StatusIndicator.js
————————————————–
2021-09-18T12:58:01.920Z
Checking Presence Status
Within configured timeframe. Will proceed
Attempt to get presence
Cron started with following schedule: */15 */1 6-22 * * *
endpoints_resolution_error: Error: could not resolve endpoints. Please check network and try again. Detail: ClientAuthError: openid_config_error: Could not retrieve endpoints. Check your authority and verify the .well-known/openid-configuration endpoint returns the required endpoints. Attempted to retrieve endpoints from: https://login.microsoftonline.com//v2.0/.well-known/openid-configuration
ClientAuthError: endpoints_resolution_error: Error: could not resolve endpoints. Please check network and try again. Detail: ClientAuthError: openid_config_error: Could not retrieve endpoints. Check your authority and verify the .well-known/openid-configuration endpoint returns the required endpoints. Attempted to retrieve endpoints from: https://login.microsoftonline.com//v2.0/.well-known/openid-configuration
at ClientAuthError.AuthError [as constructor] (/home/pi/projects/StatusIndicator/node_modules/@azure/msal-common/dist/index.js:398:24)
at new ClientAuthError (/home/pi/projects/StatusIndicator/node_modules/@azure/msal-common/dist/index.js:634:28)
at Function.ClientAuthError.createEndpointDiscoveryIncompleteError (/home/pi/projects/StatusIndicator/node_modules/@azure/msal-common/dist/index.js:671:16)
at Function. (/home/pi/projects/StatusIndicator/node_modules/@azure/msal-common/dist/index.js:6074:47)
at step (/home/pi/projects/StatusIndicator/node_modules/@azure/msal-common/dist/index.js:79:23)
at Object.throw (/home/pi/projects/StatusIndicator/node_modules/@azure/msal-common/dist/index.js:60:53)
at rejected (/home/pi/projects/StatusIndicator/node_modules/@azure/msal-common/dist/index.js:51:65)
at processTicksAndRejections (internal/process/task_queues.js:86:5)
{ ClientAuthError: endpoints_resolution_error: Error: could not resolve endpoints. Please check network and try again. Detail: ClientAuthError: openid_config_error: Could not retrieve endpoints. Check your authority and verify the .well-known/openid-configuration endpoint returns the required endpoints. Attempted to retrieve endpoints from: https://login.microsoftonline.com//v2.0/.well-known/openid-configuration
at ClientAuthError.AuthError [as constructor] (/home/pi/projects/StatusIndicator/node_modules/@azure/msal-common/dist/index.js:398:24)
at new ClientAuthError (/home/pi/projects/StatusIndicator/node_modules/@azure/msal-common/dist/index.js:634:28)
at Function.ClientAuthError.createEndpointDiscoveryIncompleteError (/home/pi/projects/StatusIndicator/node_modules/@azure/msal-common/dist/index.js:671:16)
at Function. (/home/pi/projects/StatusIndicator/node_modules/@azure/msal-common/dist/index.js:6074:47)
at step (/home/pi/projects/StatusIndicator/node_modules/@azure/msal-common/dist/index.js:79:23)
at Object.throw (/home/pi/projects/StatusIndicator/node_modules/@azure/msal-common/dist/index.js:60:53)
at rejected (/home/pi/projects/StatusIndicator/node_modules/@azure/msal-common/dist/index.js:51:65)
at processTicksAndRejections (internal/process/task_queues.js:86:5)
errorCode: ‘endpoints_resolution_error’,
errorMessage:
‘Error: could not resolve endpoints. Please check network and try again. Detail: ClientAuthError: openid_config_error: Could not retrieve endpoints. Check your authority and verify the .well-known/openid-configuration endpoint returns the required endpoints. Attempted to retrieve endpoints from: https://login.microsoftonline.com//v2.0/.well-known/openid-configuration‘, subError: ”, name: ‘ClientAuthError’ }
{ ClientAuthError: endpoints_resolution_error: Error: could not resolve endpoints. Please check network and try again. Detail: ClientAuthError: openid_config_error: Could not retrieve endpoints. Check your authority and verify the .well-known/openid-configuration endpoint returns the required endpoints. Attempted to retrieve endpoints from: https://login.microsoftonline.com//v2.0/.well-known/openid-configuration
at ClientAuthError.AuthError [as constructor] (/home/pi/projects/StatusIndicator/node_modules/@azure/msal-common/dist/index.js:398:24)
at new ClientAuthError (/home/pi/projects/StatusIndicator/node_modules/@azure/msal-common/dist/index.js:634:28)
at Function.ClientAuthError.createEndpointDiscoveryIncompleteError (/home/pi/projects/StatusIndicator/node_modules/@azure/msal-common/dist/index.js:671:16)
at Function. (/home/pi/projects/StatusIndicator/node_modules/@azure/msal-common/dist/index.js:6074:47)
at step (/home/pi/projects/StatusIndicator/node_modules/@azure/msal-common/dist/index.js:79:23)
at Object.throw (/home/pi/projects/StatusIndicator/node_modules/@azure/msal-common/dist/index.js:60:53)
at rejected (/home/pi/projects/StatusIndicator/node_modules/@azure/msal-common/dist/index.js:51:65)
at processTicksAndRejections (internal/process/task_queues.js:86:5)
statusCode: -1,
code: ‘ClientAuthError’,
requestId: null,
date: 2021-09-18T12:58:04.004Z,
body:
‘ClientAuthError: endpoints_resolution_error: Error: could not resolve endpoints. Please check network and try again. Detail: ClientAuthError: openid_config_error: Could not retrieve endpoints. Check your authority and verify the .well-known/openid-configuration endpoint returns the required endpoints. Attempted to retrieve endpoints from: https://login.microsoftonline.com//v2.0/.well-known/openid-configuration‘ }
Set LEDs to red
Setting leds with: Red: 255, Green: 0, Blue: 0 and Brightness: 0.05
Clear all LEDs
Set LEDs to red
Setting leds with: Red: 255, Green: 0, Blue: 0 and Brightness: 0.05
Clear all LEDs
Set LEDs to red
Setting leds with: Red: 255, Green: 0, Blue: 0 and Brightness: 0.05
Clear all LEDs
(node:484) UnhandledPromiseRejectionWarning: ClientAuthError: endpoints_resolution_error: Error: could not resolve endpoints. Please check network and try again. Detail: ClientAuthError: openid_config_error: Could not retrieve endpoints. Check your authority and verify the .well-known/openid-configuration endpoint returns the required endpoints. Attempted to retrieve endpoints from: https://login.microsoftonline.com//v2.0/.well-known/openid-configuration
at ClientAuthError.AuthError [as constructor] (/home/pi/projects/StatusIndicator/node_modules/@azure/msal-common/dist/index.js:398:24)
at new ClientAuthError (/home/pi/projects/StatusIndicator/node_modules/@azure/msal-common/dist/index.js:634:28)
at Function.ClientAuthError.createEndpointDiscoveryIncompleteError (/home/pi/projects/StatusIndicator/node_modules/@azure/msal-common/dist/index.js:671:16)
at Function. (/home/pi/projects/StatusIndicator/node_modules/@azure/msal-common/dist/index.js:6074:47)
at step (/home/pi/projects/StatusIndicator/node_modules/@azure/msal-common/dist/index.js:79:23)
at Object.throw (/home/pi/projects/StatusIndicator/node_modules/@azure/msal-common/dist/index.js:60:53)
at rejected (/home/pi/projects/StatusIndicator/node_modules/@azure/msal-common/dist/index.js:51:65)
at processTicksAndRejections (internal/process/task_queues.js:86:5)
(node:484) UnhandledPromiseRejectionWarning: Unhandled promise rejection. This error originated either by throwing inside of an async function without a catch block, or by rejecting a promise which was not handled with .catch(). (rejectionid: 1)
(node:484) [DEP0018] DeprecationWarning: Unhandled promise rejections are deprecated. In the future, promise rejections that are not handled will terminate the Node.js process with a non-zero exit code.
————————————————–
I haven’t had this error earlier. When starting the application I do get errors as well because the login process was not completed. Once I login they disappear. But I don’t think that’s your problem since you don’t even come to the place where it should create a device code.
It looks like the application can’t reach the Graph API endpoints for some reason. The reasons I could imagine now are:
Could you check those?
Thanks for the reply Benedikt. I’ll check those reasons you suggest again this weekend, just to be sure.
Hi Benedikt,
This is my first pi project and I am having some trouble getting around the following:
internal/modules/cjs/loader.js:670
throw err;
^
Error: Cannot find module ‘/home/pi/dist/StatusIndicator.js’
at Function.Module._resolveFilename (internal/modules/cjs/loader.js:668:15)
at Function.Module._load (internal/modules/cjs/loader.js:591:27)
at Function.Module.runMain (internal/modules/cjs/loader.js:877:12)
at internal/main/run_main_module.js:21:11
I have tried rerunning the scripts, installs, and the build but nothing I have done, to date, seems to have worked. Could you point me in the right direction?
Thanks in advance
To which folder have you downloaded the repo?
Have you had any errors during build?
Hi Benedikt,
Thank you for helping. I have made a video of the steps I took as I formatted it and started from scratch. I did hit this error at the ‘npm install node-blinkt’
npm WARN deprecated tar@2.2.2: This version of tar is no longer supported, and will not receive security updates. Please upgrade asap.
npm WARN deprecated .2: request has been deprecated, see https://github.com/request/request/issues/3142
npm WARN deprecated har-validator@5.1.5: this library is no longer supported
npm WARN deprecated uuid@3.4.0: Please upgrade to version 7 or higher. Older versions may use Math.random() in certain circumstances, which is known to be problematic. See https://v8.dev/blog/math-random for details.
> node-wiring-pi@0.0.5 install /home/pi/projects/StatusIndicator/node_modules/node-wiring-pi
> /bin/bash ./install.sh
/usr/bin/dpkg-query
dpkg-query: package ‘wiringpi’ is not installed and no information is available
Use dpkg –info (= dpkg-deb –info) to examine archive files.
dpkg-query: no packages found matching wiringpi
Checking for wiringpi:
Could not find wiringpi package – try ‘sudo apt-get install wiringpi’
npm WARN statusindicator@1.0.0 No repository field.
npm ERR! code ELIFECYCLE
npm ERR! errno 1
npm ERR! node-wiring-pi@0.0.5 install: `/bin/bash ./install.sh`
npm ERR! Exit status 1
npm ERR!
npm ERR! Failed at the node-wiring-pi@0.0.5 install script.
npm ERR! This is probably not a problem with npm. There is likely additional logging output above.
npm ERR! A complete log of this run can be found in:
npm ERR! /home/pi/.npm/_logs/2022-03-19T00_30_42_608Z-debug.log
pi@MarkTeamsAlertPi:~/projects/StatusIndicator $ npm WARN statusindicator@1.0.0 No repository field.
npm ERR! code ELIFECYCLE
npm ERR! errno 1
npm ERR! node-wiring-pi@0.0.5 install: `/bin/bash ./install.sh`
npm ERR! Exit status 1
npm ERR!
npm ERR! Failed at the node-wiring-pi@0.0.5 install script.
npm ERR! This is probably not a problem with npm. There is likely additional logging output above.
npm ERR! A complete log of this run can be found in:
npm ERR! /home/pi/.npm/_logs/2022-03-19T00_30_42_608Z-debug.log
You can see the video at https://donfam-my.sharepoint.com/:v:/g/personal/mark_calleja_saudigital_com_au/EcpajQwtQ4ZAiGmjiBdgXLcBjQCLEg0_a1GFT14O9wodmA?e=8xbj0D
It looks like the underlying error is that WiringPi wasn’t installed correctly.
I did a quick search and found that WiringPi themes to be deprecated. I will have to check and work out a solution for that.
Hi Benedikt,
Not sure if you have been able to find an alternative to WiringPi??
Thanks in advance
Mk
Unfortunately, I haven’t had time for that yet. I hope to be able to take a look at it in the coming days.