Setting up a TypeScript project for Dataverse
In one of my recent projects, I had the need to set up a new TypeScript project. To be honest it was the first time I did this from scratch, which resulted in a few situations where I had to search for tutorials/explanations and combine all of those. That is the reason for me to write this blog post and describe how to do that.
There are a few great posts about this topic out there already (for example from Scott Durow or Oliver Flint). I found that all of them either describe more than I think I need in my projects, less than I need or are split into different posts which makes it harder to follow.
After you read this post you will know how to create a TypeScript project from scratch.
The following configuration is working as of writing this blog post (December 2020). Everything in the Front-end space is evolving very fast. There might be stuff that is not working as described when you read the post. If you find something please let me know.
At the end of this post, you can find a “Summary” section where I list all the commands we executed and the configuration files we created. To have a quicker start and skip all the explanations you could directly go there.
You can find the project with all the configuration on GitHub.
Table of contents
Why TypeScript?
Let’s take a minute and talk about this question first.
As described in one of my previous blog posts I do see three big advantages of using TypeScript over vanilla JavaScript
Strongly typed
Since TypeScript is strongly typed the job of writing it gets a lot easier. If you use a proper IDE (Visual Studio Code for example) it will show you type errors while developing.
Backward compatibility
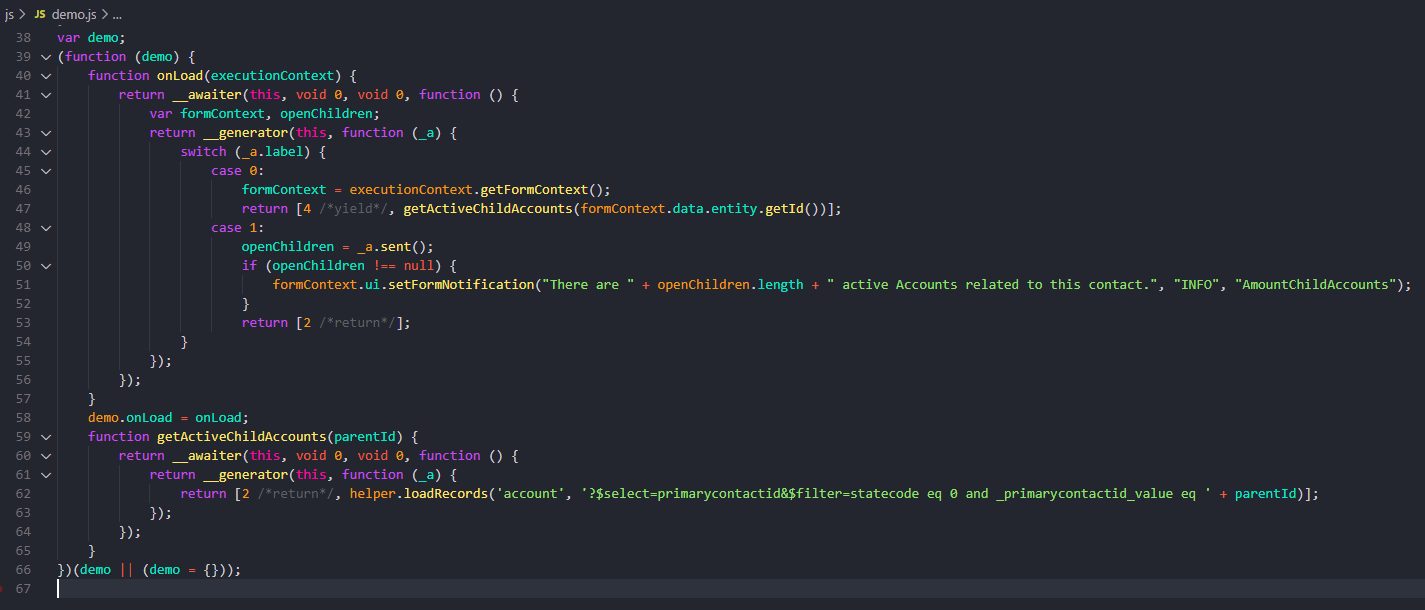
In the end, TypeScript has to be transpiled/compiled to JavaScript. This could, for example, be done via the “tsc” command, which will transpile the TS file to the configured target ECMAScript version (ECMAScript is a standard to define JavaScript. You can read more about that here as well as about the browser support here). With the ability to target different/older versions of the standard the TS will get automatically transpiled into a JS file that is compatible with older browser versions. This means one can write readable code without thinking about compatibility. When transpiled it gets something that is compatible. Of course, it’s not always that easy. In the screenshot below you can see a part of our transpiled demo file.
Tests & Debugging
With TypeScript it is much easier to create tests that could be run automatically in a pipeline. Another big plus is that it is possible to debug the code with the help of source map files.
Objectives
The objectives of this post is to show how to set up a Typescript project for a Dataverse implementation from scratch.
This includes the following techniques (in addition to the basic TypeScript)
Type declaration
Since TypeScript is a strongly typed language (as mentioned above) we need to import the type declaration of Xrm. With that TypeScript “knows” which functions there are and which types to use.
There is the possibility to create type declarations based on the entities there are in Dataverse. One tool to achieve this is delegateas/XrmDefinitelyTyped. For a starting point, I think that is not mandatory (even though it could help), therefore we will not cover it in this blog post.
This would be enough for a really basic setup. Since I usually would like to have a bit more functionality and think it makes developers live a lot easier I add the following as well.
Bundling
One common technique when it comes to front end development is bundling. This is for example automatically activated/configured if you create a new Angular or React project.
The idea is to combine several ts files into one js file. With that development becomes easier, since one can separate files, and still there only will be a small number of different files to deploy and serve.
We will use a tool/package called Webpack to achieve this.
Linting
A linter is basically a spellchecker for one’s JavaScript/TypeScript code. It scans the code and enforces semantic code rules. For example to use let instead of var.
To achieve this we will use ESLint.
Code formatting
There are several tools that enforce correct code formatting. For example, so that one is not using both tabs and spaces in the same file.
Prettier is the tool we will use for that.
Delimitations
I would like to be clear on the delimitation. I will not talk about tests and deployment of the Webresources. This would definitely be too much for one blog post. I might create separated posts about those areas.
Prerequisites
In this chapter we will briefly learn about the prerequisites needed for the rest of this blog post.
Software
You need to have NodeJS and NPM installed on your machine. I do assume that is already the case, if not you can download it here.
I will use Visual Studio Code for everything related to TypeScript. One could of course use any other IDE.
Folder structure
I like clean folder structures where one knows directly what to expect, therefore I am going with the following:
Within the bigger project (which probably includes Plugins, custom workflow actions, Batchjobs and whatever) I have a folder called “front-end”. There we have one folder called “ts” that will include all our stuff around TypeScript (.ts files, tests, configuration, …) and a “Webresources” folder. The Webresources folder contains the actual webresources that get deployed to Dataverse. This also means that there is a js folder which will be the output folder for our transpile job.
front-end
├── ts
│   ├── src
│   │   ├── code
│   │   │   ├── forms
│   │   │   │   ├── __test__
│   │   │   │   │   ├── *.test.ts
│   │   │   │   ├── *.ts
│   │   │   ├── ribbon
│   │   │   │   ├── __test__
│   │   │   │   │   ├── *.test.ts
│   │   │   │   ├── *.ts
│   │   │   ├── utils
│   │   │   │   ├── __test__
│   │   │   │   │   ├── *.test.ts
│   │   │   │   ├── *.ts
├── Webresources
│   ├── html
│   │   ├── *.html
│   ├── css
│   │   ├── *.css
│   ├── images
│   │   ├── *.jpg
│   │   ├── *.png
│   │   ├── *.svg
│   ├── js
│   │   ├── *.js
Files
For the test purpose, we need two files.
helper.ts
This file should be created in the “utils” folder in ts/src/code and contain the following code.
Shout out to Magnus Gether Sørensen: With his help, I could improve the following TypeScript a lot.
export async function loadRecords(
entityName: string,
query: string,
maxPageSize?: number,
errorCallback?: (error: any) => void,
): Promise<any>{
try {
const result: any = await Xrm.WebApi.online.retrieveMultipleRecords(entityName, query, maxPageSize);
return result?.entities?.length >= 1 ? result.entities : null;
} catch (e: any) {
if (errorCallback != null) errorCallback(e);
throw Error();
}
}
demoForm.ts
This file should be created in the “ts/src/code/forms” folder and contain the following code
import * as helper from "../utils/helper";
export async function onLoad(executionContext: Xrm.Events.EventContext): Promise<void> {
const formContext = executionContext.getFormContext();
const openChildren = await getActiveChildAccounts(formContext.data.entity.getId());
if (openChildren !== null) {
formContext.ui.setFormNotification(
"There are " + openChildren.length + " active Accounts related to this contact.",
"INFO",
"AmountChildAccounts",
);
}
}
async function getActiveChildAccounts(parentId: string): Promise<any[] | null> {
return helper.loadRecords(
"account",
"?$select=primarycontactid&$filter=statecode eq 0 and _primarycontactid_value eq " + parentId,
);
}
Setup
Let’s get started with the real fun stuff. We will create and configure our Typescript project.
Basic setup
The first step will be to setup a basic TypeScript project. Later we will add all the mentioned tools.
Install packages
For the basic setup, we will open our front-end folder with Visual Studio Code and execute the following commands.
Open correct folder
In the Terminal (within VS Code) we go to the “ts” folder with the help of the following command.
cd ts
All the commands that follow will be executed in the Terminal within Visual Studio Code and within the “ts” folder.
npm init
This will guide you through some questions and create a “package.json” file.
npm init
Install TypeScript
The next step is to install TypeScript. This could be done globally
npm install -g typescript
or locally in the current folder (recommended).
npm install typescript --save-dev
Install Node types
After that, we have to install node types
npm install @types/node --save-dev
Install XRM types
In addition to that, we need general Xrm Typings. Those can be installed with the following command.
npm install @types/xrm --save-dev
For the ease of this post, I will not go into detail about custom typings based on one’s solution (like one could create with tools like delegateas/XrmDefinitelyTyped for example).
Init tsc
The last step, for now, is to init the tsc command. This will create a tsconfig.json. In that file, one could configure how the transpiler behave. For example, one could define the target ECMAScript version here.
tsc --init
The created tsconfig.json should look something like the following (just with a lot more comments)
{
"compilerOptions": {
/* Visit https://aka.ms/tsconfig.json to read more about this file */
/* Basic Options */
"target": "es5",
"module": "commonjs",
/* Strict Type-Checking Options */
"strict": true,
"esModuleInterop": true,
/* Advanced Options */
"skipLibCheck": true,
"forceConsistentCasingInFileNames": true
}
}
Configurations
If you now run “tsc” it will generate two js files within the same folder as the ts files are. This behaviour we have to change.
To do so we will add/change a few things to the tsconfig.json (read more about what is possible). The first thing is that we would like to have the created JS-files in the js folder under webresources, to do that we will add (or comment out) the “outDir” config and set it to “../Webresources/js”. In addition to that, we would like to include all the files we have in the “src/code” folder, so that we just can run “tsc” without specifying which file to transpile. That can be done by adding an additional row at the end of the file.
"include": ["./src/code/**/*"]
Another thing I use to change is the target to “es6” (the default is “es5”). If we look at the browsers that are supported for Dataverse and which browsers support which version of ECMA Script “es6” should be fine since IE is not recommended to use for Dataverse. We also align the module configuration from “commonjs” to “es6”.
In addition to that we will add the following rows.
"allowJs": true,
"allowSyntheticDefaultImports": true,
"moduleResolution": "node",
"resolveJsonModule": true,
Let me briefly explain every configuration.
allowJs
Makes it possible to import js files in addition to just ts and tsx. Read more.
allowSyntheticDefaultImports
Allows an easier import syntax even when the module doesn’t export anything. Read more.
moduleResolution
“node” is today’s standard. Read more.
resolveJsonModule
Allows import of modules with a .json extension. Read more.
The whole file should now look like this.
{
"compilerOptions": {
/* Visit https://aka.ms/tsconfig.json to read more about this file */
/* Basic Options */
"target": "es6",
"module": "es6",
"outDir": "../Webresources/js",
/* Strict Type-Checking Options */
"strict": true,
"esModuleInterop": true,
/* Advanced Options */
"skipLibCheck": true,
"forceConsistentCasingInFileNames": true,
"allowJs": true,
"allowSyntheticDefaultImports": true,
"moduleResolution": "node",
"resolveJsonModule": true,
},
"include": ["./src/code/**/*"]
}
If we now run “tsc” the js files will be created in the Webresource/js folder. The basic setup is created and works.
As mentioned earlier one could stop here to have a very basic setup. I think, however, that the following stuff is nice to have, increases the productivity of developers, makes their life easier and should be included in a TypeScript project.
Add Webpack
Next step is to add webpack to our project.
Install packages
We have to install the following packages
webpack
The basic webpack package
webpack-cli
Package to be able to use webpack in the command line.
webpack-merge
Plugin to be able to merge different configs.
clean-webpack-plugin
Plugin to clean the output dir before every build.
ts-loader
OOB webpack can only load js files. With this loader, it is possible to load TypeScript files as well.
This can be done with the following command
npm install --save-dev ts-loader webpack webpack-cli webpack-merge clean-webpack-plugin
Configuration – webpack.*.js
For webpack to work we need a webpack.js. Since the config between development and production will differ we will create 3 config files in the ts folder.
webpack.common.js
Contains all configuration that is shared between dev and prod. The file should have the following content.
const path = require('path');
const { CleanWebpackPlugin } = require('clean-webpack-plugin')
module.exports = {
devtool: 'source-map',
entry: {
demoForm: './src/code/forms/demoForm.ts'
},
output: {
filename: '[name].js',
sourceMapFilename: 'maps/[name].js.map',
path: path.resolve(__dirname, '../Webresources/js'),
library: ['bebe', '[name]'],
libraryTarget: 'var'
},
module: {
rules: [
{
test: /\.(ts|tsx)$/,
use: 'ts-loader',
exclude: /node_modules/,
},
],
},
plugins: [
new CleanWebpackPlugin()
],
resolve: {
extensions: ['.ts', '.js' ],
}
};
devtool
Defines that we have separated source map files.
entry
A list of entry points where webpack starts to build the relation tree. In this example, we would like to start at the demo.ts.
output
Configures how the output file should be created. In our case the filename will be the name of the entry followed by “.js”. All the source map files will be stored in a dedicated folder “maps” and have the following schema as the file name: <entry name>.js.map. The path is our “webresources/js” folder. The library is “bebe” followed by the entry name, this means that all the functions will be called by “bebe.<entry name>.<function name>” (in our case “bebe.demoForm.onLoad”). So the first library should be your prefix. The last part is that the library should be within a var.
module
Here we add the ts-loader so that webpack knows how to handle TypeScript files.
plugins
We have added one plugin, “CleanWebpackPlugin”, which will clean the output folder before every build.
resolve
The last configuration defines which files to process. In our case only ts and js.
webpack.dev.js
Contains configuration that is specific to development. The file should have the following content.
const { merge } = require('webpack-merge')
const commonConfig = require('./webpack.common')
module.exports = merge(commonConfig ,{
mode: 'development',
optimization: {
minimize: false
},
});
This file merges the commonConfig with everything we added here.
mode
Defines what the target mode is. Either Development or Production. This will change some stuff under the hood.
optimization
This configuration defines that we do not want to minify our js when we build as development.
webpack.prod.js
Contains configuration that is specific to production. The file should have the following content.
const { merge } = require('webpack-merge')
const commonConfig = require('./webpack.common.js')
module.exports = merge(commonConfig , {
mode: 'production'
});
This file merges the commonConfiguration with everything we added here.
mode
Defines what the target mode is. Either Development or Production. This will change some stuff under the hood.
Configuration – package.json
Another part we have to configure is the package.json.
We will add the following rows under “scripts” within the package.json.
"build": "webpack --config webpack.dev.js",
"dist": "webpack --config webpack.prod.js",
"start": "webpack --watch --config webpack.dev.js",
With that, we do have three new commands to execute. One to build our solution in development, one for production and one to start a watch that builds everything in development mode whenever a file is changed.
If we now execute “npm run build” we will have one demo.js and one demo.js.map in our Webresouce/js folder. The demo.js file includes our function from the helper.ts file as well.

Add ESLint & Prettier
Next up are both ESLint and Prettier.
Install packages
We have to install the following packages
eslint
Core eslint package.
@typescript-eslint/parser
This package makes it possible for ESLint to handle TypeScript files.
@typescript-eslint/eslint-plugin
Plugin that contains some standard rules for TypeScript
prettier
Core package of prettier
eslint-config-prettier
To disable ESLint rules that might be in conflict with prettier rules.
eslint-plugin-prettier
Plugin that runs prettier from ESLint.
eslint-webpack-plugin
Needed to include eslint in webpack build.
This can be done with the following command
npm install --save-dev eslint @typescript-eslint/parser @typescript-eslint/eslint-plugin prettier eslint-config-prettier eslint-plugin-prettier eslint-webpack-plugin
In addition to that we have to install both prettier and eslint globally. This is needed to be able to execute them via the command line later.
npm install -g eslint prettier
Configuration
ESLint
First of all we have to create the basic configuration of ESLint. To do that we could run the init command of ESLint.
npx eslint --init
Since we in either way have to change the generated file we can skip this command and copy the following content to a new file, “.eslintrc.js”, in the ts folder. Read more about the ESLint config here.
By using a JavaScript file instead of a JSON file one could add comments for other developers.
module.exports =  {
"env": {
"browser": true,
"commonjs": true,
"es6": true
},
"extends": [
"plugin:@typescript-eslint/recommended",
"prettier",
"plugin:prettier/recommended"
],
"parser": "@typescript-eslint/parser",
"parserOptions": {
"project": "./tsconfig.json",
"sourceType": "module"
},
"plugins": [
"@typescript-eslint",
"prettier"
],
"rules": {
"@typescript-eslint/no-explicit-any": "off",
"prettier/prettier": "error"
}
}
env
List of environments to define available global variables.
extends
Contains a list of stuff (Plugins for example) the ESLint configuration extends.
parser
Defines which parser to use. In our case the typescript parser we installed.
parserOptions
Configures options for the parser. In our case the project and the sourceType to make it possible to import modules.
plugins
A list of plugins that should be used.
rules
Contains the project-specific rules that are not already defined in the standard plugins we extend. In our case we disable the “no-explicite-any” rule.
With this configuration prettier will be executed whenever ESLint is executed.
There is one more thing to do. All the config files are not used anywhere in the project, that’s why ESLint shows an error. To prevent it we create a file in the ts folder called “.eslintignore” and add the following content.
webpack.dev.js
webpack.prod.js
webpack.common.js
jest.config.js
.eslintrc.js
Prettier
The configuration of prettier is much easier. Here we have to create another file in the ts folder called “.prettierrc.js”. The content should be the following
module.exports =  {
"semi": true,
"trailingComma": "all",
"singleQuote": false,
"printWidth": 120,
"tabWidth": 4,
"endOfLine":"auto"
}
Webpack
To run the ESLint within the webpack pipeline we have to add the following line in the beginning of the webpack.common.js file.
const ESLintPlugin = require('eslint-webpack-plugin');
As well as the following additional plugin to the “plugins” array.
new ESLintPlugin({fix: true, extensions: ['ts', 'tsx'], lintDirtyModulesOnly: true, failOnError: true})
You can read more about the Plugin here and about which options are allowed here.
fix
With this option, ESLint will try to automatically fix errors.
extensions
Defines which file extensions to test.
lintDirtyModulesOnly
If “true” ESLint will only look at files that were changed.
failOnError
When “true” ESLint will fail the pipeline when an error was found, and could not be fixed automatically (since we have fix true)
Run both
To run ESLint we have two different alternatives
- From the command line
- Directly in VS Code via an extension
Command line
To be able to run those from the command line we add the following two lines to our package.json file within the scripts object.
"format": "prettier ./src/code/**/*.ts --write",
"lint": "eslint ./src/code/**/*.ts --fix"
format
When executed it will fix all the ts files format via prettier.
lint
When executed it will lint all the ts files via eslint.
VS Code
Normally one would like to run both prettier and eslint while developing and not only when transpiling the TypeScript files. This can be achieved by installing two plugins to VS code.
Prettier should work directly and show errors whenever a file is not following the configured formatting standard.
To get ESLint working we have to execute one additional step. Since our configuration of ESLint is not in our project root folder, but in the ts folder, we have to tell ESLint where to search for it. To do so we create a “settings.json” file within a “.vscode” folder which should be located in the project root folder. It could be that you have to create this folder if it is not there. The content of that file should be.
{
"eslint.workingDirectories": [
"ts"
],
"editor.codeActionsOnSave": {
"source.fixAll": true,
}
}
The second part of this file configures VS Code in a way that it fixes all files (eslint and prettier) when the file gets saved.
This manual one-time configuration has to be done by every developer since the .vscode folder will not be included in your repo by default.
Now ESLint and Prettier constantly scan all the ts files and show errors whenever something is not matching any of the configured rules.
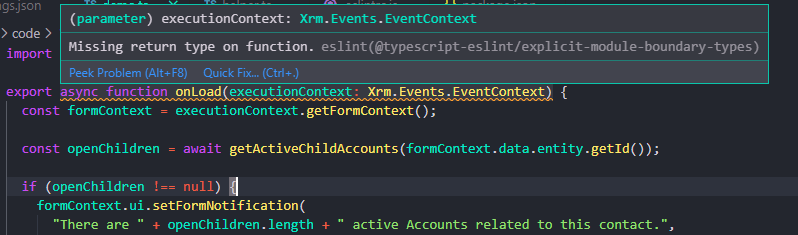
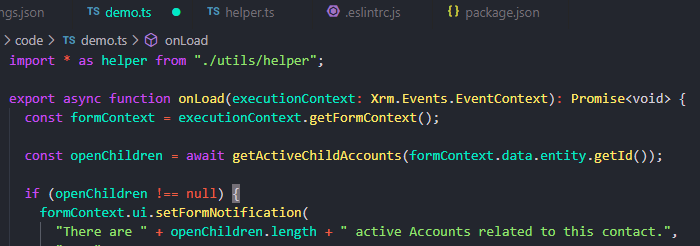
Here is an example of a missing function return type and how it was fixed.
Possible Error
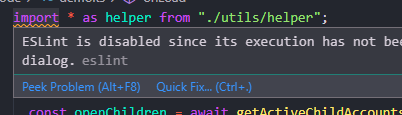
After installing ESLint (the VS Code extension) I got another error on the first line of every file.
ESLint is disabled since its execution has not been approved or denied yet. Use the light bulb menu to open the approval dialog.
By clicking on “Quick Fix” and choosing the first option in the appearing dropdown a pop up will be shown.
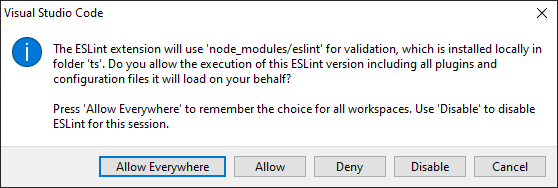
If you choose “Allow everywhere” the error should be gone and the file proceeded.
Conclusion
TypeScript makes it much easier to develop backward compatible JavaScript. But it is not the easiest thing to set up. On the other hand, it helps a lot when one has set it up, so it is most definitely worth it.
There are some more blog posts which build on top of this one if you would like to add more functionality to your TypeScript project.
- Add React and Tests to a TypeScript project
- Add SASS to a TypeScript project for Dataverse
- Add Sparkle Xrm to a Webresource project
I hope this article helped you. Feel free to contact me if you have any questions. I am always happy to help.
Summary
In this chapter, you can find all the commands and files to execute/create/modify. The intention is to give a very short quick start guide without any explanation.
Install packages
Open the project folder with VS Code, cd into the ts folder with the Terminal within VS Code and execute the following commands.
npm init
npm install --save-dev typescript @types/xrm ts-loader webpack webpack-cli webpack-merge clean-webpack-plugin eslint @typescript-eslint/parser @typescript-eslint/eslint-plugin prettier eslint-config-prettier eslint-plugin-prettier eslint-webpack-plugin
tsc --init
npm install -g eslint prettier
Install VS Code Extensions
Install the following two extensions
Configuration
Add the following files, or if present change the content to the following.
package.json
Add the following scripts
"build": "webpack --config webpack.dev.js",
"dist": "webpack --config webpack.prod.js",
"start": "webpack --watch --config webpack.dev.js",
"format": "prettier ./src/code/**/*.ts --write",
"lint": "eslint ./src/code/**/*.ts --fix"
tsconfig.json
{
"compilerOptions": {
/* Visit https://aka.ms/tsconfig.json to read more about this file */
/* Basic Options */
"target": "es6",
"module": "es6",
"outDir": "../Webresources/js",
/* Strict Type-Checking Options */
"strict": true,
"esModuleInterop": true,
/* Advanced Options */
"skipLibCheck": true,
"forceConsistentCasingInFileNames": true,
"allowJs": true,
"allowSyntheticDefaultImports": true,
"moduleResolution": "node",
"resolveJsonModule": true,
},
"include": ["./src/code/**/*"]
}
webpack.common.js
Change the first library within the output definition to your prefix
const path = require('path');
const { CleanWebpackPlugin } = require('clean-webpack-plugin');
const ESLintPlugin = require('eslint-webpack-plugin');
module.exports = {
devtool: 'source-map',
entry: {
demoForm: './src/code/forms/demoForm.ts'
},
output: {
filename: '[name].js',
sourceMapFilename: 'maps/[name].js.map',
path: path.resolve(__dirname, '../Webresources/js'),
library: ['bebe', '[name]'],
libraryTarget: 'var'
},
module: {
rules: [
{
test: /\.(ts|tsx)$/,
use: 'ts-loader',
exclude: /node_modules/,
}
],
},
plugins: [
new CleanWebpackPlugin(),
new ESLintPlugin({fix: true, extensions: ['ts', 'tsx'], lintDirtyModulesOnly: true, failOnError: true})
],
resolve: {
extensions: ['.ts', '.js' ],
}
};
webpack.dev.js
const { merge } = require('webpack-merge')
const commonConfig = require('./webpack.common')
module.exports = merge(commonConfig, {
mode: 'development',
optimization: {
minimize: false
},
});
webpack.prod.js
const { merge } = require('webpack-merge')
const commonConfig = require('./webpack.common')
module.exports = merge(commonConfig, {
mode: 'production'
});
.eslintrc.js
module.exports =  {
"env": {
"browser": true,
"commonjs": true,
"es6": true
},
"extends": [
"plugin:@typescript-eslint/recommended",
"prettier",
"plugin:prettier/recommended"
],
"parser": "@typescript-eslint/parser",
"parserOptions": {
"project": "./tsconfig.json",
"sourceType": "module"
},
"plugins": [
"@typescript-eslint",
"prettier"
],
"rules": {
"@typescript-eslint/no-explicit-any": "off",
"prettier/prettier": "error"
}
}
.eslintignore
webpack.dev.js
webpack.prod.js
webpack.common.js
jest.config.js
.eslintrc.js
.prettierrc.js
module.exports =  {
"semi": true,
"trailingComma": "all",
"singleQuote": false,
"printWidth": 120,
"tabWidth": 4,
"endOfLine":"auto"
}
.vscode/settings.json in the project root folder
{
"eslint.workingDirectories": [
"ts"
],
"editor.codeActionsOnSave": {
"source.fixAll": true,
}
}
You can also subscribe and get new blog posts emailed to you directly.
About The Author
Benedikt
Power Platform Consultant @ CRM Konsulterna
Thank you Beneditk. This is great post, I followed your complete post and I am going to move steps by step closer towards using typescript for development.
That is great! Glad you liked it.
Let me know if there is something I could help with.
Hi benedikt, I am been playing with Typescript and going well. If you can could you add some more examples to you github code. For example Error Message with openErrorDialog, CURD operation with Webapi and so on.
Thanks for your comment. Sure I can do that. I can update you if its there.
definitely I would like to know.
Wonderful article.
I did notice that I am receiving an error in the Output terminal in VSCode for ESLint when running the “lint” script added to package.json.
Cannot read config file: C:\…..\front-end\ts\node_moduels\eslint-config-prettier\@typescript-eslint.js Error: “prettier/@typescript-eslint” has been merged into “prettier” in eslint-config-prettier 8.0.0.
Not sure the best path for resolving this error without causing the eslintrc to go crazy. Any ideas?
Hej, glad you liked the post. It is correct that the configuration was changed since everything was merged into prettier. Earlier I updated the post to reflect that change. It looks like I missed updating the summary. I did that now.
Basically, you have to change line 9 in the .eslintrc.json from “prettier/@typescript-eslint” to “prettier”.
Hope it helps and the updated post works now again.
//Benedikt
I’ve setup a different project following the steps.
I noticed each time I open the webpack.config files, ESLint is throwing an error. For example:
Parsing error: “parserOptions.project” has been set for @typescript-eslint/parser.
The file does not match your project config: webpack.config.dev.js.
The file must be included in at least one of the projects provided.
Also appears when opening the eslintrc.js file:
Parsing error: “parserOptions.project” has been set for @typescript-eslint/parser.
The file does not match your project config: .eslintrc.js.
The file must be included in at least one of the projects provided
Any thoughts on this? All settings are matching what you have in the post.
Thanks for bringing this issue up. The problem is that the config files aren’t used in the project (which is intended). This results in the ESLint error you described. To prevent that we have to add a file called .eslintignore to the project. I have updated the post accordingly. Please see the end of the ESLint config part.
Thanks for the article. How would I use this code (just gulp serve)?
Hej Rali,
since this is for a Dynamics project you would have to deploy the js-file to a Dataverse instance and use it on a form or view.
Was that an answer to your question?
Hey Benedikt, amazing stuff, I got it to work bar one error and I cannot figure out what I missed.
TS2306: File ‘learning\ts\src\code\utils\helper.ts’ is not a module.
??
Argh
Hej Keith,
that is weird. Could you provide a link to a GitHub repo where your code (or parts of it) is stored so that I could have a look at it?
Thanks for the post. I have now configured all the steps you describe in this post. Is the idea to add a .ts file under forms folder for each table form in my solution, then add the filename to the entry{} in webpack.common.js. Thereafter upload the generated js file to library and configure one of the form events? Finally, do I now need be a bit stricter with the syntax when declaring the event functions – i have seen a few examples written without “async” and “Promise” declarations?
Hej Daniel,
yes that is the general idea. You add a ts, add it to the webpack config, upload the generated js (probably using some tool like Spkl) and configure the event (be aware of the namespace which will be generated by webpack).
Regarding the question of being stricter: There might be cases where you still need a sync function, but in general the recommendation is to use async (with either promises or await).
Hi Benedikt
thanks a lot for your helpful posts! I really appreciate it.
after following all the steps of this post above I get several of these errors (e.g. in the .eslintrc.js file):
Parsing error: Cannot read file ‘c:\git\typescript\zzzproject1\front-end\tsconfig.json’.eslint
my tsconfig.json is saved in /front-end/ts and NOT in the /front-end folder. where did I go wrong?
Hej Raphael,
that is hard to tell since it very much depends on your local setup.
Eslint usually searches in the root folder you opened in VS Code after the tsconfig.json file. Unless you tell it otherwise in the .vscode folder.
Which folder are you opening with VSCode and do you have a .vscode folder?
Hi Benedikt
I have written quite lot of TS for various form handers. No issues until I tried to wire up a helper.ts to a FormLoad . Note I am not using namespaces in either the helper or DemoForm.ts but all compiles ok
Web resource method does not exist: onFormLoad
exports.onLoad = exports.resetColumn = exports.resetSectionControls = void 0;
const helper = __importStar(__webpack_require__(/*! ../utils/helper */ “./src/code/utils/helper.ts”));
function onFormLoad(executionContext) {
var formContext = executionContext.getFormContext();
console.log(“OnForm Load”);
// helper.debugHelloForm(executionContext);
I suspect will need to fiddle with webpack to remove the helper if I want try and get the formload to work without the helper.
Hej Daniel,
so your problem is that it stops working as soon as you include the helper?
The code you have in your question is your TS?
Please ignore my last comment. I have two project folder structures: one with and one without web pack, so it is “bebe.demoForm.onFormLoad for the the former.
Hello Benedikt! How do you upload these files to CRM so they actually work on forms? I followed instructions from Oliver (you linked them in the introduction), but CRM cannot find neither OnLoad() function or class ContactMainForm (and no, there is no typo).
Hej,
have you taken the namespace into consideration which will be generated by webpack?
In your webpack config under output/library you have a list of namespaces. in our example if you have an OnLoad function in a file called account.ts you would need to write “bebe.account.OnLoad” as the function name.
[…] If you would like to get started with TypeScript for Dataverse make sure to take a look at my blog post “Setting up a TypeScript project for Dataverse“. […]