Filter rows between start and end dates
In this article we will learn how to filter a list of rows (f.k.a records, learn more) between start and end dates.
Scenario
In one of my current projects we had the need to categorize rows. Creating new categories should be dynamically and not require a deployment.
To achieve this we created a table (f.k.a entity, learn more) to store the categories. The table contains, beside others, a column (f.k.a field or attribute, learn more) for the start date (in our case required) and a column for the end date. On the table that should be categorized we created a lookup to our new category table.
The idea is to only show those records in the lookup where the start date is passed and the end date is either not set or not passed yet.
This opens the possibility to create categories before they should get “active” (by setting a start date in the future) or define when they should automatically get “inactivated” (by setting an end date), which makes them easier to maintain.
This approach could be used on other tables, like configuration tables, as well.
Solution
Let’s take a look at how this could be done, with code and in Dataverse (f.k.a Common Data Service (CDS), learn more) views.
Code
First we will take a look how this could be achieved with code, since this is a bit easier than in the view filter.
In all the following approaches one needs to replace the date and time with the current date and time. In C# this could be done with the following code.
DateTime.UtcNow.ToString('yyyy-MM-dd HH:mm');
In TypeScript the snipped would look something like this (only date no time)
let today = new Date();
let date = today.getFullYear() + '-' + (today.getMonth() + 1).toString().padStart(2, '0') + '-' + today.getDate().toString().padStart(2, '0');
OData
When using an OData request this could be achieved with the following url.
https://<org url>/api/data/v9.1/bebe_datedemos?$filter=(statecode eq 0 and bebe_startdate le '2020-11-14 20:00' and (bebe_enddate eq null or bebe_enddate ge '2020-11-14 20:00'))
FetchXML
The following FetchXML will retrieve the same rows as the OData above.
<fetch>
<entity name="bebe_datedemo" >
<filter>
<condition attribute="statecode" operator="eq" value="0" />
<condition attribute="bebe_startdate" operator="le" value="2020-11-14 20:00" />
<filter type="or" >
<condition attribute="bebe_enddate" operator="null" />
<condition attribute="bebe_enddate" operator="ge" value="2020-11-14 20:00" />
</filter>
</filter>
</entity>
</fetch>
QueryExpression
In the following snipped you can find a QueryExpression that will retrieve the same rows as the other two approaches above.
var nowAsString = DateTime.UtcNow.ToString('yyyy-MM-dd HH:mm');
var demoQuery = new QueryExpression("bebe_datedemo");
demoQuery.ColumnSet.AllColumns = true;
demoQuery.Criteria.AddCondition("statecode", ConditionOperator.Equal, 0);
demoQuery.Criteria.AddCondition("bebe_startdate", ConditionOperator.LessEqual, nowAsString);
var endDateFilter = new FilterExpression();
demoQuery.Criteria.AddFilter(QEbebe_datedemo_Criteria_0);
endDateFilter.FilterOperator = LogicalOperator.Or;
endDateFilter.AddCondition("bebe_enddate", ConditionOperator.Null);
endDateFilter.AddCondition("bebe_enddate", ConditionOperator.GreaterEqual, nowAsString);
Usually one would not use “allColumns” and define the columns needed instead.
Dataverse view
Let’s come to the (a bit more) complex part, the Dataverse views.
In the screenshot below you can see the view before the filter was create.
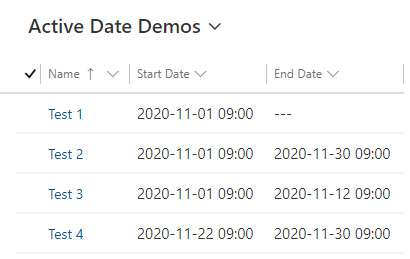
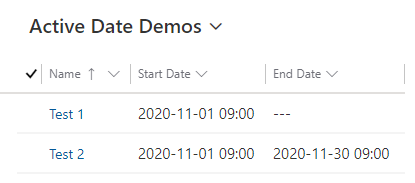
As of writing this article (2020-11-16) the rows are as following:
- Start date is passed, end date not set
- Start date passed, end date not passed
- Start date passed, end date passed
- Start date not passed, End date not passed
Which means only the first 2 rows should be shown in the view after the filter was applied.
Unfortunately, the “Greater Than” or “Less Than” filter there is in Dataverse for DateTime fields requires a fixed date and is not able to handle dynamic dates. Therefore we have to “create” it ourself.
The filters we will create do only take the date in consideration and not the hour.
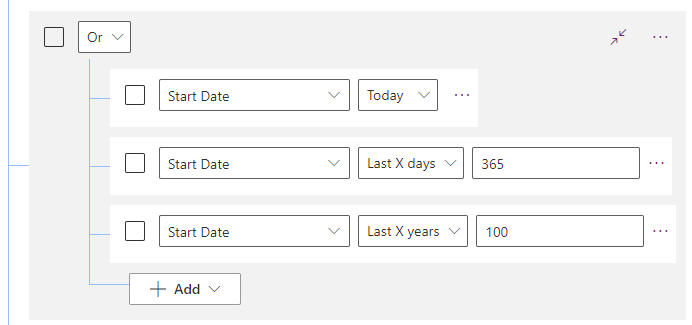
Filter Start Date part
To do so we will create a new filter group that handles the filters as “or”.
As a filter we will add the following:
- Start Date is today
- Start Date Last 365 Days
- Start Date Last 100 Years
This results in all rows where the start date is already passed.
Since the Start Date column is required we do not need to take in consideration that the field might be empty.
In the screenshot below you can see the start date part of the filter.
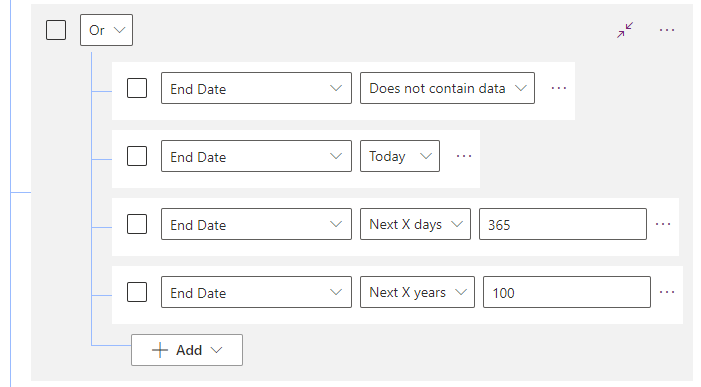
Filter End Date part
The End Date part of the filter is a “or” filter group as well. This time we have to consider empty value as well, since the end date could be left blank.
The following filters should be added to the group:
- End Date does not contain data
- End Date today
- End Date Next 365 days
- End Date Next 100 Years
This filter will result in all rows where the End Date is either empty, today or in the future.
In the screenshot below you can see the end date part of the filter.
Result
The whole filter should now look like the following.
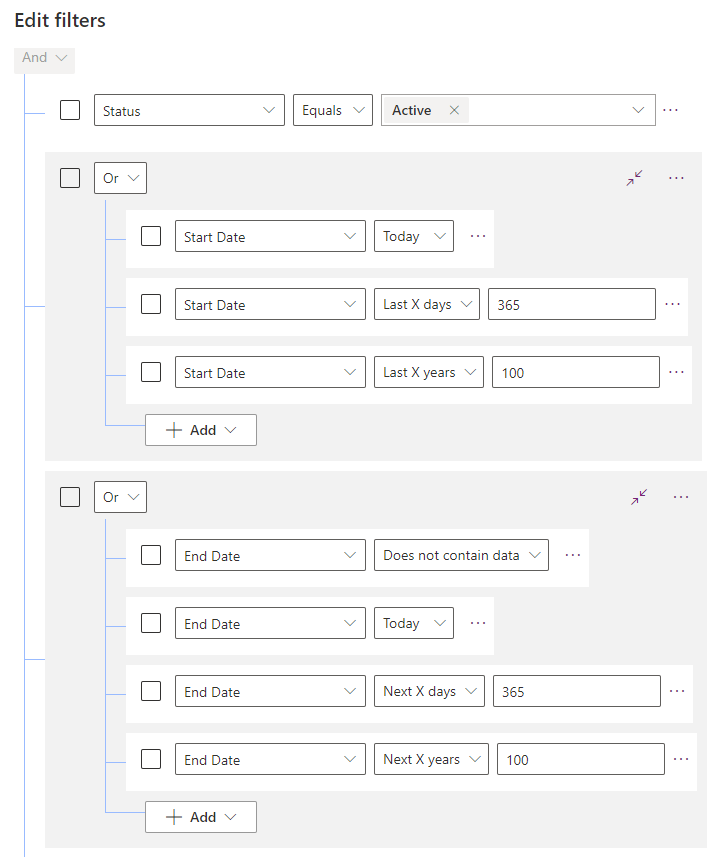
When we save the filter and reload the view it will only contain the 2 rows we expected.
This view could now be used in the lookup on the table that should be categorized.
Tip: If you use this filter technique you should inactivate the recent records and the opportunity to change the view in lookup.
Conclusion
As you can see it is not very complicated to achieve this, if one knows how to build the filter.
I hope this article helped you. Feel free to contact me if you have any questions. I am always happy to help.
You can also subscribe and get new blog posts emailed to you directly.
About The Author
Benedikt
Power Platform Consultant @ CRM Konsulterna