Setup a Service Principal in Power Automate
Every now and then I get the question on how to setup a Service principal in Power automate. This blog post intends to explain this common request.
Background
First of all, we have to talk about what a Service Principal is and why we should use it.
What is a Service Principal?
The Microsoft docs do describe a Service Principal very well. They write the following:
To access resources that are secured by an Azure AD tenant, the entity that requires access must be represented by a security principal. This requirement is true for both users (user principal) and applications (service principal). The security principal defines the access policy and permissions for the user/application in the Azure AD tenant. This enables core features such as authentication of the user/application during sign-in, and authorization during resource access.
MS Docs
This basically means that a service principal is defining which access and permission an application that tries to access a resource within Azure has. The docs do also describe the three different types of service principals. We will only take a look at the type of Application.
Why use it?
There are three main reasons to use a service principal.
- A service principal decouples the Flow from a user and solves the dependency to it. So when a user get’s inactivated or deleted the flow does not lose access.
- We can use a different service principal per area/integration. This makes it possible to give the certain application user only the needed access within Dataverse. Which allows us to use the princible of assigning only the minimal permissions.
- It is possible to use different service principals for different environments which makes sure that we not by mistake access the wrong environment.
In Power Automate it is very tempting to just use the connection which uses a user principal that will be automatically created. Because of the mentioned reasons, it is a good idea to change the connection to a service principal connection.
Setup
Now that we know what a service principal is and why we should use it we can take a look at how to set one up.
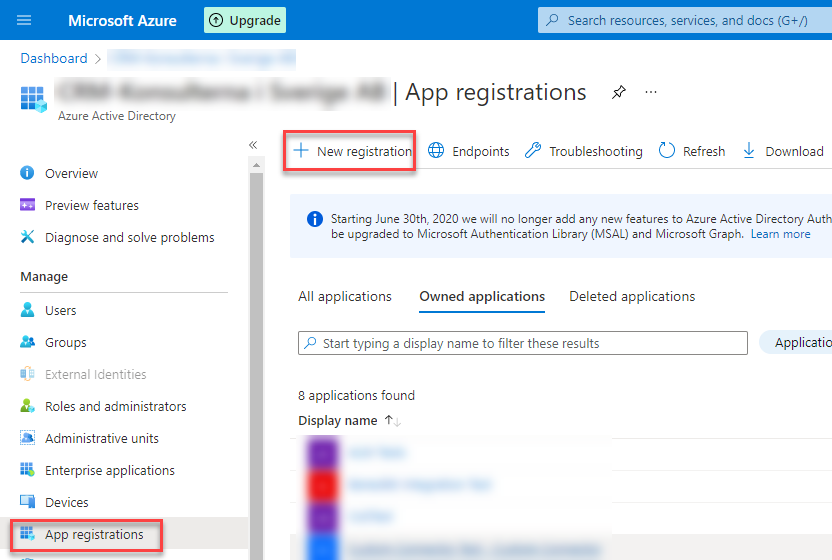
Create App Registration
First, we have to create the App Registration in Azure AD.
To be able to do the following steps you need certain permissions within the desired Azure subscription. Those are documented on Microsoft Docs. In general, the owner of a subscription is allowed to create App Registrations within the given subscription.
To do so we
- log in to the Azure portal
- open Azure AD
- navigate to App Registrations
- click on “New registration”.
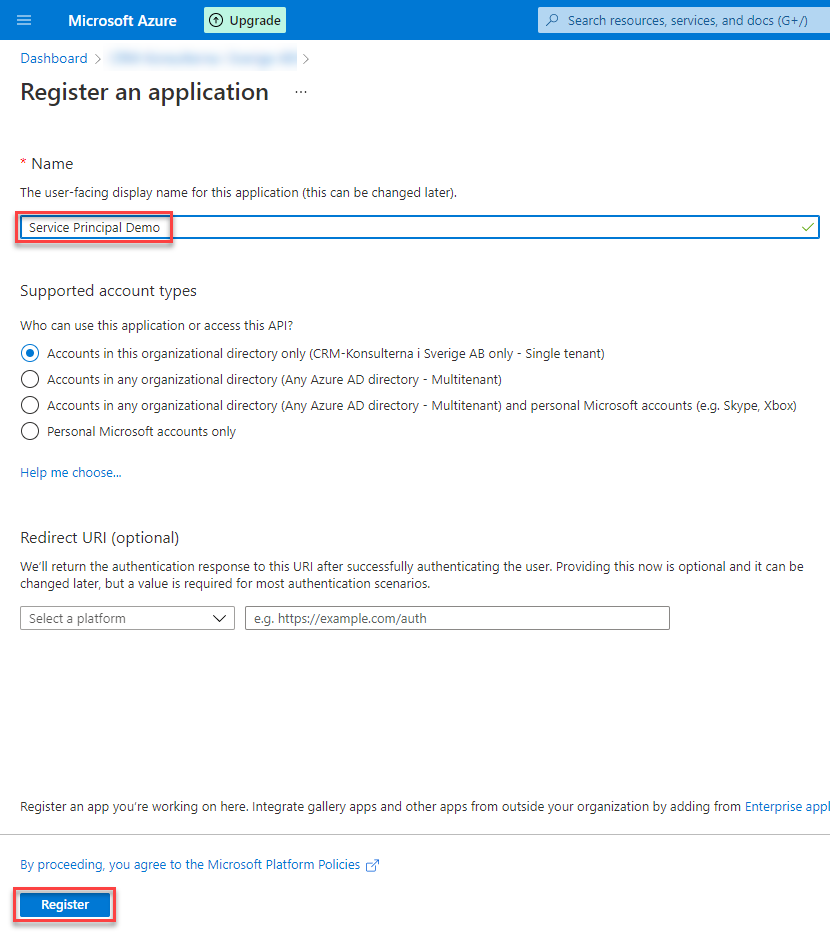
In the next screen you can give your App Registration a good name. I took “Service Principal Demo”. All the other parts can be left as the default is. Click on “Registe” to create the App Registration.
After you have created the App Registration you will come to the overview. Here you can copy parts of the information you will need later.

Now that the App registration is created we can configure everything we need.
Certificate & secrets
We navigate to “Certificate & secrets” and click on “New client secret”.
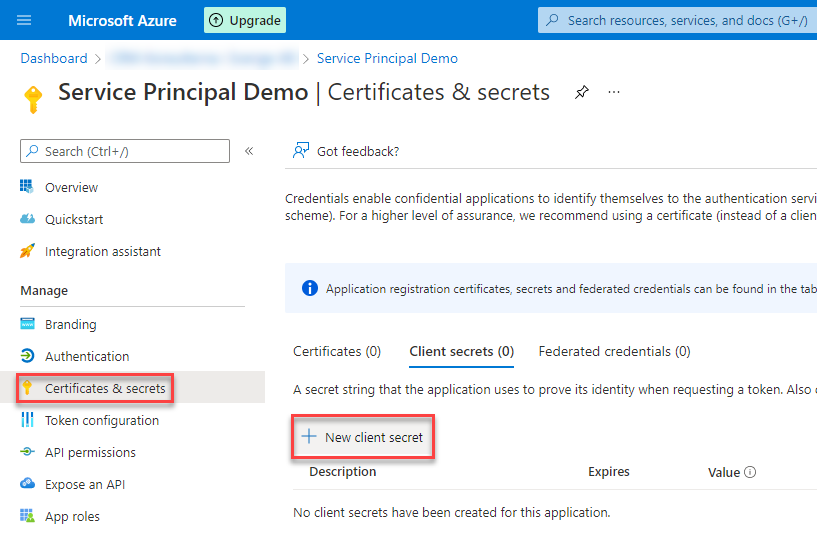
On the next screen you can give your secret a name and select a period how long it should be valid.
If you need a secret which is valid longer than 24 month you can take a look at my other article about just that.
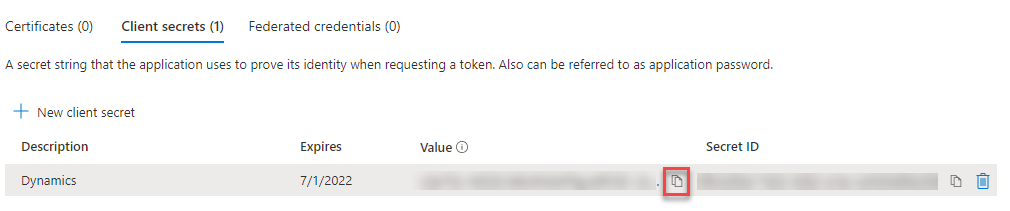
Make sure to copy the value of the secret and save it somewhere safe. It will only be shown once.
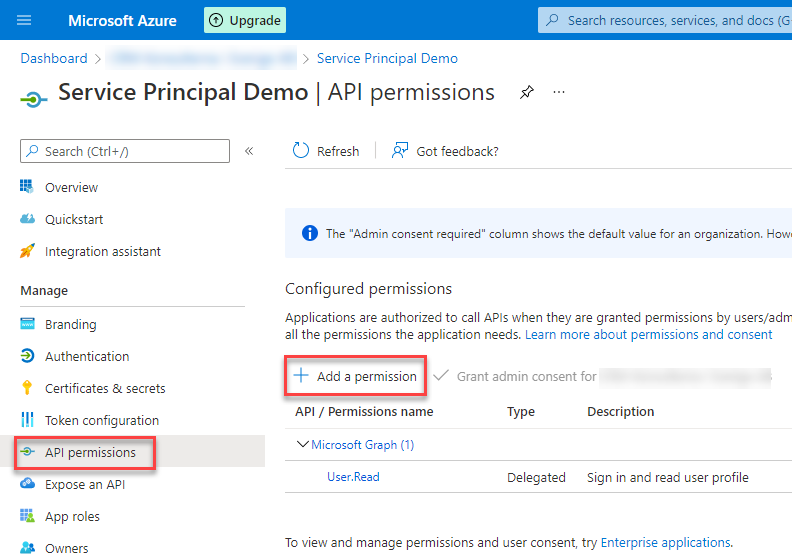
API permissions
Last thing to configure is the API permissions. The App registration needs access to the Dynamics 365 API.
To configure this we navigate to “API permissions” and click on “Add a permission”.
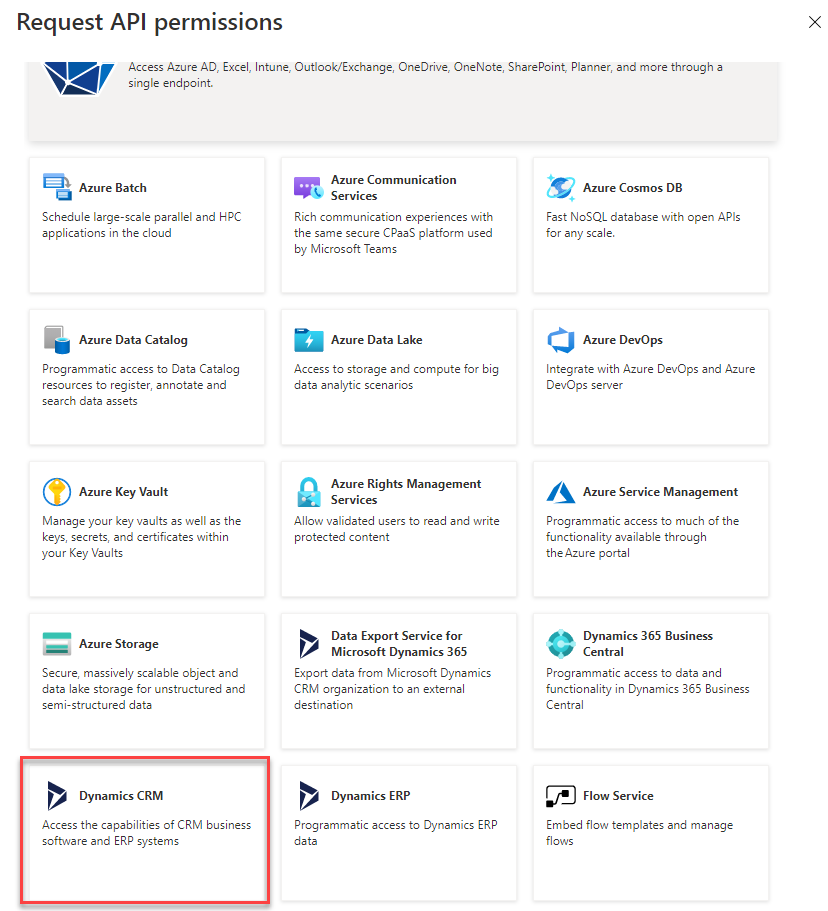
In the upcoming side pane select “Dynamics CRM” as the service you’d like to add permissions to.
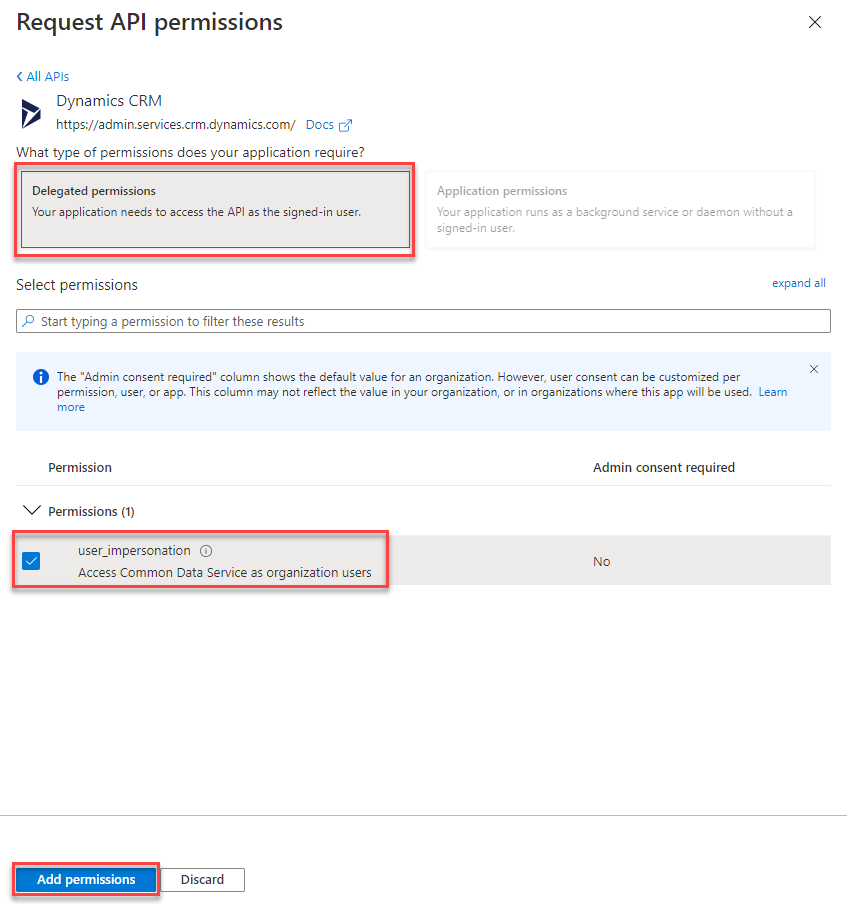
On the next page select “Delegated permissions” as well as “user_impersonation” and click “Add permissions”.
Add App Registration to Dataverse
Next step is to register the App registration to Dataverse so that it get’s the right access.
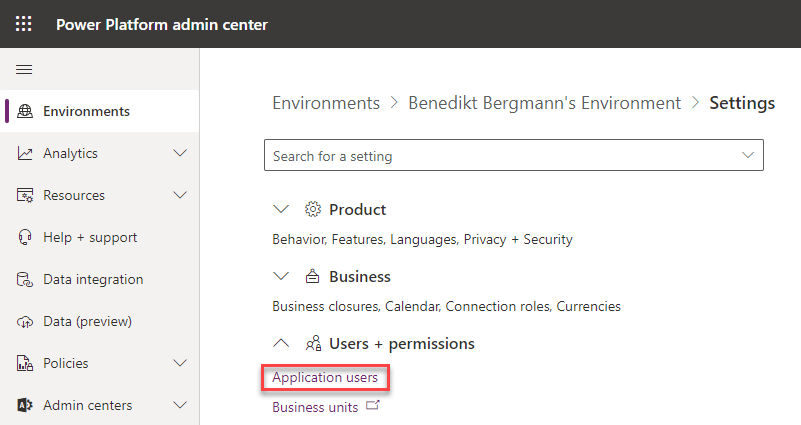
To do so we navigate to the power platform admin portal, navigate to Environments, open the desired environment by clicking the name and go to settings.

On the next page we open the settings page for “Application users”.
There we click on “New app user”.
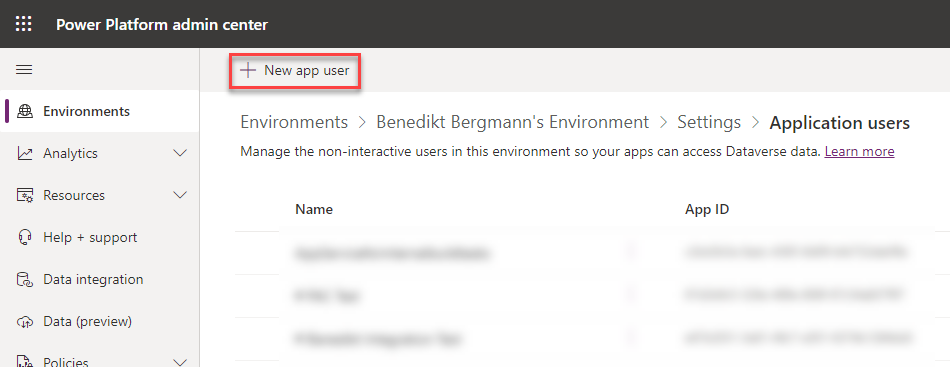
On the side pane which opens you have to select the desired Business Unit from the dropdown as well as the needed security role(s) and add the app we have created. To Add the app click on “Add an app” and search for the app registration you recently created, select it and click on “Add”.
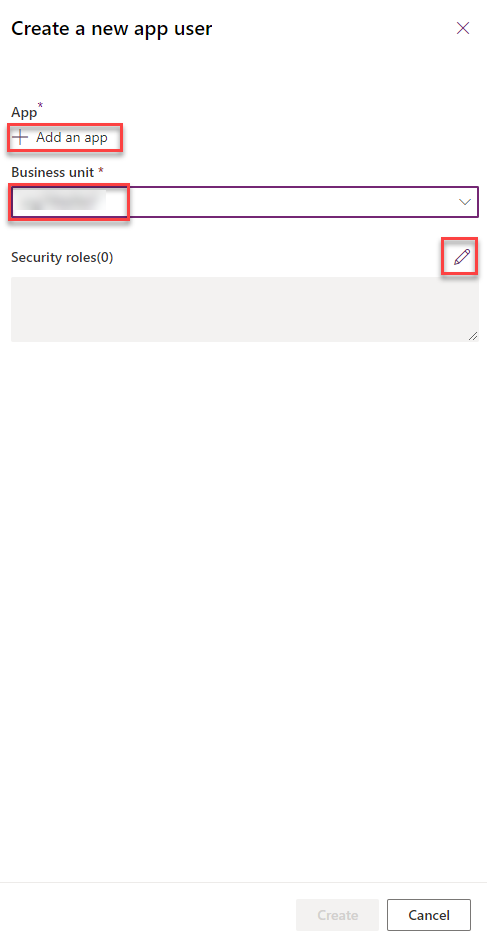

When you have configured everything you are able to press the “Create” button.

Configure Service Principal in Power Automate
Last step to setup a Service principal in Power automate is to actually use it in Power automate.
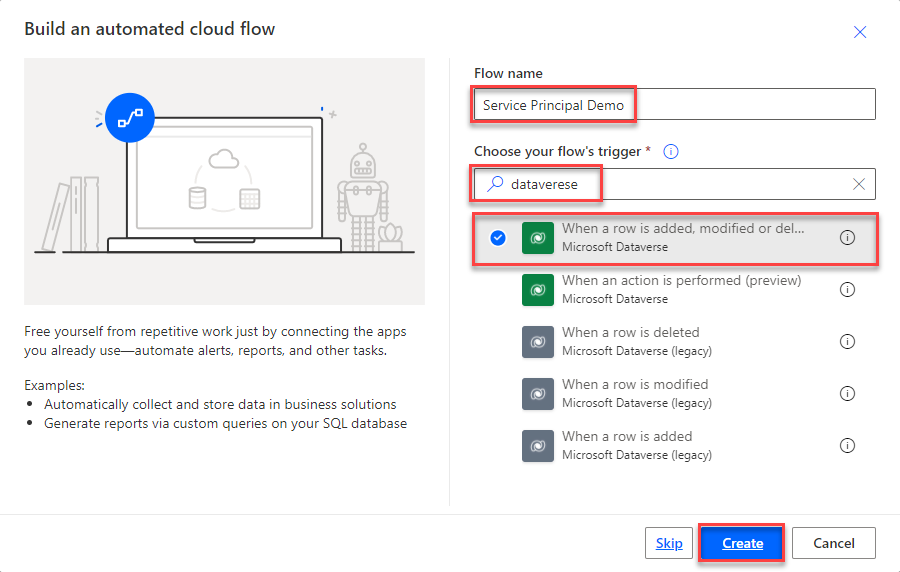
We go to the maker portal, open a solution and create a new automated cloud flow.
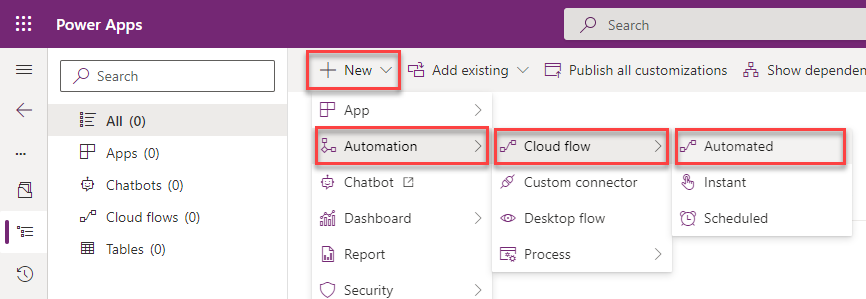
Give a saying name to the flow, select the Datavere “When a row is added,….” as the trigger ad click on “Create”.
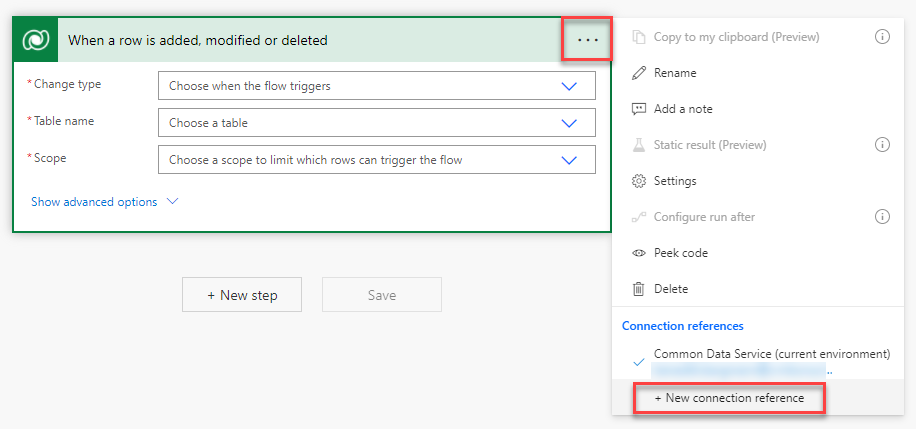
On the Flow edit page, which opens, you click on the three dots and select “New connection reference” in the context menu.
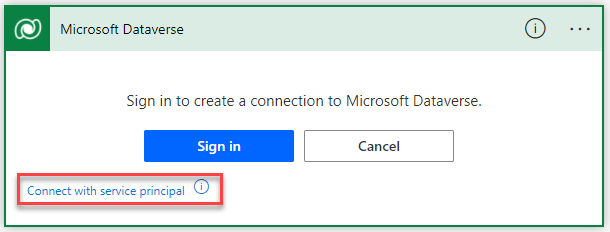
The trigger itself changes, there you have to click on “Connect with service principal”.
Again the trigger changes and gives ou a form where all the information needs to be registered.
You will need:
- Connection name
- Client ID – Which you get from the App Registration overview in Azure
- Client Secret – The Secret value you copied earlier
- Tenant – Which you get from the App Registration overview in Azure
After you have filled in this information you can press “Create”.

To check if everything worked as expected you can open the context menu of the trigger again.

Conclusion
Congratulations you have successfully setup a service principal in Power automate.
The setup isn’t very complex if you know which steps to execute.
Hope this article helped you. Please let me know if you have any problems.
You can also subscribe and get new blog posts emailed to you directly.
About The Author
Benedikt
Power Platform Consultant @ CRM Konsulterna
This is a great guide, thanks Benedikt. But how do you migrate the service principal connection across environments without having to reestablish it?
Glad you like it!
That’s where connection references come into the picture. When you create a connection within a Flow you basically create both a connection reference and a connection. The connection reference defines what connector has been used and for what steps. It is also included in the solution (please see my recent post regarding Solutions). The connection on the other hand is the real connection to the connector but isn’t included in a solution. When you import a solution you have to specify a connection to every connection reference included in the solution.
With that, you can have a different connection (aka different service principals) for the different environments without the need of changing the flow.
One of my next posts will be on exactly that. Explaining Connection references and connections.
Hope the answer helped and was what you were looking for.
Is there any way to update the secret of the connection created? Let say they secret expires after 2 years? And yes some customers wants to have time limits. Not 150y in future.
There is no option to update credentials within such a connection.
But here the beauty of connection references and connections come into the picture.
Within a connection reference, one can easily specify which connection to use. Every flow using the connection reference will change to the new connection. What you could do is create a new connection with the new credentials and then specify this one within the connection reference.
Hi Benedikt, that’s a very useful post.
To your knowldge is there limitation related to licenses?
Say I have cretaed a basic flow that looks for modifictaions in an item in SharePoint List, retrieves information about Office365, and sends reminders. It works because I am a valid licensed user.
Woudl the same flow work under a Service principal?
Can we for ex. send emails from Shared Mailboxes, when using Service Principals (theer are Outlook connectiors that do not support shared mailboxes, ex. send email with options)
How can we check if all built-in connectors in Power Automate support Service Principals?
Thansk in advance
Regards,
Nicola
I am not a licensing expert, with that said: Unfortunately afaik only the Dataverse connector is really supporting service principles. There is an item on the 2022 release wave 1 plan which describes that MS would like to add support for service principals for every connector (https://docs.microsoft.com/en-us/power-platform-release-plan/2022wave1/power-platform-pro-development/service-principal-support-connectors), but this hasn’t landed yet. This means depending on which user you are using within your connection you are licensed or not. This has nothing (or not always) to do with who is owning the flow. For me, that’s the important part. When a flow is owned by a certain user it gets inactivated/deleted when the user gets inactivated within Azure AD. Using a Service principle makes the solution less related and dependent on certain users.
@Benedikt – Thank you very much for the detailed document.
Would it be possible for Power Automate to connect to Azure SQL using a Service Principal?
Hej Zubair,
I do not work directly with SQL often. But as far as I know it should work with Azure SQL.
Hi Benedikt,
Thanks for the article!
If I understand well about solution import and connection:
as I’m being asked on which connection I want to map my solution connection reference, during the import, and as there’s no way to create a connection for a service principal outside of a flow, I need to create the service principal connection in advance, through a fake flow, in my destination environment…?
Hej Yoya,
this is correct. I assume you are referring to the dataverse connector. There you would have to create the connection in advance yes
Hi Benedikt, thank you for the great article !
Is there any real security benefit (added value) in using Service Principal as opposed to User Login ?
From my perspective, Service Principal increases the attack surface, since now besides Username and Password of the account used to create the workflow, there is also Secret, Client ID & Tenant ID that can be compromised.
The fact that only Delegate Permission is available for Service Principal, means that the authentication is delegated to the account used to create / run the workflow, same as we would have the connection established via User Login.
Let alone, you can give the above account the same least privilege permissions as for the Service Principal and use separate account for each workflow, therefore achieving the same level of Security as if Service Principal is used.
I am trying to understand whether using Service Principal has an added value or if it recommended solely because it sounds good, the idea being imported from other Development Platforms.
PS: I couldn’t find any official MS documentation that would recommend using Service Principal with Dataverse specifically.
Hej Ioan,
thanks for your comment.
Could you elaborate on the point that now Secret, ClientId and TenantId could be compromised?
In general, I don’t see why it should be negative to use. The security within Dataverse is the same, as you mention. Both a named user and a service principal get security roles assigned.
What I see as a plus is that a named user connection could time out when MFA is used where as a service principal one will not. Sure the Secret of a service principal has an expiration date, but this could be handled in advanced.
In addition, when using a named user the flow will get inactivated and at the end deleted when the user leaves the company (at least when it comes to ownership of the flow).
I hope MS is going to enable managed identities for the Power Platform which would make any authentication (whether password or secret) obsolete.
Hi, Benedikt
Unfortunately, even after adding everything there is no option to login using service principle. 🙁
Hej, sorry for the late response.
Where do you want to login with the service principal? The only way to use it is by creating a connection in Power Automate as described in the post.
Hey Benedikt,
i have an application which needs to connect with azure sql data warehouse, for it i am having a service principal account. I want, if i publish my application (using powerapps), other users can also use the same credentials (service principal) without sharing the client secret with them and they don’t get a pop up of signing in when they open the application.
Thanks for your comment.
Is it a Canvas App you are talking about?
Hi Benedikt, shouldn’t we use Service Accounts instead of Service Principals in Power Automate?
Hej,
thanks for your comment.
Recommendation from MS and me is to use Service Principals wherever it is possible. There are some connectors which can’t handle those though. For example the Teams or SharePoint connectors can’t be used with Service Principals. Here we would have to use Service Accounts instead.