Settings solution component explained
A few days ago Microsoft announced a new Feature in public preview, the Settings solution component. In this blog post, we will take a look at this new feature. I will explain how it works and how you could use it in your solution.
The functionality I will explain in this blog post is still in preview and might change over time. It is working as described as of writing this blog post (2021-12-03)
You can find a managed and unmanaged version of my demo solution attached to this post.
Everything written in this blog post is obligated to change since the feature only is in preview. There might be things I explain which wasn’t intended by Microsoft to use the way I explain it.
Background
The idea of a “feature flag” isn’t something new, but it is quite new as a feature in the power platform. As explained in the mentioned blog post Microsoft used this feature already internally to activate/inactivate functionality like the Deal Manager. What is new is that now everyone can create those features and is able to use them.
As stated in the blog post this preview feature is not available in every region, yet. In my usual test/demo environment which is located in the Europe region (crm4) it is not available for example. Luckily I do have another test/demo environment in a different tenant which is located in the US region (crm).
The intend is to be able to create configurations for features that could be changed in different levels:
- Default
- Environment
- App
- (User per App)
It does have similarities with the setup of Environment Variables but goes one step further. More about that in one of the next chapters.
Table Structure
The following picture describes the Table Structure related to Settings.

I have created the model with the ERD Visio Builder plugin of the XrmToolBox, which was created by Carl Cookson (Twitter & LinkedIn).
Let’s take a look at every entity and what it is used for.
Setting Definition (settingdefinition)
Settings Definition is the “anker” table around the settings. It defines the Setting as well as holds the default value. The following things could be configured.
Display name
The value will be shown to the user in the solution as well as the App settings area. It is required but can be changed later.
Name
The unique name of the setting. It is required and can not be changed later. This value always contains the publisher prefix and will be used later to identify the setting in our code examples.
Description
A not required field where one can describe the purpose of the Setting.
Date type
It defines which type the setting should have. Either one of the following
- Number
- String (The max characters are 50)
- Yes/No
Default value
Defines the default value, which will be used when no record in any sub-table is defined.
Overridable
Defines whether the setting is overridable by any of the sub-entities (environment/organization setting or App setting)
Value can be overridden for
When overridable is enabled you can choose which sub-entities are allowed to override the value. Either one of
- Environment and app
- Environment only
- App only
Release level
Here you could specify which level the setting has. Either Generally available or Preview. This defines in which tab under the app settings this will be shown.
Information URL
A link to a page with additional information. This field is not required.
Organization Setting (organizationsetting)
This table holds organization-wide value for a certain setting. There is always only one record per setting.
Model-Driven App Setting (appsetting)
The table can define value on a per-app level. There could be several records for a setting, but only one per setting and Model-Driven App.
Model-Driven App User Setting (appusersetting)
This table is not mentioned in the docs neither it is shown in the UI (at least I haven’t found it). I do assume that in the future it might be possible to change the value on a per-app per-user level. Which is only a wild guess of mine.
Order of use
An interesting question that immediately popped into my mind was:
When will which of those be used when all are present?
I found the docs not very clear on this question. What I understood (and how it worked during my tests) is that it will take the values in the following order
- App value if exists
- Environment value if exists
- Default value
This means you can override the values with the next “level” of values.
Please be aware that only the OOB JavaScript function does take this in consideration. If you would like to use Settings in Flow or C# you have to handle this yourself.
Difference to Environment Variables
As I see it there are 2 main differences between Settings and Environment Variables.
The first is that Settings do have values per app, which environment variables do not have. The following image illustrates the table structure of environment variables.
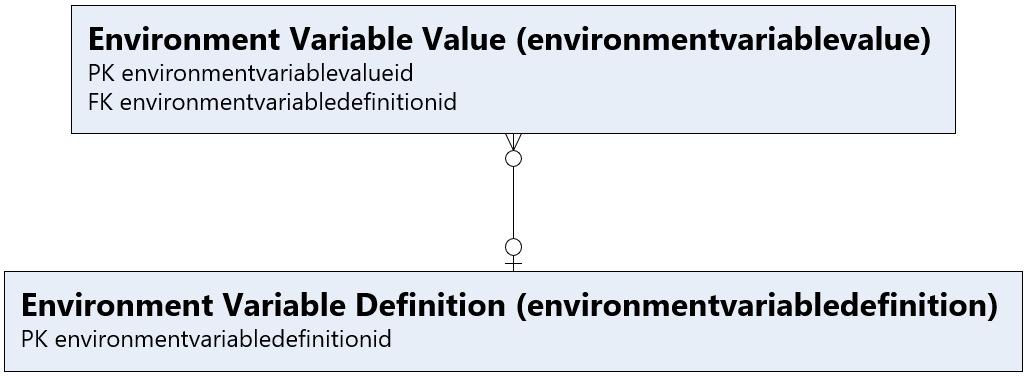
The second is that environment variables have some additional Data types (JSON and Data Source).
Use Cases
Let’s talk a bit about different use cases. As I think Settings are mostly to change the behaviour of your app when it comes to front-end (JavaScript/TypeScript) development. But to make it more consistent they also can be used in Flows or C# code (Plugins, Custom APIs, Custom Workflow steps or custom Actions). Since those two don’t run in the scope of an app I only see the environment value usable for those most of the time.
Here is a list of the use cases I see
- Show/Hide Buttons on a Model-Driven App level (will be the code example)
- Show/Hide parts of the sitemap on a Model-Driven App level
- Change behaviour of forms on a Model-Driven App level
- Hide/Show fields
- Hide/Show sections
- Change data validation
Mehdi El Amri (Twitter & LinkedIn) does describe another great use case in his most recent blog post. He changes the Menu of a Model-Driven app to multi-session. Which is one of the few use cases where a flow could use Settings in the scope of one App.
When to use what
Another interesting question is when one should use Settings over Environment Variables.
As I mentioned the intention of MS with Settings is to be used for front-end switches, whereas Environment Variables should set stuff based on the environment. This could be urls to other services or thresholds.
Some of those could be implemented with Settings a well, but the limitation in string length makes it harder for others (URLs for example).
Another point to choose environment variables over settings is the better ALM story (I explain this later in this post) as well as the tight integration with Power Automate. I hope this will be fixed for Settings in the future as well.
Setup
To set up a Settings post you open a Solution and add a new component to it. The entry for settings is found under More > Setting > Setting definition.
As mentioned earlier Settings aren’t available in all regions yet.

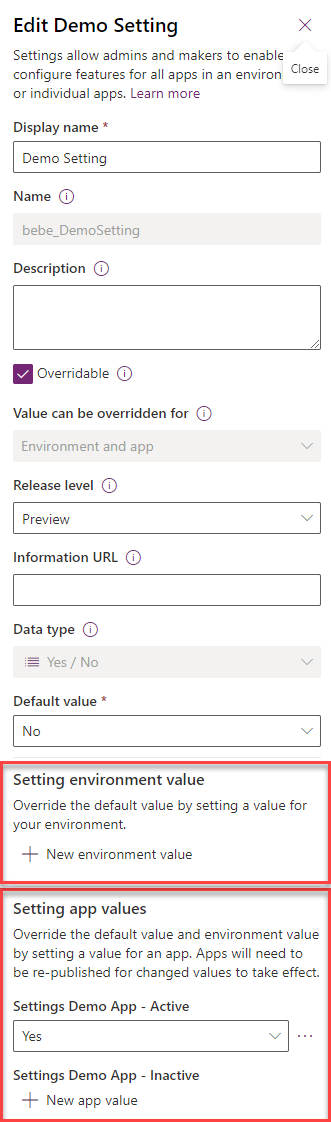
This will open a side pane where the Setting can be configured with all the fields mentioned earlier.

In the same pane, you could add environment values and app-specific values.
If you look at the documentation there should be/will be another way of setting the app values – through the Apps setting page. Currently, this does not show custom settings though.
In the list of Apps are only those apps shown that are in the same solution.
ALM
Since ALM is something that I like (you might have noticed already) I figured it would be nice to write some words on that as well.
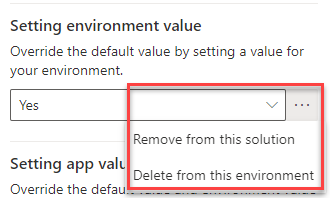
All the involved tables are solution aware. As with environment variables you should not deploy the current/environment value. After creating this in your development environment it should be removed from the solution. The handling here is very similar to how environment variables. After adding the environment value 3 dots appear beside the input. There you could choose to delete it either from the solution or the environment.
The app values can’t be removed though. This means when you have some value specific for a certain app it will always be included in your solution and deployed to the next environment.
Setting values in downstream environments
One way of setting values in a downstream environment is to include them in the solution, as mentioned. Which isn’t usually what you want when it comes to the environment value.
Unfortunately, the new settings file functionality of the Import Solution Taks of the Power Platform Build Tools, which I described in my last post does not handle settings (yet).
So those either have to be handled manually, by creating an unmanaged solution in the target environment where the Settings row will be added. Then the environment value can be added. Or by a PowerShell script in your pipeline.
To change an app setting the app has to be in the solution as well. Those can even be changed if they were included in a solution that was deployed as managed.
Implementation
The last part of this blog post will shed light on how to use your settings in JavaScript/TypeScript, C# Code or Power Automate.
As I mentioned earlier: Settings are mostly intended for front-end switches. Which explains why they’re only is a JavaScript function to fetch the correct value. To make the post as complete as possible I also would like to show how it could be used in other parts of the platform, even though the use cases there are very limited.
JavaScript/TypeScript
The function “getCurrentAppSetting” does return the correct value of a given setting.
Let’s say we would like to implement a button on a table that should be shown/hidden based on a setting.
The JavaScript for it would look something like the following.
export async function someDemoFunctionality(formContext: Xrm.FormContext): Promise<void> {
    alert("Function does work");
}

export async function showSomeDemoFunctionalityButton(formContext: Xrm.FormContext): Promise<boolean> {
    const setting = (<any>Xrm.Utility.getGlobalContext()).getCurrentAppSetting("bebe_DemoSetting");

    if (setting) {
        return true;
    } else {
        return false;
    }
}
The important part is on line 6 where we call the mentioned function to get the current value of my demo setting.
C# Code
When it comes to C# things get tricky. As mentioned settings aren’t intended to be used in c# code. But you could handle them anyway by querying and handling the data manually. For the ease of this article, I only take the default value and the environment value into consideration, since all C# code runs outside of an app scope.
What you could do though is handle app values in some way like if one of them is true activate the functionality.
To be honest there might be an OOB way of handling it. Microsoft created a function/action to get the setting, but it’s not exposed in the SDK and I always think they are a bit weird to work with (the docs do explain how it’s done though). That’s why I like to create my own functions.
Anyway here is the code for a function that would get the typed value of a setting. The environment value is present, if not it returns the default value.
I do use EarlyBounds created with the Early Bound Generator within the XrmToolBox. The Plugin was created by Daryl LaBar (Twitter & LinkedIn).
 private T GetSettingsValue<T>(string settingName, IOrganizationService service)
        {
            var returnValue = default(T);

            if(typeof(T) == typeof(string) ||
               typeof(T) == typeof(bool) ||
               typeof(T) == typeof(int))
            {
                var linkedEntityAlias = "OrgSetting";

                var settingDefinitionQuery = new QueryExpression(SettingDefinition.EntityLogicalName);
                settingDefinitionQuery.ColumnSet = new ColumnSet(new string[] {
                    SettingDefinition.Fields.DefaultValue,
                    SettingDefinition.Fields.DataType,
                    SettingDefinition.Fields.IsOverridable,
                    SettingDefinition.Fields.OverridableLevel,
                    SettingDefinition.Fields.ReleaseLevel
                });
                settingDefinitionQuery.Criteria.AddCondition(SettingDefinition.Fields.UniqueName, ConditionOperator.Equal, settingName.ToLower());
                settingDefinitionQuery.TopCount = 1;
                settingDefinitionQuery.LinkEntities.Add(new LinkEntity()
                {
                    LinkFromAttributeName = SettingDefinition.PrimaryIdAttribute,
                    LinkFromEntityName = SettingDefinition.EntityLogicalName,
                    LinkToAttributeName = OrganizationSetting.Fields.SettingDefinitionId,
                    LinkToEntityName = OrganizationSetting.EntityLogicalName,
                    Columns = new ColumnSet(new[] { OrganizationSetting.Fields.Value }),
                    EntityAlias = linkedEntityAlias,
                });

                var settings = service.RetrieveMultiple(settingDefinitionQuery);

                if (settings != null && settings.Entities.Count == 1)
                {
                    var setting = settings.Entities.First().ToEntity<SettingDefinition>();
                    if (setting != null)
                    {
                        var orgSettingValueField = linkedEntityAlias + "." + OrganizationSetting.Fields.Value;
                        if (setting.IsOverridable.HasValue && setting.IsOverridable.Value &&
                            setting.OverridableLevel.Value != (int)SettingDefinition_OverridableLevel.AppOnly &&
                            setting.Attributes.Contains(orgSettingValueField) &&
                            setting.GetAttributeValue<AliasedValue>(orgSettingValueField) != null &&
                            setting.GetAttributeValue<AliasedValue>(orgSettingValueField).Value != null &&
                            !string.IsNullOrEmpty(setting.GetAttributeValue<AliasedValue>(orgSettingValueField).Value.ToString()))
                        {
                            returnValue = (T)Convert.ChangeType(setting.GetAttributeValue<AliasedValue>(orgSettingValueField).Value.ToString(), typeof(T));
                        }
                        else
                        {
                            returnValue = (T)Convert.ChangeType(setting.DefaultValue, typeof(T));
                        }
                    }
                }
            }

            return returnValue;
        }
You could also create a custom API to get the current value. This could then be called by either C# code or Power Automate.
In the latest release of the Dataverse-CustomAPIs, created by David Rivard (Twitter & LinkedIn), a Custom API to get Settings was added.
Power Automate
The last option would be with Power Automate. We will build the following flow which could be called as a child flow from any other flow to get a setting’s value.
There are other scenarios (as described by Mehdi El Amri) where you would use the setting in a different way.
A version of this flow can be found in the attached solution files.
The complete flow looks like this.
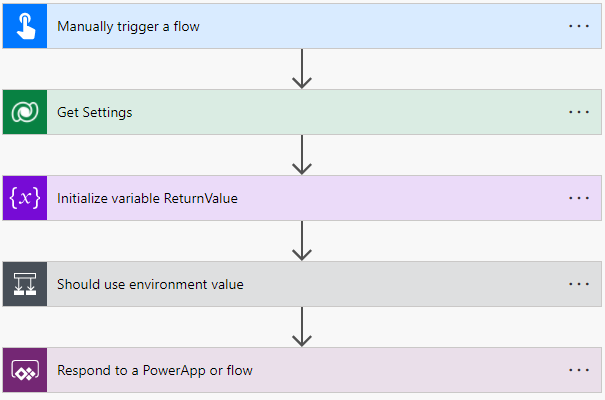
Let’s take a look at every step in detail.
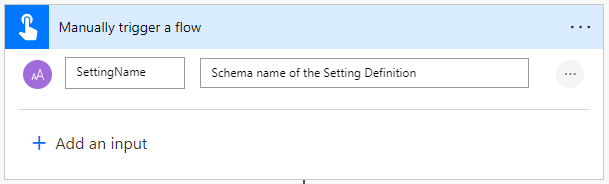
Trigger
To trigger our flow we use a manual trigger where we configure one input parameter called “SettingName” which is of type text.
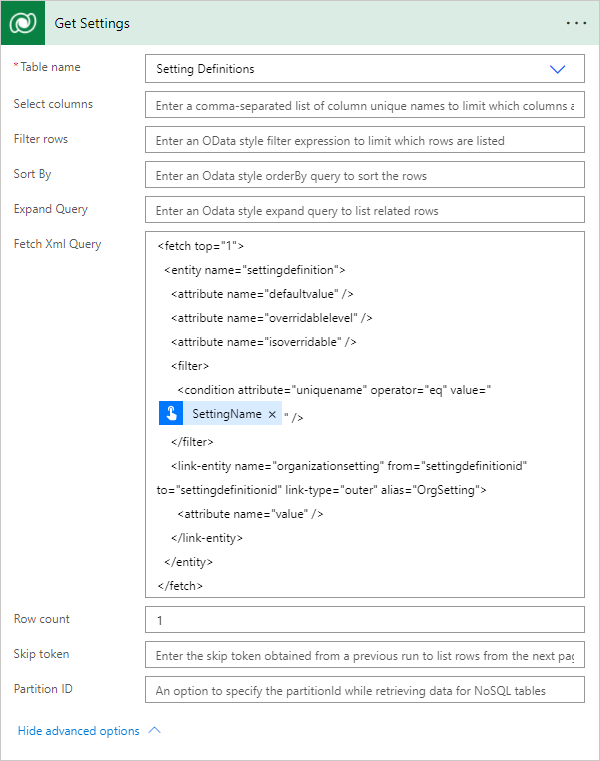
Get Settings
Thereafter we have to load the needed setting row with the related environment value. To do so we use the List rows step of the Dataverse connector.
We use a Fetch Xml I created with the FetchXML Builder within the XrmToolBox. The Plugin was created by the awesome Jonas Rapp (Twitter & LinkedIn).
<fetch top="1">
  <entity name="settingdefinition">
    <attribute name="defaultvalue" />
    <attribute name="overridablelevel" />
    <attribute name="isoverridable" />
    <filter>
      <condition attribute="uniquename" operator="eq" value="@{triggerBody()['text']}" />
    </filter>
    <link-entity name="organizationsetting" from="settingdefinitionid" to="settingdefinitionid" link-type="outer" alias="OrgSetting">
      <attribute name="value" />
    </link-entity>
  </entity>
</fetch>
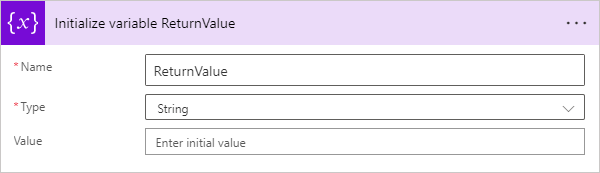
Initialize variable ReturnValue
We initialize the variable “ReturnValue” with string as its type.
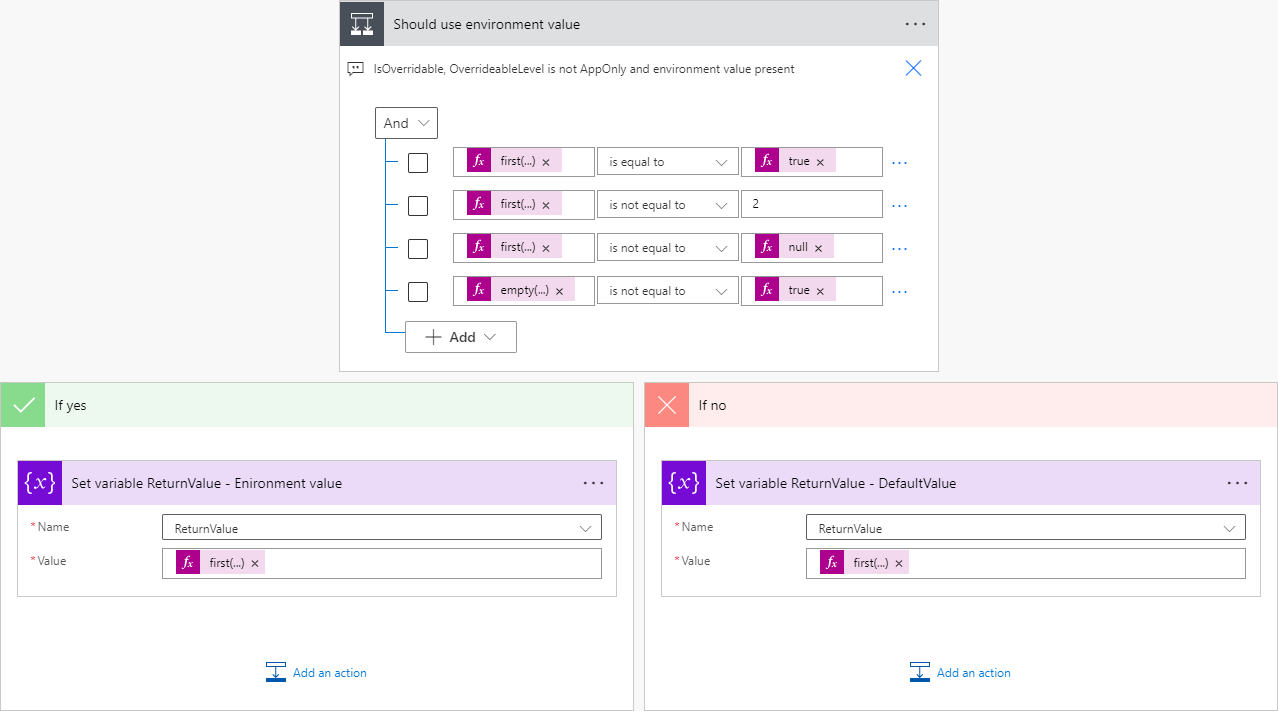
Condition
This step is probably the trickiest part of this flow. It checks whether the setting is overridable, if so from the environment value and whether this is presented or not.
The expressions for the different conditions are as follows.
first(outputs('Get_Settings')?['body/value'])?['isoverridable']
first(outputs('Get_Settings')?['body/value'])?['overridablelevel']
first(outputs('Get_Settings')?['body/value'])?['OrgSetting.value']
empty(first(outputs('Get_Settings')?['body/value'])?['OrgSetting.value'])
If all the conditions are met it sets the mentioned variable to the environment value. The expression for that is as follows.
first(outputs('Get_Settings')?['body/value'])?['OrgSetting.value']
If the condition step returns false it will set the variable to the default value using the following expression.
first(outputs('Get_Settings')?['body/value'])?['defaultvalue']
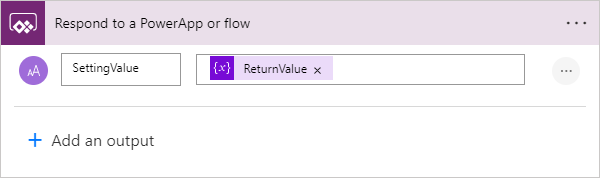
Respond
The last step is to return the variable to the calling Flow/Power App.
Conclusion
There was a lot of things to explain in regards to Settings. I think it’s a really nice feature that can help us develop applications at a faster pace since functionality could be deployed without being active yet.
I hope this post was helpful. Please feel free to contact me if you have any further questions.
Attachments
You can also subscribe and get new blog posts emailed to you directly.
About The Author
Benedikt
Power Platform Consultant @ CRM Konsulterna
Hi,
Nice article!!
Unmanaged solution import is failing in my instance with the dependency on connection reference which is I believe not included in the solution.
Can you please and update the solution zip file with connection reference included.
Thanks,
Bipin
Hej Bipin,
thanks for your comment. I have uploaded a new version of both solutions. It should include the connection reference.
//Benedikt