Set Connection References and Environment Variables in Pipelines
Since Microsoft has released both Connection References and Environment Variables the process of setting them in a Pipeline wasn’t very straightforward. Scott Durow (Twitter & LinkedIn) explained a possible solution to it in one of his blog posts (Connection References with ALM – Mind the Gap!). In this blog post, I will explain a different way to set Connection References and Environment Variables in Pipelines.
The approach I am explaining and demonstrating is as of writing (2021-12-01) still in preview.
Update: As of 2021-12-15 the explained approach is GA. See MS announcement.
Since parts of the approach are still in preview you would use it at your own risk. I personally figure this still might be better than handling everything manually, but more about that later.
Problem
First of all, we should talk a bit about the problems that we currently have when it comes to ALM and Connection References as well as Environment Variables.
Manual deployment
When you are doing manual deployments it should work pretty well most of the time. When you import a solution that contains either Connection References you don’t have associated with a connection or Environment Variables where neither a default value nor current value exists an additional step in the import will be shown where you can configure those things.
Automated deployment
Bigger problems arise when it comes to automated deployments. Since there isn’t a human interaction possible no one could associate connections to connection references or assign values to environment variables.
This means those things have to happen after the deployment is finished. Either manually or through some PowerShell Scripting (some might call it “voodoo”) as Scott describes in the mentioned blog.
A result is that all Power Automate flows using a connection reference without an associated connection will get inactivated during import.
Don’t get me wrong, I do like the idea of both of them. The problem was/is “only” the ALM part.
Solution
Fortunately, Microsoft listens to feedback and comes to the rescue. The Import Solution Task of the Power Platform Build Tools does have two new configurations UseDeploymentSettingsFile and DeploymentSettingsFile.
What you have to do is basically create a settings file where you map Environment Variables to values and Connection References to in your target environment already existing connections.
The step will then perform the assigning and association part itself. This should lead to smooth deployments including activated flows.
Let’s see how we could use this part of the Import Solution task.
Prerequisits
To be able to follow this blog post we need to make sure we have some prerequisites in place.
ALM Process
I will base my explanation on the Basic ALM process I explained in an earlier blog post.
To summarize it very shortly:
The mentioned Basic ALM process does contain 3 build/release pipelines
- Create export from DEV
- Build Managed Solution
- Release (to Test)
During the further explanations within this blog post, we will do changes in the last two of those pipelines.
Power Platform CLI
In addition, you will need the Power Platform CLI installed on your machine.
Solution
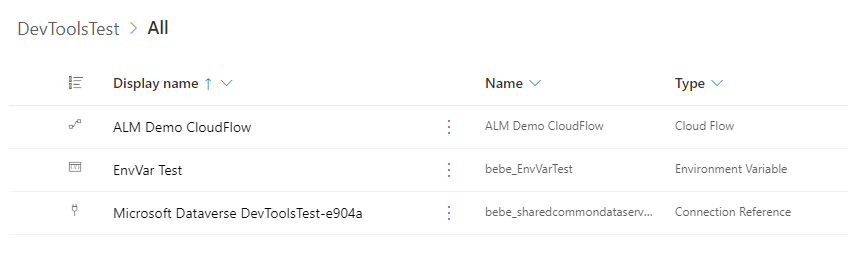
Prepare a solution containing at least one Environment Variable and one Connection Reference to be able to test the process.
My solution looks like the following and is called “DevToolsTest“.
Create Settings file
The first step would be to create our Settings file. There are several ways of doing it (as described in the docs). We will do it based on a solution file.
Export Solution
We export the solution we created as part of the prerequisites unmanaged and save it somewhere on our machine.
Run pac
Open a Command Prompt (or PowerShell) in the folder which contains the solution zip file.
The following command will create a settings file (called settings-test.json) based on your solution in the same folder. You have to replace the name of the zip file with yours.
Make sure you have the latest version of the pac installed by executing “pac install latest” first.
pac solution create-settings --solution-zip ./DevToolsTest_1_0_0_1.zip --settings-file ./settings-test.json
In my case, the settings file looks like this
{
  "EnvironmentVariables": [
    {
      "SchemaName": "bebe_EnvVarTest",
      "Value": ""
    }
  ],
  "ConnectionReferences": [
    {
      "LogicalName": "bebe_sharedcommondataserviceforapps_e904a",
      "ConnectionId": "",
      "ConnectorId": "/providers/Microsoft.PowerApps/apis/shared_commondataserviceforapps"
    }
  ]
}
What you can see is that there is an array of Environment Variables where you could add the desired value. The file also contains an array of Connection References, what missing here is the ID of the connection (in the target environment) you would like to associate.
For the ease of this post, I will hard code all of that. For sure you could dynamically set/fill this file as a part of your pipeline. What I found most practical is having a settings file for every target environment. Much like the app.config one knows from C# projects.
If you have several static settings files those have to be handled manually in the future. For example when new Environment Variables or Connection References should be added.
The settings file should then be stored within your repository. I use a Settings folder for it. If you follow my “Folder structure of a Dataverse project“, I would put it under “PowerPlatform”
Find connection id
One step which could be a bit confusing is finding the internal Id of a connection. It is though as easy as opening the connection in the target environment and copying the Id from the url.

Finished settings file
My finished settings file looks like the following.
{
  "EnvironmentVariables": [
    {
      "SchemaName": "bebe_EnvVarTest",
      "Value": "Test Value"
    }
  ],
  "ConnectionReferences": [
    {
      "LogicalName": "bebe_sharedcommondataserviceforapps_*****",
      "ConnectionId": "6ea97b9cf5ae4bc0ad52************",
      "ConnectorId": "/providers/Microsoft.PowerApps/apis/shared_commondataserviceforapps"
    }
  ]
}
Change Pipeline
So far so good, but what do we have to change in our pipeline to be able to use this.
Since we use static settings files we “only” have to add them to the artefact of our second pipeline (Build Managed solution) and use it in our Import Solution task of the release pipeline.
Build Managed solution
We have to change the following two things in this pipeline.
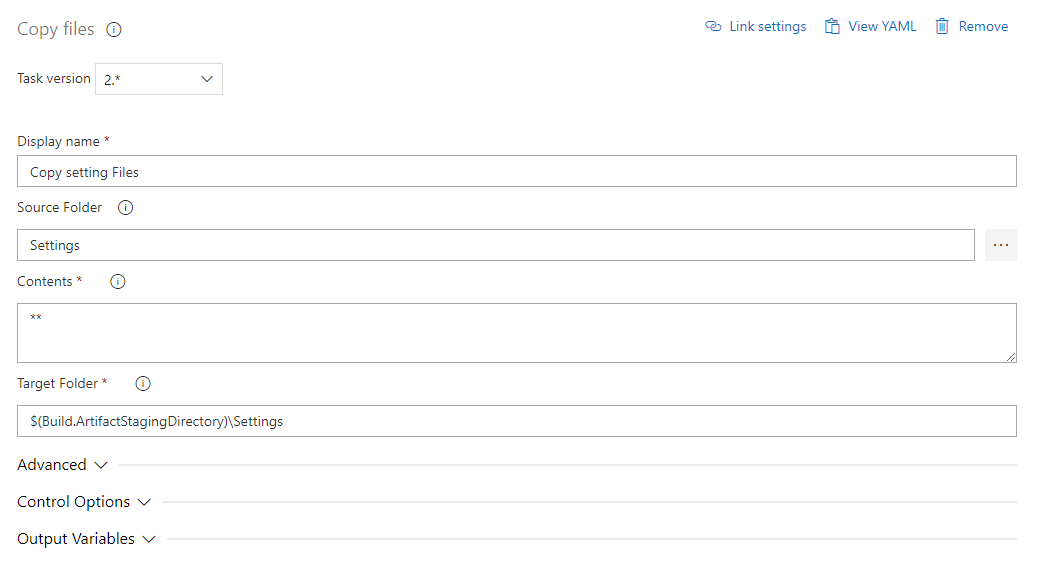
Copy Files
As the penultimate task in our pipeline, we add a “copy file” task.
As “Source Folder” we select the folder in our repository where we stored the settings file(s).
As “Contents” we write two stars (**) to fetch everything.
As “Target Folder” choose the artefact staging directory and “Settings” as the subfolder
$(Build.ArtifactStagingDirectory)\Settings
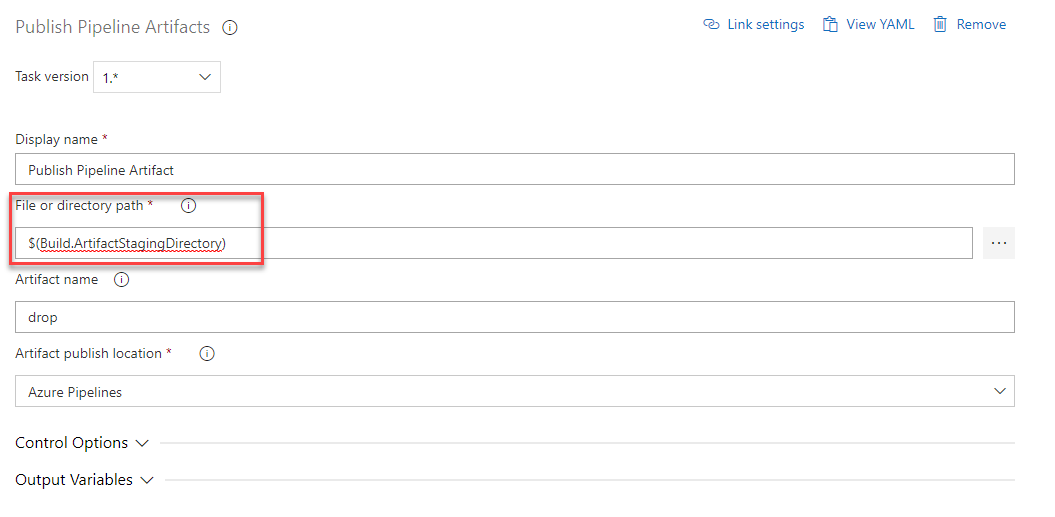
Publish Pipeline Artifacts
We also have to alter the last task (Publish Pipeline Artifacts) in a way that takes the whole staging folder and not only the solution zip file.
To do so just change “File or directory path” to the following.
$(Build.ArtifactStagingDirectory)
Release to Test
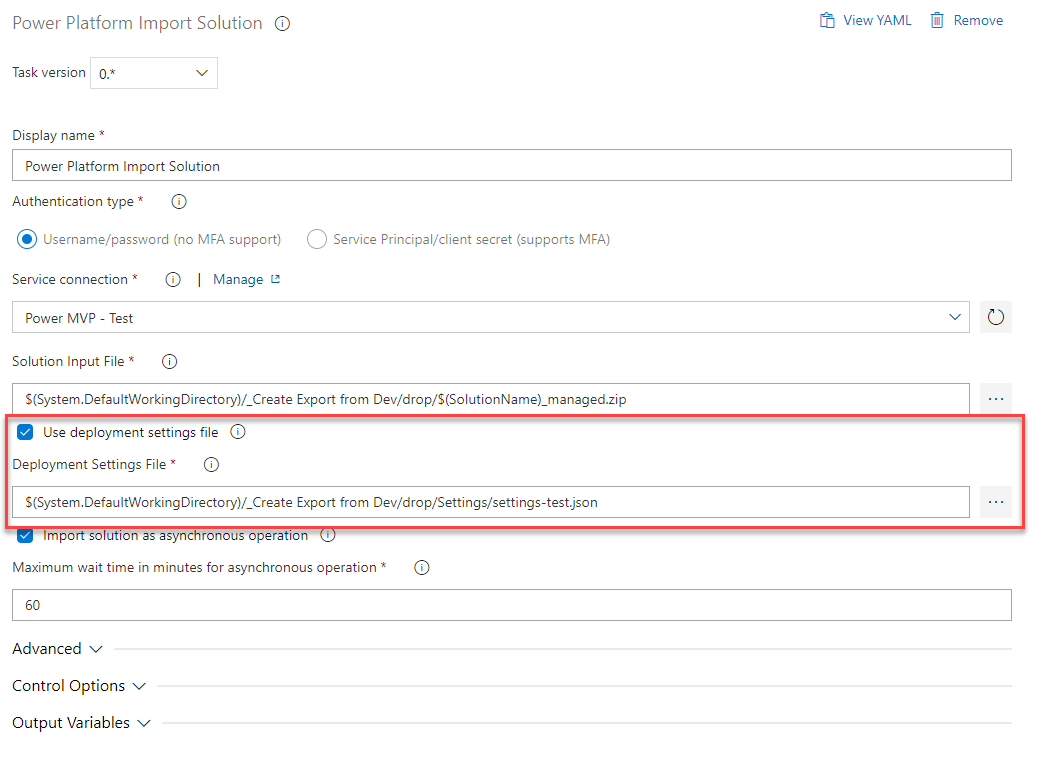
All that is left to set Connection References and Environment Variables in Pipelines is to change our Release to Test release pipeline to actually use the settings file.
To do so we check the checkbox “Use deployment settings file” and choose the correct file from the artifact.
Conclusion
As you can see this approach to set Connection References and Environment Variables in Pipelines is much easier than running different PowerShell scripts. That’s at least what I think. As mentioned this part of the import step is still in preview, but hopefully, it will be GA soon. Since 2021-12-15 this approach is GA and can safely be used in Production.
I hope this post helped you to come a bit closer to your ALM goal. Please feel free to contact me if you have any further questions.
You can also subscribe and get new blog posts emailed to you directly.
About The Author
Benedikt
Power Platform Consultant @ CRM Konsulterna
Hi Benedikt,
activating the flows after setting the connmectionreferences is still necessary, isn’t it?
regards
Lars
Hej Lars,
when they were deployed the first time directly using this method they should be activated automatically. Otherwise it is still necessary yes.
“pac install latest” This step is much too unclear. This neither works trough powershell: “pac: The term ‘pac’ is not recognized as a name of a cmdlet, function, script file, or executable program.”
Neither using this as an example, still getting the same error using in YAML pipeline :
https://github.com/BenediktBergmann/AzureDevOpsPipelines/blob/master/ExecutePAC.yaml
Getting error: “pac : The term ‘pac’ is not recognized as a name of a cmdlet, function, script file, or executable program.” When trying to execute steps after installing nuget and pac that is: “pac install latest” and in the step defined as “pac solution create-settings –solution-zip ./DevToolsTest_1_0_0_1.zip –settings-file ./settings-test.json”
I am sorry to hear that.
The error looks like the pac wasn’t installed successfully on your machine. To be able to run “pac install latest” you have to have pac installed already.
Have you followed all the prerequisites outlined in the post?
https://benediktbergmann.eu/2021/12/02/set-connection-references-and-environment-variables-in-pipelines/#power_platform_cli
In addition to that is here a link with prerequisites for the cli
https://docs.microsoft.com/en-gb/learn/modules/build-power-app-component/1-create-code-component
I just tried it and it does work for me from a cmd window. It does not work from VS Code Terminal though. There I get a different error than you got but it still does not work.
Sorry, my bad. Turns out the “finding path” part is necessary, I thought it is just double-checking. With this step in place it works out wonders. Thanks!!!
How would you go about deploying and environment variable of the type JSON? Does the value parameter accept only strings?
I never really used envVars of type JSON more than some quick tests. I would assume you have to have your JSON in the string yes. But since the config file is a json file as well you would have to escape everything.
When i try to take the ConnectionId from the dataverse connection in my target environment. My URL looks like this, https://make.powerapps.com/environments/********-****-****-****-da1966704f2d/connections/shared_commondataserviceforapps/shared-commondataser-********-****-****-****-e4ffd4e68533/details#
While your connectionId has no hyphens. Do you know why this is the case? When i try to import with the latter connectionId in my deploymentsettingsfile it does not seem to work.
Thanks in advance,
Gertjan
I think they changed the Ids a bit since I wrote the article.
You should be able to take the ID without “shared-commondataser-“, I can check that later.
Do we have a Powershell command to update the connection reference at the target environment without CI/CD pipeline?
I really struggling to have any solution to this scenario.
I personally don’t but Scott wrote about it some time ago.
https://www.develop1.net/public/post/2021/04/01/connection-references-with-alm-mind-the-gap
His article is partly outdated today but the scripts should work.
How would you run the powershell script? manually? A normal manual approach for changing the connection used in connection references is to create a new unmanaged solution in the target, adding all connection references and changing them there.
Can you explain, why I still have to activate the workflows using the connection references? After the deployment they are deactivated, although I chose the option to automatically activate the flows after the deployment.
If I try to activate the flows manually after the deploy I have to edit them, save the connection references again and only after that, I can activate them. Do you have an idea, why this is?
Greetings, Marco
Are you doing a manual or an automated deployment (via Azure DevOps or GitHub)?
This shouldn’t be the case if everything is set up correctly.
Thanks for this. The issue that I’m having is that the person performing the solution import has to own all of the connections that they want to use, which is problematic for us — for the connections in the target env are created by a range of different people. And when someone tries to import the solution they are only offered connections that they own. Is there any solution to this? Thanks!
Unfortunately, I am not aware of a solution for manual imports.
With automated imports using a service principal, the solution would be to have a settings file referencing all connections and that every user shares their connection with the service principal. With that, the connection should be automatically set for the connection reference.
Hi Benedikt, I used the above approach for the Environment Variables only and it worked the first time. But the subsequent runs is throwing SQL exceptions:
[error]Exception type: System.ServiceModel.FaultException`1[Microsoft.Xrm.Sdk.OrganizationServiceFault]
Message: Cannot insert duplicate key exception when executing non-query: System.Data.SqlClient.SqlCommand Exception: System.Data.SqlClient.SqlException (0x80131904): Violation of UNIQUE KEY constraint ‘ndx_envvarval_schemaname’. Cannot insert duplicate key in object ‘dbo.EnvironmentVariableValueBase’.
Not sure what I’ve missed.
Hi Benedikt,
I’m following this process, however the environment I am pushing my solution up to via Pipelines is a brand new environment, thus there are no connection references yet created in this target environment. How do I continue on with prepopulating my json file with the necessary connection reference details? My solution includes a custom connector and a canvas app, and the release pipeline always fails which I’m assuming is because I previously did not employ a deployment settings file.
Through testing, when I remove the custom connector the solution imports successfully but ofc this is not helpful as then my custom connector is not imported.
Hej Zain,
thanks for your comment.
The idea of Settings is that you add all the Environment Variables (EnvVar) and Connection References (ConRef) to your settings file as soon as you create them in DEV. When you then deploy to an downstream environment (test or prod) the correct value will be set as soon as the component (EnvVar or ConRef) is created. You create both settings files (for test and prod) based on your solution in dev, which contains all the needed ConRef and EnvVars.
When it comes to custom connectors there is a “known” bug. A custom connector has to be installed/deployed to the downstream environments before a flow or Canvas app using it is deployed. This means you have to create a new Solution which only contains your connector (and all the components it needs, for example EnvVars). This new solution has to be deployed first.
The underlying problem is that the install process tries to install flows and canvas apps before custom connectors. This means when it comes to the point of installing the flow/canvas app the needed connector isn’t there yet. Therefore the install will fail.
Hope this helps. Feel free to ask if there is something unclear.
//Benedikt
Hi, Great blog post thanks for sharing!
I’ve been trying to do this for a long time but one piece is still missing, under: “Find connection id”
I want to also create the connection automatically, ideally to an SPN.
(Often we don’t even get more than SNP access to an environment so we couldn’t login and get it if we wanted to)
Have you ever come across a way to do that? MS documentation including API info is not help..
Hej Martin,
sorry for the late reply.
I never created a connection automatically. What I did (when I haven’t had access) I have created it together with the IT department during a screen sharing session.
But when I don’t remember completely wrong Scott Durow wrote about it some time ago. Here is the blog post I had in mind
https://www.develop1.net/public/post/2021/04/01/connection-references-with-alm-mind-the-gap
Hi, We have an error like couldn’t find connection XXXXXXXXX for shared_commondataserviceforapps when importing solution with deployment setting file. The connection is definitely there in the target environment. Do you have any idea how to fix it?
Hej Randy,
thanks for your comment.
is the connection shared with the service principal you are using in your pipeline?
Hi, is it possible to use dataverse connection with service principle in the deployment setting file? The pipeline complains cannot find the connection id which is in the target environment. However, the pipeline is working if we use connection with normal user credential in the setting file.
Hej Randy,
thanks for your comment. Yes this should be possible.
As for your previous comment: Is the connection shared with the service principal you are using in your pipeline?
Is there a difference in ownership or sharing between the two connections you are testing with?
Thanks Benedikt. We finally realize it’s about the shared connection id. I thought it’s just a guid, however, it’s something like “shared-commondataser-guid”.
Hi Benedikt, again question about activating the flow after solution import. Seems like the flows cannot be turned on. I just wonder why it works when deploy the solution the first time?
Hi Benedikt, I used the above approach for the Environment Variables only and it worked the first time. But the subsequent runs is throwing SQL exceptions:
The reason given was: Cannot insert duplicate key exception when executing non-query: System.Data.SqlClient.SqlCommand Exception: System.Data.SqlClient.SqlException (0x80131904): Violation of UNIQUE KEY constraint ‘ndx_envvarval_schemaname’. Cannot insert duplicate key in object ‘dbo.EnvironmentVariableValueBase’. The duplicate key value is (eim_EimskipNoReply, 0, Jan 1 1900 12:00AM).
The statement has been terminated.
at Microsoft.Crm.CrmDbConnection.HandleExecutionExceptionAbstract(Exception exception, String commandText, IDbConnection connection, IDbCommand command, IDbTransaction transaction, Boolean isOpen, Int32 commandTimeout, IConnectionRetryPolicy localRetryPolicy, Int32& retryCount)
at Microsoft.Crm.CrmDbConnection.InternalExecuteWithRetryAbstract[TResult](Func`1 executeMethod, IDbCommand command, IConnectionRetryPolicy retryPolicy)
at Microsoft.Crm.CrmDbConnection.c__DisplayClass235_0.b__0()
at Microsoft.PowerApps.CoreFramework.ActivityLoggerExtensions.Execute[TResult](ILogger logger, EventId eventId, ActivityType activityType, Func`1 func, IEnumerable`1 additionalCustomProperties)
at Microsoft.Xrm.Telemetry.XrmTelemetryExtensions.Execute[TResult](ILogger logger, XrmTelemetryActivityType activityType, Func`1 func)
at Microsoft.Crm.Platform.Server.DataEngine.SqlDataAccessManager.ExecuteNonQuery(IDbCommand command, ISqlExecutionContext context, Int32 sourceLineNumber, String memberName, String sourceFilePath)
at Microsoft.Crm.BusinessEntities.BusinessProcessObject.ExecuteNonQueryAbstract(IDbCommand command, ISqlExecutionContext context)
at Microsoft.Crm.BusinessEntities.BusinessProcessObject.ExecuteNonQueryAbstract(IDbCommand command, ExecutionContext context)
at Microsoft.Crm.Platform.SolutionAwareComponents.UpdateExecutor.ExecuteUpdate(IDbCommand command, ExecutionContext context)
Kindly help on this issue.
Thanks,
Jeeva
Hej,
that should not be the case, obviously.
I would assume it was a temporary problem. Do you still have it?
Hi Ben
in my case if I try to use the settings file I face the below error and I’m unable to recover the log file specified in the error.
The files are placed in the same structure that you poste:
– drop/ –> contains the two solution zip managed and unmanaged
– drop/Settings/ –> contains the json file that has the same name of the solution
. Do you have some suggestion?
———————————————————————————————————————-
ERROR
———————————————————————————————————————-
2024-02-19T14:32:34.3129479Z “The Authentication Result: ‘***’ authenticated successfully.,Validating connection…,Connected to… SampleApp_PROD,Default organization: SampleApp_PROD,Authentication profile created, * UNIVERSAL : *** Public https://org1111.crm4.dynamics.com/ ,,Microsoft PowerPlatform CLI,Version: 1.30.7+ge6211cf,Online documentation: https://aka.ms/PowerPlatformCLI,Feedback, Suggestions, Issues: https://github.com/microsoft/powerplatform-build-tools/discussions,,Warning: Argument –url will be deprecated soon. Please use –environment instead.,”
2024-02-19T14:32:34.3130490Z ]
2024-02-19T14:32:34.3167988Z [
2024-02-19T14:32:34.3168854Z ‘Calling pac cli inputs: solution import –path D:\\a\\r1\\a\\_DB_5317_5606 – Build Pipeline\\drop\\Soluzione_SampleApp_managed.zip –async true –force-overwrite false –publish-changes false –skip-dependency-check false –convert-to-managed true –max-async-wait-time 60 –activate-plugins true –skip-lower-version false –settings-file D:\\a\\r1\\a\\_DB_5317_5606 – Build Pipeline\\drop\\Soluzione_SampleApp.json’
2024-02-19T14:32:34.3169465Z ]
2024-02-19T14:32:36.2596481Z [ ‘Connected as ***’ ]
2024-02-19T14:32:39.3469948Z [ ‘Connected to… SampleApp_PROD’ ]
2024-02-19T14:32:39.5822505Z [
2024-02-19T14:32:39.5823165Z ‘Sorry, the app encountered a non recoverable error and will need to terminate. The exception details have been captured and will be forwarded to the development team, if telemetry has been enabled. Exception Id: 0fdae60b-39c1-4987-ab66-4b09680a8d20, Exception Type: Newtonsoft.Json.JsonSerializationException’
2024-02-19T14:32:39.5823890Z ]
2024-02-19T14:32:39.5879369Z [
2024-02-19T14:32:39.5879963Z ‘The diagnostic logs can be found at: D:\\a\\_tasks\\PowerPlatformToolInstaller_8015465b-f367-4ec4-8215-8edf682574d3\\2.0.52\\bin\\pac\\tools\\logs\\pac-log.txt’
2024-02-19T14:32:39.5880360Z ]
2024-02-19T14:32:39.8362251Z ##[error]error: 1
2024-02-19T14:32:39.8371890Z ##[error]failed: Connected as ***
Connected to… SampleApp_PROD
Sorry, the app encountered a non recoverable error and will need to terminate. The exception details have been captured and will be forwarded to the development team, if telemetry has been enabled. Exception Id: 0fdae60b-39c1-4987-ab66-4b09680a8d20, Exception Type: Newtonsoft.Json.JsonSerializationException
The diagnostic logs can be found at: D:\a\_tasks\PowerPlatformToolInstaller_8015465b-f367-4ec4-8215-8edf682574d3\2.0.52\bin\pac\tools\logs\pac-log.txt
———————————————————————————————————————-
———————————————————————————————————————-
MY SETTING FILE
———————————————————————————————————————-
{
“EnvironmentVariables”: [
{
“SchemaName”: “test”,
“Value”: “Test Value”
}
],
“ConnectionReferences”: [
{
“LogicalName”: “SrvProd”,
“ConnectionId”: “id of service connection”
}
]
}
Where the LogicalName is the real name of the Service Connection and the Connection Id is got from here (https://dev.azure.com/OrganizName/projectname/_apis/serviceendpoint/endpoints?api-version=5.0-preview.2) replacing the organization name and project name
Regards
Hej,
that is hard to tell. I think I had this problem when the Settings-File was formatted in a wrong way (for example not escaping / as //) or when the connection id wasn’t correct.
Could that be the problem?
Hi Benedikt’s,
I use the PowerShell command to create deployment file and using command i able to add environment variable value but the connection references are null. In my release pipeline i tick on deployment setting file and i able to see the change in environment variable value but after update of solution when i am trying same i am getting the error below
16T08:08:21.7273347Z ‘Sorry, the app encountered a non recoverable error and will need to terminate. The exception details have been captured and will be forwarded to the development team, if telemetry has been enabled. Exception Id: bb8ee8dc-99a8-4afd-84af-4b0d1c65d2b2, Exception Type: Newtonsoft.Json.JsonSerializationException’
2024-02-16T08:08:21.7275321Z ]
2024-02-16T08:08:21.7323742Z [
2024-02-16T08:08:21.7324346Z ‘The diagnostic logs can be found at: D:\\a\\_tasks\\PowerPlatformToolInstaller_8015465b-f367-4ec4-8215-8edf682574d3\\2.0.52\\bin\\pac\\tools\\logs\\pac-log.txt’
2024-02-16T08:08:21.7324609Z ]
2024-02-16T08:08:21.9177603Z ##[error]error: 1
2024-02-16T08:08:21.9207596Z ##[error]failed: Connected as ***
Hej,
I don’t think I understand the question.
Is your problem generating the settings-file or when you use it while importing?