Add React and Tests to a TypeScript project
In one of my last blog posts, I explained how to set up a basic TypeScript project. In this article, I would like to explain how to add React and Tests to a TypeScript project. We will achieve this in a way that the react parts are in the same structure as the rest of our TypeScript.
At the end of this post, you can find a “Summary” section where I list all the commands we executed and the configuration files we created. To have a quicker start and skip all the explanations you could directly go there.
You can find the project with all the configuration on GitHub.
Scenario
A valid scenario to add a react app to your project could be some configuration page or stand alone application which should be shown within dataverse. For example from a menu entry within a Model-Driven App.
Objective
The objective of this blog post is to show how one could add tests and most important an react app to a TypeScript project that is already in place.
This includes the following parts
React App
React is a JavaScript library to build user interfaces. It is broadly used in modern web development. In the Dataverse context, it could be used for example in PCFs or stand-alone web resources.
Tests
As in every other language, tests are important when one is developing TypeScript. There are different types of tests (unit tests, integration tests, UI tests, …). In this blog post we will see how to add the possibility for unit tests with jest.
Delimitations
I would like to be clear on the delimitation. I will not talk about mocking frameworks. There are different frameworks out there (all created by the community). For example:
Those make it much easier to write tests for code that runs against Dataverse. I might create a separate blog post about that.
I will also not explain how to develop react. There are a lot of good articles out there if you would like to start with it. One example would be reactforbeginners.com.
Prerequisites
We will use the project created in my mentioned blog post about the set up of a basic TypeScript project.
Setup
Now that all that is clear we can start with the fun part and add react and tests to our project.
Add React
First of all we will add our react app.
Install packages
To install the needed packages, we will open our front-end folder with Visual Studio Code and execute the following commands.
Open correct folder
In the Terminal (within VS Code) we go to the “ts” folder with the help of the following command.
cd ts
All the commands that follow will be executed in the Terminal within Visual Studio Code and within the “ts” folder.
Install react
First we have to install react. It’s the core package of react.
npm install react
Install react-dom
After that, we have to install react-dom. This package allows us to add a react component to the HTML DOM.
npm install react-dom
Install type declarations
The last part is to install the matching type declarations (@types/react and @types/react-dom). This will allow us to use both react and react-dom in our .tsx files without getting errors.
npm install react react-dom
Configurations
Now that we have installed all the necessary packages we have to change some configurations to include those packages as well.
tsconfig.json
Here we have to make sure that the following two lines are present.
"jsx": "react",
"moduleResolution": "node",
If you would like to know more here are the links to the documentation
package.json
In the package.json file we add the following script to be able to run a build watch. When executed the system will look at any change of the code and immediately builds the code when a change is detected.
"build-watch": "webpack --watch --config webpack.config.dev.js",
We also have to update both the “lint” and “format” script to include every file under src/code.
"format": "prettier ./src/code/**/* --write",
    "lint": "eslint ./src/code/**/* --fix"
webpack-config.shared.js
In this file we have to add tsx as an allowed file extension.
extensions: ['.tsx', '.ts', '.js' ],
Test/Demo
Now that everything is set up we can test it. I prepared some demo files which you have to add to your project.
reactdemo.tsx
This file should be created in a new folder called “reactdemo” in ts/src/code and contain the following code.
import * as React from "react";
import ReactDOM from "react-dom";

export interface IReactDemoProps {
    value: string | undefined;
}

class ReactDemo extends React.Component<IReactDemoProps> {
    public render(): JSX.Element {
        return <div>React: {this.props.value}</div>;
    }
}

ReactDOM.render(<ReactDemo value="test" />, document.getElementById("reactdemoroot"));
reactdemo.html
This file should be created in the “html” folder in “Webresources” and contain the following code.
<!DOCTYPE html>
<html lang="en">
  <head>
    <meta charset="utf-8" />
    <meta name="viewport" content="width=device-width, initial-scale=1" />
    <link rel="stylesheet" href="../css/reactdemo.css" />
    <title>React Demo</title>
  </head>
  <body>
    <div class="content">
      <h1>React Demo</h1>
      <div id="reactdemoroot"></div>
    </div>
    <script src="../js/reactdemo.js"></script>
  </body>
</html>
reactdemo.css
This file should be created in the “css” folder in “Webresources” and contain the following code.
#reactdemoroot{
    color:red;
}
Next step would be to add a new entry point to your webpack.config.shared.js file. To do so we add the following row in the “entry” object.
reactdemo: './src/code/reactdemo/reactdemo.tsx'
If you now run the build script
npm run build
the project should create a file, reactdemo.js, in the “Webresources/js” folder.
If you then deploy all 3 files (Webresources/js/reactdemo.js, Webresources/html/reactdemo.html,Webresources/css/reactdemo.css) to your Dataverse environment and add the HTML-file as a menu entry in an Model-Driven App you should see something like the following.
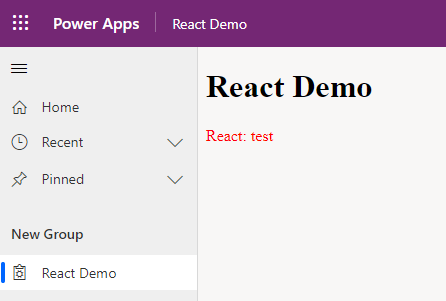
Congratulations! You just created and depoyed your first React app to Dataverse.
Add Test – Jest
The second part of “add React and Tests to a TypeScript project” is to add the possibility to write tests for your TypeScript code. We will use Jest to do so.
Install packages
As we did before we will install the packages via the terminal within Visual Studio code.
Install jest
First we have to install jest. It’s the core package of jest.
npm install --save-dev jest
Install ts-jest
The second package would be ts-jest. It provides jest with the possibility to process ts files.
npm install --save-dev ts-jest
Install @types/jest
The last package is @types/jest. It provides type definitions for jest.
npm install --save-dev @types/jest
Configurations
As we did before we have to change some configurations to include our jest packages.
tsconfig.json
Here we have to change the include to include everything under the src folder
"include": ["./src/**/*"]
package.json
In the package.json file we add two more scripts:
- test – to run all tests
- test-watch – to watch on any file change and run tests if one is detected
It might be that “test” already exists. In that case it should be changed to the code you see below.
"test": "jest",
"test-watch": "jest --watch",
jest.config.js
The last step would be to create a new file “jest.config.js” in the “ts” folder. This file will configure the behavior of jest.
module.exports = {
    "roots": [
      "<rootDir>/src"
    ],
    "testMatch": [
      "**/__tests__/**/*.+(ts|tsx|js)",
      "**/?(*.)+(spec|test).+(ts|tsx|js)"
    ],
    "transform": {
      "^.+\\.(ts|tsx)$": "ts-jest"
    },
    moduleFileExtensions: ['ts', 'tsx', 'js', 'jsx', 'json', 'node'],
}
Let me briefly explain every configuration.
roots
Defines where jest should start “searching” for tests. Read more.
testMatch
An array of regex’s to match test files. Read more.
transform
Defines how the files should be transformed. In our case all .ts and .tsx files should be transformed with “ts-jest”. Read more.
moduleFileExtensions
Defines the allowed file extensions. Read more.
Test/Demo
Now that everything is set up we can test it. To do so we create one file which contains a very simple test.
tmp.test.js
This file should be created in a new folder called “test” in ts/src and contain the following code.
test("adds 1 + 2 to equal 3", () => {
    expect(1 + 2).toBe(3);
});
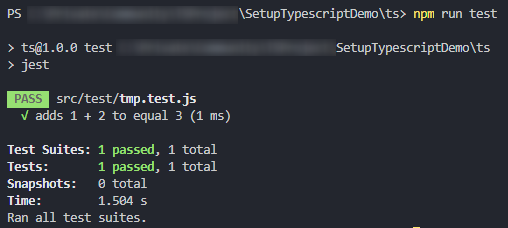
If you now run
npm run test
within the terminal of VS Code jest should run and execute all tests (which is only one).
Conclusion
In this blog post you learned how to add React and Tests to a TypeScript project.
As you can see it is quite easy to add both a react app as well as tests to an existing project.
It is possible to add several react apps and structure them in an understandable way as well.
The shown set up (both articles together) are still rather basic. One could add a lot more like custom typing (early bound), automated deployment, mocking, Fluent Ui, optimization (for example tree shaking), and a lot more.
I hope this article helped you. Feel free to contact me if you have any questions. I am always happy to help.
Summary
In this chapter you can find all the commands and files to execute/create/modify. The intention is to give a very short quick start guide without any explanation.
Install packages
Open the project folder with VS Code, cd into the ts folder with the Terminal within VS Code and execute the following commands.
npm install @types/react @types/react-dom react react-dom
npm install --save-dev jest @types/jest ts-jest
Configuration
Add the following files, or if present change the content to the following.
package.json
Add the following scripts
"test": "jest",
"test-watch": "jest --watch",
"build-watch": "webpack --watch --config webpack.config.dev.js",
Update the scripts “format” and “lint” to include all files
"format": "prettier ./src/code/**/* --write",
"lint": "eslint ./src/code/**/* --fix"
tsconfig.json
Make sure the file contains the following configuration
"jsx": "react",
"moduleResolution": "node",
Change the include config to include everything under the “src” folder
"include": ["./src/**/*"]
webpack.config.shared.js
Add ‘.tsx’ to the list of possible extensions within the resolve part of the configuration
resolve: {
  extensions: ['.tsx', '.ts', '.js' ],
},
jest.config.js
Add the file to your “ts” folder and copy the following content
module.exports = {
    "roots": [
      "<rootDir>/src"
    ],
    "testMatch": [
      "**/__tests__/**/*.+(ts|tsx|js)",
      "**/?(*.)+(spec|test).+(ts|tsx|js)"
    ],
    "transform": {
      "^.+\\.(ts|tsx)$": "ts-jest"
    },
    moduleFileExtensions: ['ts', 'tsx', 'js', 'jsx', 'json', 'node'],
}
You can also subscribe and get new blog posts emailed to you directly.
About The Author
Benedikt
Power Platform Consultant @ CRM Konsulterna