Apply Solution Upgrade in Pipeline
In todays article I would like to describe how it is possible to apply a Solution Upgrade directly in your Azure DevOps pipeline.
This post can be considered the first post in a series of blog posts that talk about different approaches to solve challenges with Azure DevOps Pipelines that cannot be solved with the Power Platform Build Tools. The second blog post in that series explained how one could use a PowerShell Module to solve a problem.
Update 2021-09-20: Now there is a task in the Power Platform Build Tools to apply a solution upgrade. Unfortunately, the MS documentation lacks behind and does not mention the task yet.
Background
Let me give you some background information first.
Update/Upgrade
While working with managed solutions you do have two different options when importing a solution:
Update
It will add components that have been added to the solution and update components. Unamanged solutions are always updates.
Upgrade
Upgrades will also delete components that where removed from the solution. This means you have the option to clean up not used components, like fields or entities. Upgrades are only available for managed solutions and when the version you are importing is higher than the present version.
Holding Solutions
In CDS you have the possibility to import an solution upgrade as an holding Solution. The new version will be in place but removed components will not be deleted yet.
The idea of those is that you are able to migrate data before you delete unused components, especially from fields and entities. Another possibility to have with holding solutions is rolling back an upgrade. Since the new version is already in place you could test it and delete the holding solution if anything is wrong. This would lead to having the old version only.
An example
You have version 1.0 of you Solution installed in Production. It contains a field named “bebe_dmeo”. Since it is in production your users are using the field and you do have data in it.
You notice that the spelling is wrong. Of course you would like to fix that, to make the system easier to maintain and understand for future developers. So you delete the field in development and add a new field named “bebe_demo”.
The next step would be to install a solution upgrade to production (obviously after you tested it in the test environment) as a holding solution. With that approach you could move the data from “bebe_dmeo” to “bebe_demo”, since both are currently present in the environment
When applying the solution upgrade the removed field, “bebe_dmeo”, will be deleted from your production environment.
Important: When there is an unapplied solution upgrade in the system it is not possible to install another update or upgrade.
Problem
The “Import Solution” task of the Power Platform Build Tools has the option to install a solution as a “Holding Solution”. But they are missing the ability to apply solution upgrades.
UPDATE (2021-04-02): For a few days there is a task in the Power Platform Build Tools to apply solution upgrades.
As I mentioned one is not able to install neither a solution update nor upgrade if there is a unapplied upgrade present in the environment.
This leads to a manual step in every ALM process: Applying the Solution upgrade after deploying to another environment.
I would say that in 90% of the deployments you do not need to migrate data and could apply the upgrade right away. At least if you deploy to test or any other environment that is not production. Therefore we would like to apply the upgrade within our pipeline.
Solution
There are several solutions to the problem.
- You do the step manually
- You use additional Build Tools that provide the functionality. For example the “Power DevOps Tools” from Wael Hamze
- You use a small application to do the job
In this blog post I will describe the last option and show you how can apply a solution upgrade with a small application.
Application
The application has to execute a “DeleteAndPromoteRequest” (link to MS docs).
Here is the code of the application.
static void Main(string[] args)
        {
            var solutionName = args[0];

            string connectionString = args.Length == 3 ? args[1] + args[2] + ";" : ConfigurationManager.ConnectionStrings["CRM"].ConnectionString;

            if (string.IsNullOrEmpty(connectionString))
            {
                throw new Exception("No ConnectionString found.");
            }

            CrmServiceClient client = new CrmServiceClient(connectionString);

            var request = new DeleteAndPromoteRequest
            {
                UniqueName = solutionName
            };

            client.Execute(request);
        }
It takes 3 arguments
- SolutionName
- Connectionstring
- Password
It generates the connectionstring out of the last two arguments. If those arent present it will take the fallback connectionstring configured in the App.config.
The next steps are to connect to the CDS environment, create the request and execute it.
You can find the code on my GitHub (link to repository).
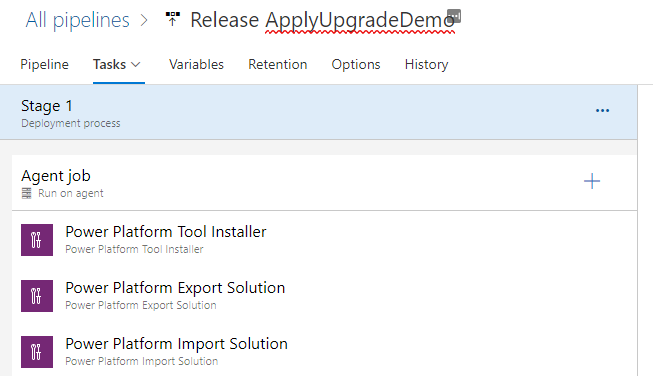
Pipeline
The Application of the last paragraph should now be included in our pipeline.
For the ease of explaining this, we use a very easy release pipeline. In a real-world scenario, one would export the solution in a build pipeline and deploy it with a release pipeline (see my article about a basic ALM process).
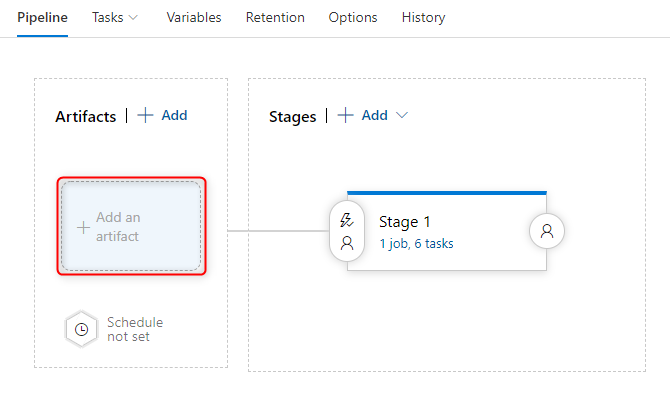
Artifact
Since we are using a release pipeline we have to add our repository as an artifact to be able to build the application.
To do so we change to the pipeline tab and click on “Add an artifact”.
In the upcomming side panel we choose “Azure Repository Git” (since my repo is a git repo in the same project). We also configure the Project, Source, and default branch.
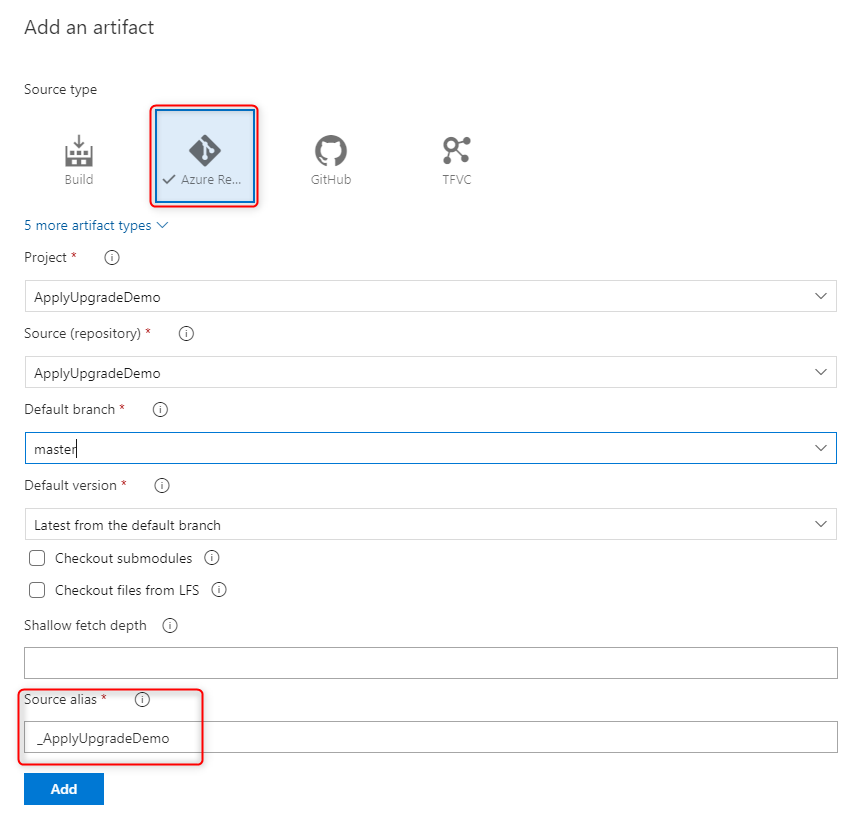
We will need the “Source alias” in one of the pipeline steps, so make sure you copy it.
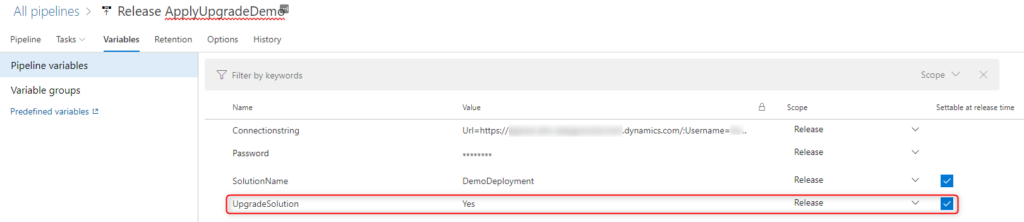
Variables
Our application needs 3 parameters. Those should be configured as variables to the pipeline.
Wee need the following variables
SolutionName
This variable contains the name of the Solution we would like to install and apply. By checking the checkbox “Settable at release time” we are able to choose the solution for every release.
Connectionstring
This variable should contain the connection string to your org, without the password. It should look something like the following.
Url=https://<your org>.crm<region>.dynamics.com/;Username=<your Username>;AuthType=Office365;RequireNewInstance=True;Password=
Password
This variable will contain only the password of the user you are using. It is important to check the little lock so that DevOps knows that it contains a password. If this is checked DevOps will not show the content or write the content in logs.

Add steps
To run the application we will add a few steps to the mentioned pipeline.
NuGet restore
This Step will restore all the NuGet packages. This step can be used with the standard configuration.

Build Solution
This Step will build all the Solution in the artifact. This step can be used with the standard configuration. In you scenario you might need to change the config depending on your repository.

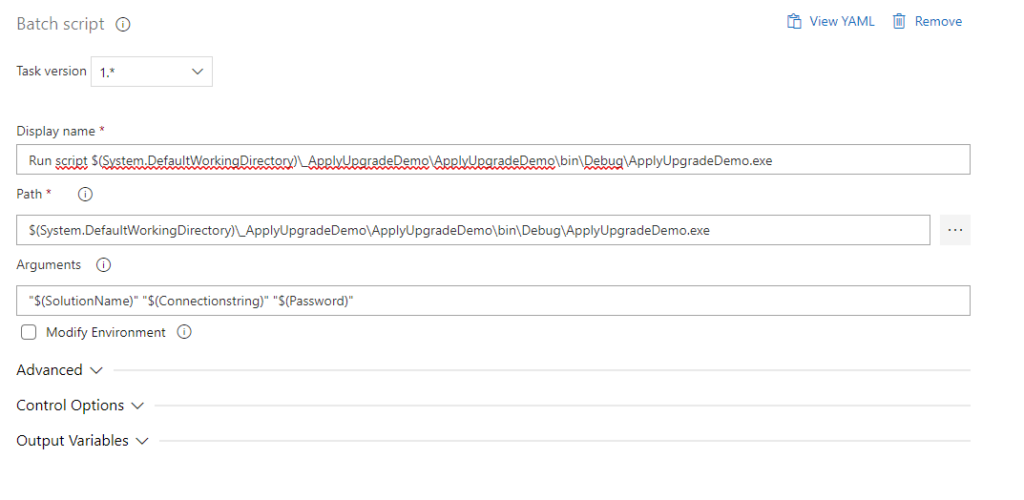
Batch Script
The last step will execute our application. As the path we choose the folder of the Artifact, in there we have a folder which is the name of the artifact (we configured this while adding the artifact) (for this demo it is “_ApplyUpgradeDemo”), in there you can find the application with its usual folderstructure . For our demo the path looks like this
$(System.DefaultWorkingDirectory)\_ApplyUpgradeDemo\ApplyUpgradeDemo\bin\Debug\ApplyUpgradeDemo.exe
For the argument we choose the string below (including the quotation marks)
"$(SolutionName)" "$(Connectionstring)" "$(Password)"
If you have worked with pipelines earlier, you will notice that this syntax shows that we use the variables we configured earlier.

Result
When running this pipeline it will export the solution, import it to the destination environment and apply the upgrade right away.
Adding possibility to choose
As mentioned earlier there might be situations where you would like to perform some steps between importing an upgrade and apllying it.
In this paragraph we will learn how to add the possibility to choose whether to apply the upgrade directly.
Variable
We will introduce an additional variable to the pipeline
UpgradeSolution
This variable contains whether we would like to apply the upgrade right away. The default value will be “Yes”. By checking the checkbox “Settable at release time” we are able to choose it for every release.
Step configuration
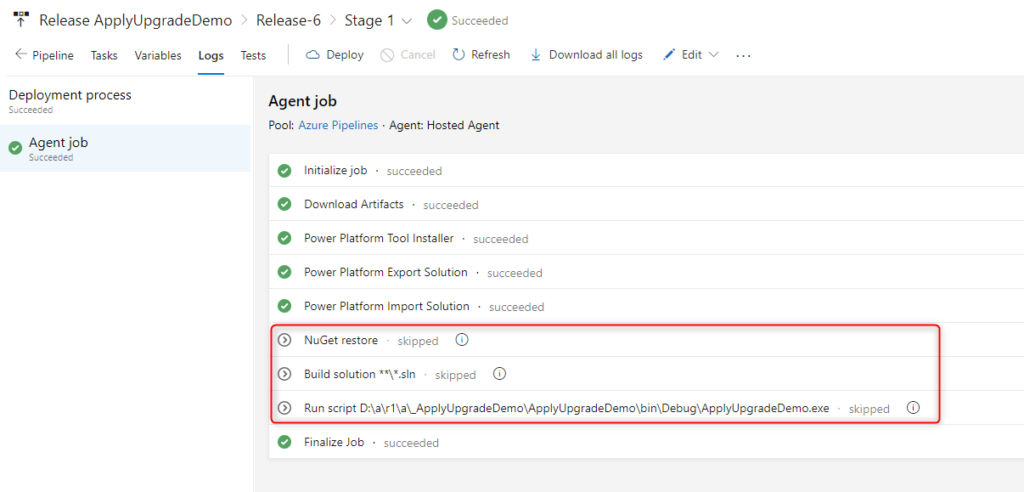
Now we have to change the configuration of the last 3 the steps we added.
- NuGet restore
- Build Solution
- Batch script
To do so we open the area “control Options”. There we choose “Custom Condition” in “Run this task” and fill in our custom condition.
and(succeeded(),eq(variables.UpgradeSolution, 'Yes'))
This makes sure that the step will only run when all the previous steps where successfull and the variable “UpgradeSolution” has the value “Yes”.
The steps should now look like this:

Result
Now we are able to decide whether to apply the upgrade while creating the release.
In the following screenshot you see the run of an release that has “No” for the varialbe “UpgradeSolution”.
Conclusion
With a few steps it is possible to apply a solution upgrade without the need of installing additional Build tools.
I hope this article helped you. Feel free to contact me if you have any questions. I am happy to help.
You can also subscribe and get new blog posts emailed to you directly.
About The Author
Benedikt
Power Platform Consultant @ CRM Konsulterna
Hi Benedikt.
This is amazing stuff and exactly what i was looking for. I do have 1 question:
1) Does the execute on DeleteAndPromoteRequest return a successfull or failure message? Meaning if i have multiple holding solutions that i want to promote, will the “batch script” step wait for a return or fire all at once? How would you go about it?
Thanks!
Alper
Hej Alper,
glad you like it!
The system can only handle one “Apply Upgrade” at the same time. If you try to send in a second one while the first one is still running you will get an error.
So they have to be in sequence.
To answer your question the request should return a DeleteAndPromoteResult.
The execution of the script will wait until this response is received.
In that situation, I would execute the application (basically the batch script) several times in sequence.
//Benedikt
Hi Benedikt,
I have a few requirements for creating Application Ribbon with javascript.
I created and it’s working without any issue.
I export as a managed solution and give the customer to they are using without any issue.
But the problem is when they try to uninstall the managed solution one of the javascript is won’t allow uninstalling the solution because we used those javascript in the application ribbon button.
can you please a suggestion on how to create a Ribbon button in the proper way using js in a managed solution?
Thanks
It should work even when everything is deployed as managed.
Do you use several solutions? Do you have included the metadata of the table within the same solution as the JS?
Hi Benedikt,
I have a pipeline setup that works well when upgrading solutions across environments. But do you know how to configure the pipeline to import the solution in the target environment for the first time?
I currently manually import the solution the first time, then use the pipeline to apply upgrades and haven’t been able to find a way to do all of this with the pipeline.
Thanks!
Hej,
sorry for the late response.
This should be possible when you import the solution not as a holding solution.
Which means the flag “HoldingSolution” should be set to false.
https://learn.microsoft.com/en-us/power-platform/alm/devops-build-tool-tasks#power-platform-import-solution
In our pipelines we have a boolean parameter for that. Whenever we run a pipeline we can decide whether it should be installed as a holding solution (resulting in an upgrade) or not (update). Updates are way faster than upgrades.
We also have a parameter “Apply Upgrade”, which (as the name says) applies the upgrade directly or not.
Hi Ben
My pipe works fine but now after a changes applied to one entity in dev env when i try to import the exported solution i’m facing the below error:
Name: DuplicatePrimaryNameAttribute
Hex: 8004701E
Number: -2147192802
The new {2} attribute is set as the primary name attribute for the {1} entity. The {1} entity already has the {0} attribute set as the primary name attribute. An entity can only have one primary name attribute.
Do you know how to resolve the issue?
Thanks in advance
Cris
Hej Cris,
unfortunately (or fortunately), I never had this problem. Is there an unmanaged layer in the target environment?